Rosette Match Studio
Search 
Select the Search tab from the navigation bar to view a list of all uploaded indices and options for each index. You can initiate a search from any uploaded index from this page.
The options for each index are:
Search: Returns all matching records from the index for a single query. The query can include one or more fields.
Batch Search: Performs multiple queries based on an uploaded file, using each record in the file as the search terms against the index.
Configure: Allows you to edit the match configuration, window size, search pane display, and results pane display for the index.
Delete: Removes the index from Match Studio.
Select New Index to import data for a new recordset.
How Search Works
Each RNI query is processed in two passes to provide the best combination of speed and accuracy.
The first pass is designed to quickly generate a set of candidates for the second pass to consider.
The second pass compares every value returned by the first pass against the value in the query and computes a similarity score. Multiple scorers are applied in the second pass, to generate the best possible score.
The first pass gives the system the speed necessary for high-transaction environments, eliminating values in the index from consideration. The slower second pass re-compares each selected value directly in their original script using enhanced scoring algorithms.
The scores from the first pass are discarded and the match candidates are re-ranked according to the similarity scores returned by the second pass. The match scores for all search terms are combined to generate a match score. All entries with a match score equal to or greater than the display threshold are displayed in a list. Those values that are equal to or greater than the match threshold will be highlighted with their match score.
The number of scores moved along to the second pass is determined by the Window Size setting. See Configure for more information on adjusting this setting.
Create Index
Note
If you are using RMS Lite, indices are read-only. Some features, such as creating new indices within RMS and editing existing indices, are only available in the full version of RMS. You can, however, link indices from a connected server.
Before searching with Rosette Match Studio, you must create an index by uploading a recordset containing your searchable data.
Rosette Match Studio imports structured data. Supported file formats are:
csv
tsv
xml
json
For .csv files, the first row must be a header row, containing the names of the fields in the source file. For other file types the key names are the field names. The field names must be unique. For .json and .xml files, multi-value fields are automatically detected. For .csv and .tsv files, multi-valued fields must use a delimiter to separate values (for example, John|Jon|Jonathan).
To create a new index:
Select the Search tab from the navigation bar.
Select New Index.
Follow the instructions on the New Index Wizard.
As part of the the process of creating a new index, you will have to map fields to the columns in the recordset. For more information, see Mapping.
Mapping
Mapping is the process of assigning data types, or fields, to the columns in your dataset. Each column must have a field type assigned to it.
The mapping process is different depending on the data file format.
Mapping for .csv, .tsv, and .txt
Review the following when mapping fields to your index:
Enable: Only enabled fields will be imported to RMS. Disabled fields will not be used for matching, nor will they appear in search results.
Data Field: The name of the field as it appears in the index file.
Field Name: In this column, enter the name of the field as you want it to appear in RMS.
Use for Match: When this is enabled, the field will be considered when determining a match. When disabled, the field will not be considered when determining a match, but will still appear in search results.
Grouped Field: Enable this if the data file contains one of the following group field types:
Name split into first name, middle name, and last name in separate columns.
Date split into day, month, and year
Address split into different fields supported by RNI Address matching
Multi-value grouped fields
For more information, see Grouped Fields.
Data Type: For fields used for match, provide the data type to tell RMS how it should match this field. For more information, see Data Types.
For fields that use the
Name - General (RNI)data type, you must also specify the values used for the theName Type (RNI)field later in the wizard.
Multi-Value: Enable this if the data file contains fields with multiple values. Such fields with multiple aliases must separate values with a delimiter. You will be prompted to specify the type of delimiter used later in the wizard.

Match for .json and .xml
Enable a field by selecting its corresponding checkbox on the left side of the screen. Only enabled fields will be imported to RMS. Disabled fields will not be used for matching, nor will they appear in search results. For each field, the following options are available:
Field name: In this column, enter the name of the field as you want it to appear in RMS.
Use for match: When this is enabled, the field will be considered when determining a match. When disabled, the field will not be considered when determining a match, but will still appear in search results.
Match type: For fields used for match, provide the match type to tell RMS how it should match this field. For more information, see Data Types.
For fields that use the
Name - General (RNI)match type, you must also specify the values used for the theName Type (RNI)field on the next step of the wizard.
Grouped Fields
Rosette allows for fields to be grouped together when multiple fields in an index map to a single field for searching. For example, if an index contains separate fields for the first name, middle name, and last name, these fields should be mapped to a single full name field for improved matching. The same is true for an index that separates dates into month, day, and year fields.
When mapping an index that contains group fields, you will have to do a bit of setup to create those groups. After the initial mapping step of the wizard, you will reach the Create Field Groups step.
Enter a name for the grouped field under Combined Field Name. For example, for a group consisting of first, middle, and last name, you might name the grouped field "Full Name".
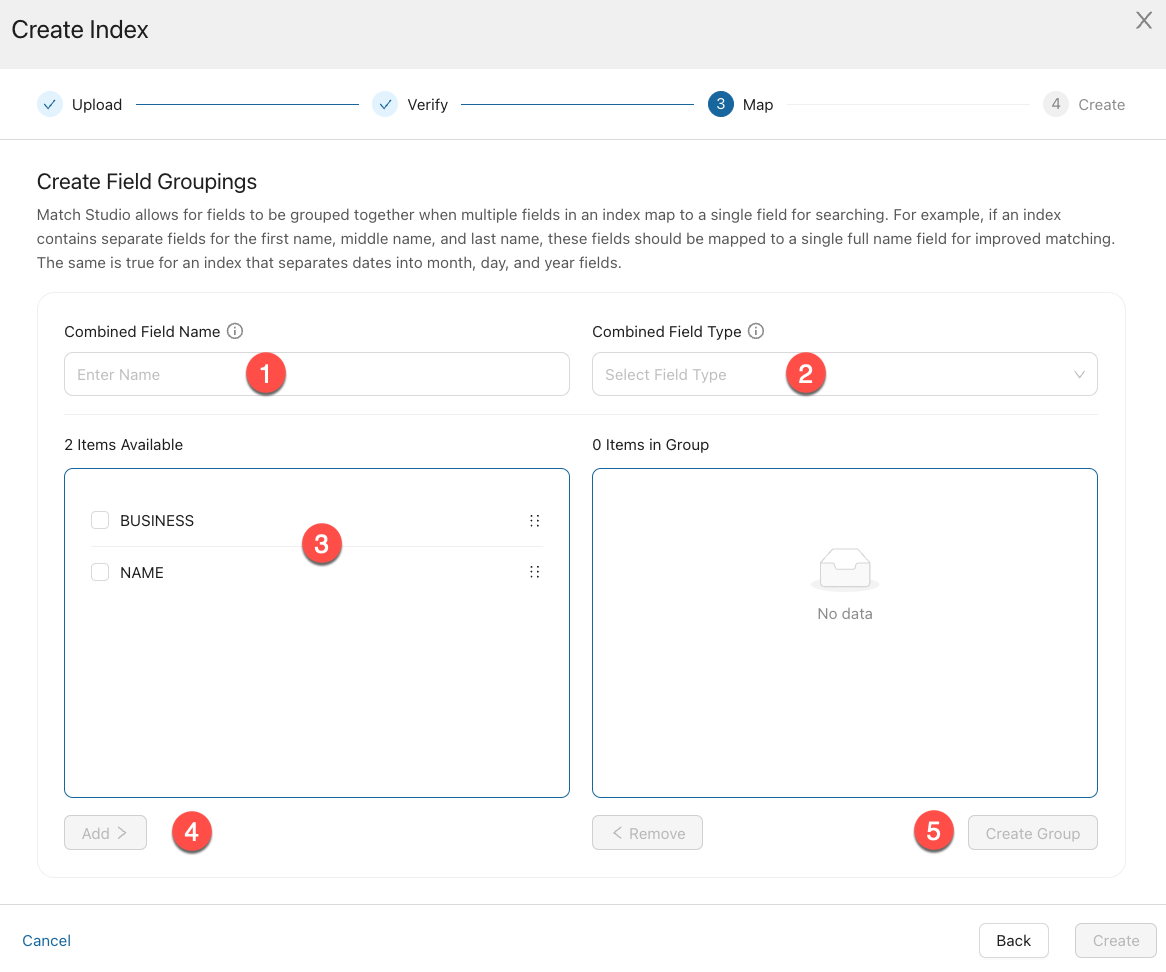
Select the appropriate field type under Combined Field Type. For example, for a group consisting of first, middle, and last name, you should select Name - Person.
Select the checkbox next to all items in the Items Available box which should be included in the group.
Select Add to Group.
Select Create Group.
Map each field included in the group. For example, for a group consisting of first, middle, and last name, you should map them to Name Field 1, Name Field 2, and Name Field 3, respectively.
Tip
If the data contains a title field, it should be indexed as 1 with the other fields indexed as 2, 3, and 4.
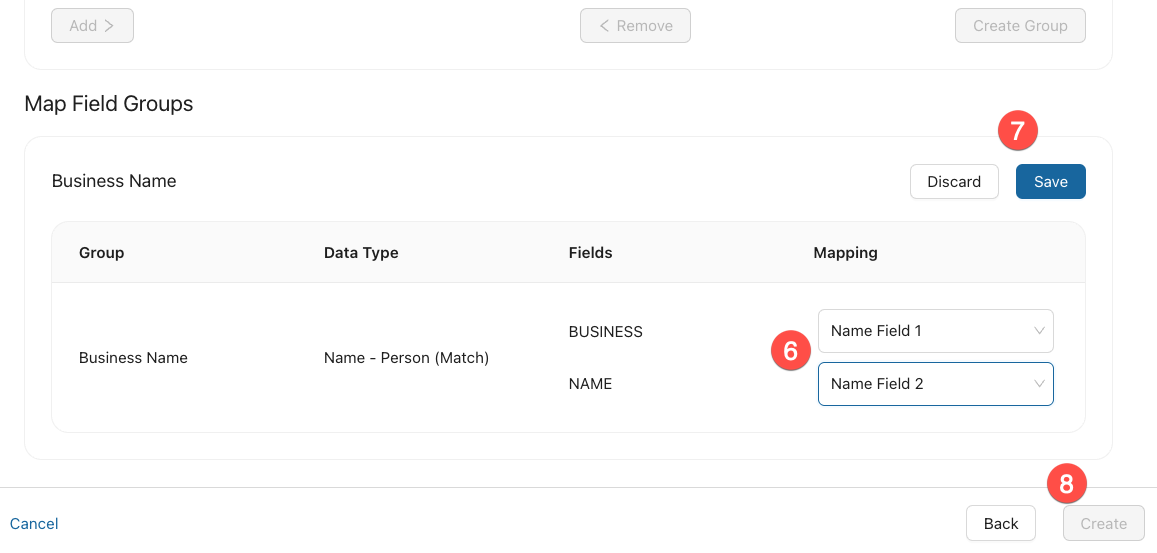
Select Save.
Select Create.
Data Types
The following data types are predefined in RMS and can be selected in the mapping definition.
Data Type | Description |
|---|---|
Name - Person (RNI) | The name, nickname, or alias of an individual. |
Name - Organization (RNI) | The name of a corporation, institution, government agency, or other group of people defined by an established organizational structure. |
Name - Location (RNI) | The name of a geographic location such as a city, state, country, region, mountain, park, lake, or address. |
Name - General (RNI) | A name that is not specified as a Person, Organization, or Location. Indices that use this data type must also use the |
Name Type (RNI) | The value used to specify whether a |
Date (RNI) | A date contains a year, month, and day. All common delimiters for English dates are supported. Dates can be expressed in various orderings, and months can be written as a numeral, their full English name, or the common three-letter abbreviation. |
Address (RNI) | A postal address of a location. |
KEYWORD | Structured content such as an ID, email address, or zip code. |
TEXT | Unstructured full-text content such as a description. |
INTEGER | A signed 32-bit integer. |
DOUBLE | A double-precision 64-bit IEEE 754 floating point number, restricted to finite values. |
FLOAT | A single-precision 32-bit IEEE 754 floating point number, restricted to finite values. |
BOOL | Boolean, true or false. |
LONG | A signed 64-bit integer. |
SHORT | A signed 16-bit integer. |
Search
Note
Before searching, you must have created an index by importing data to search against.
Search returns a list of records from your index which are potential matches for a query, as determined by the calculated match score.
To perform a search:
Select the Search tab from the navigation bar.
Select Search for the index you want to search in.
Enter one or more values into the search fields.
You can enter partial names or an initials.
You can enter partial dates in date fields. 1955-12-30, 1955--03, 12/30, -12, 1955 are all supported date formats.
Select Run Search.
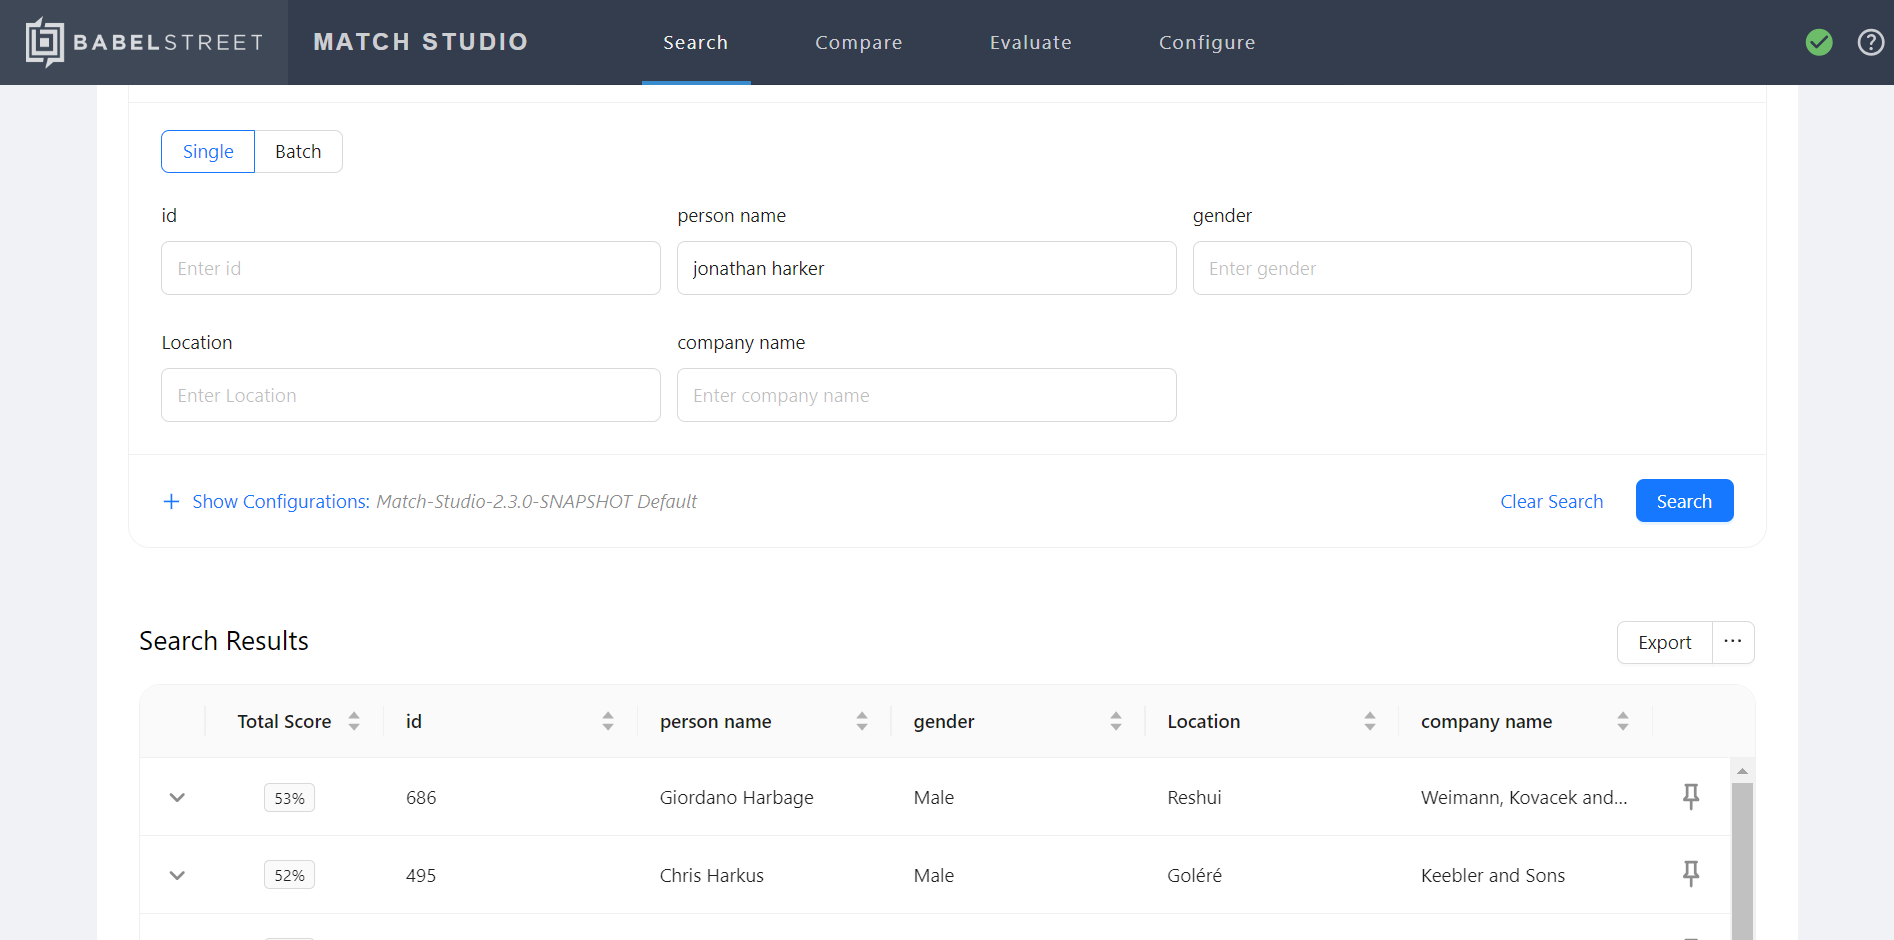
Scores higher than the display threshold are shown. They are listed in descending order by match score. Results with match values greater than the match threshold are highlighted in green.
For each result:
Select the plus icon to expand a result for more detail.
Select
 under Action to go to the Compare page, which shows how the match scores for a result were calculated. The name fields are preloaded with the searched and selected names. You can also use advanced settings to modify match parameters and see the resulting change in match scores.
Batch Search
Note
Before searching, you must have created an index by importing data to search against.
You must also have a query data file, similar to an index, that includes the data for each record (represented by rows in .csv) and field (represented by columns in .csv) you want to search.
Batch search performs multiple searches in a single task, using each record in a file as the query value against the index.
To perform a batch search:
Select the Search tab from the navigation bar.
Select Batch Search for the index you want to search in.
Select Upload New Batch.
Select or drag the file with your query data on the Upload Query Data page. This file should be a dataset of records similar to the index records.
Assign fields types to columns on the Map Data Fields page. You can also configure the window size match threshold, display threshold, and match configuration on this page.
Select Next. Match Studio displays the batch search results.
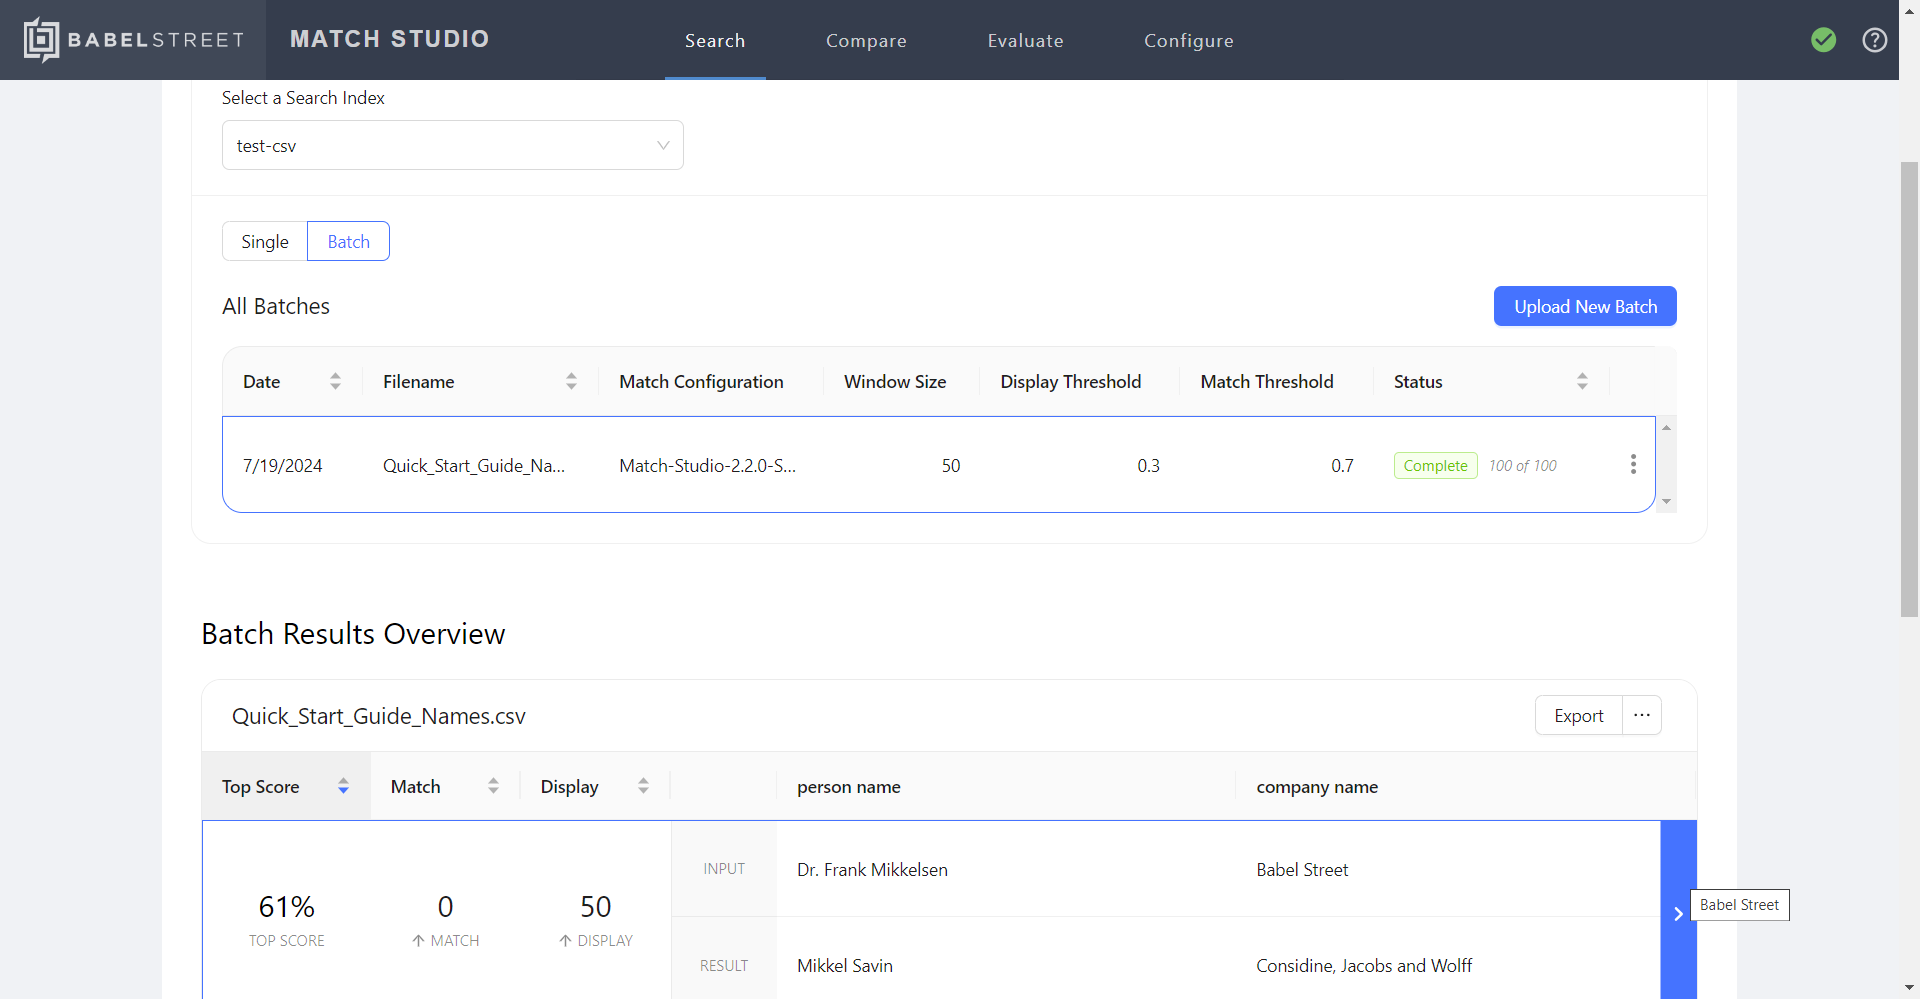
For each value in the batch file, Batch Search displays the search term from the file. To see the matching records from the index, select the plus sign next to a name. This will show the top results with a match score above the display threshold. All match scores above the match threshold will be highlighted in green.
To initiate a new batch search with another dataset, select Upload New Batch.
To view the results from another set, select that set's box in the Query Data list.
Tip
Get the best performance by following a few simple guidelines:
Smaller searches will get faster results. You can process a larger data set, but it will take longer to process.
Select Export above the results list to download a
.csvfile with the match results for each record in the batch file. This allows you to easily review and analyze the results of a batch search.
Configure
The Configure section allows you to change how your data can be searched and how the results are displayed.
To access the Configure section:
Select the Search tab from the navigation bar.
Select Configure next to the desired index.
You can also access this section by selecting the gear icon beneath the search pane.
Data
Note
This feature is not available in RMS Lite.
The Data tab displays information about the index, such as when it was created and which file was used to create it. This can be useful if you need more information to distinguish similar indices.
To rename the index, select the pencil icon to the right of the index name.
Import Data
This function allows you to add new entries to an existing index. The source file for the new data must contain all the imported columns from the original index, with identical field headers. Additional columns will be ignored.
Layout
This tab controls how fields are displayed in both the results list and the search pane (to the left of the results list).
Display Name
Choose how the field name appears in both the search pane and results pane. Changing this setting via the Search Pane tab also changes it in the Results Pane tab, and vice versa.
Position
Click and drag the icon in this column to rearrange the order in which the fields are displayed. Fields at the top of this list will appear on the far left of the results pane, while fields on the bottom will appear on the far right.
Configurations
Use this tab to control the matching behavior of an index, including the weight of each field and the details of how match scores are calculated.
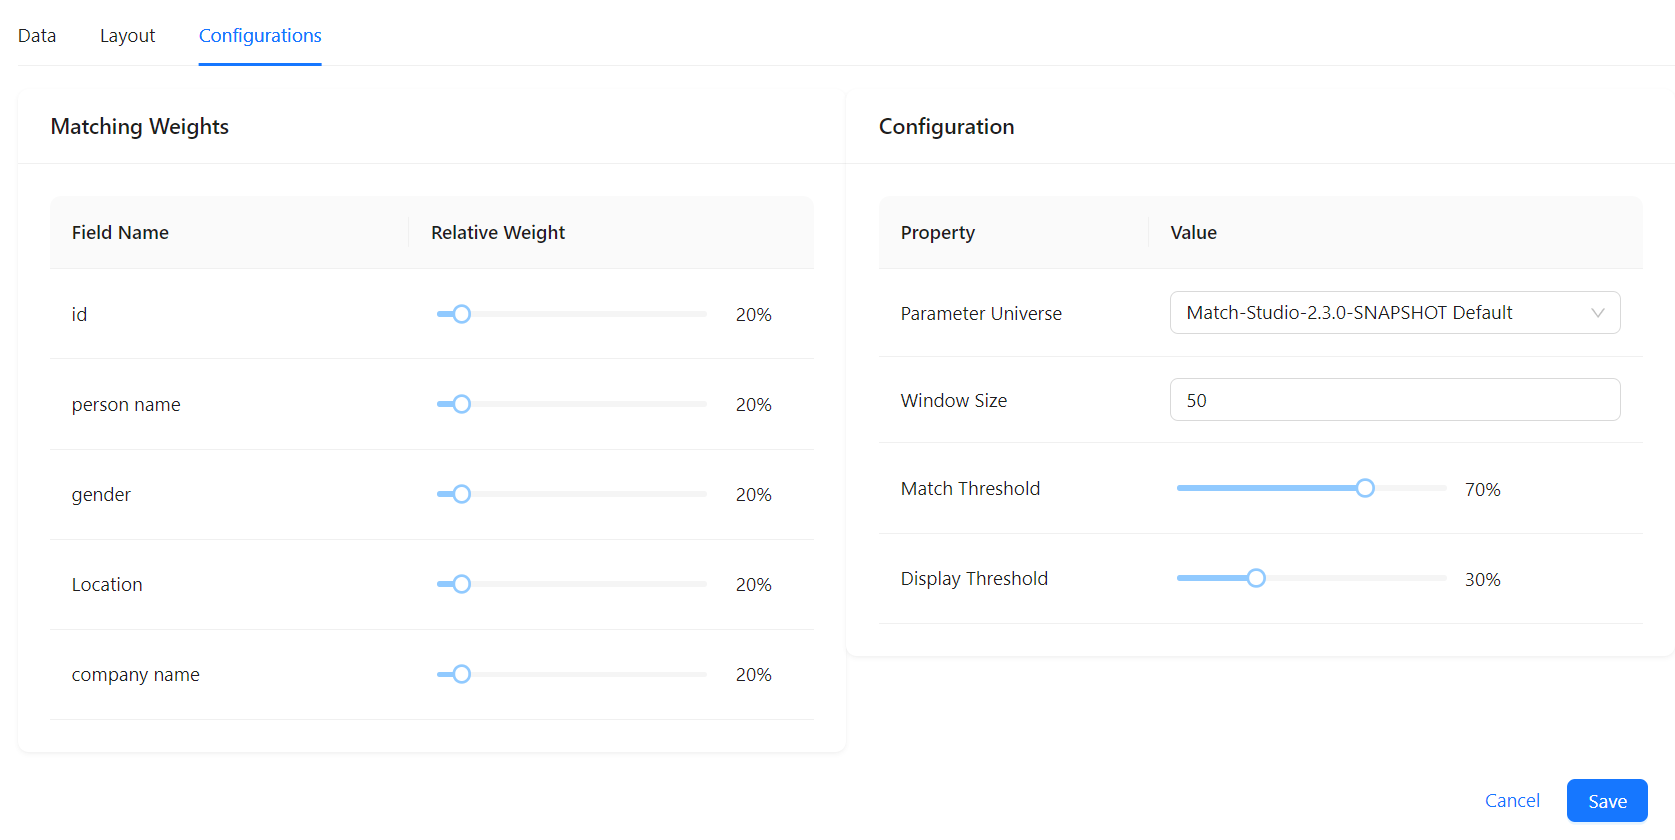
Matching Weights
A field's weight value represents the magnitude of its impact on the final match score. When determining a match, some fields are more important than others. For example, the person name is likely more important in determining a match between two people than the location name. Adjust the weight slider for each field based on its relative importance.
Weight is distributed equally among all fields by default. If a field is missing from a record, that field is ignored and its weight evenly distributed across other fields.
Match Configuration
Individual name tokens are scored by a number of algorithms. These algorithms can be optimized by modifying configuration parameters, thus changing the final match score.
A match configuration contains a set of parameters. Each named match configuration contains parameter values for a specific language pair and entity type. A single named match configuration can contain multiple language pairs and entity types.
Use the Match Configuration dropdown menu to set the default match configuration for search and batch search. You can use the default configuration (RMS-<version> Default) or create a new match configuration. See New Match Configuration for more information on creating a new match configuration.
New match configurations can also be selected directly from the search pane. Display of this value on the search pane is disabled by default. Use the toggle in the Display column to enable display.
Window Size
Each RNI query is processed in two passes to provide the best combination of speed and accuracy.
The first pass is designed to quickly generate a set of candidates for the second pass to consider.
The second pass compares every value returned by the first pass against the value in the query and computes a similarity score. Multiple scorers are applied in the second pass, to generate the best possible score.
Window size determines the number of scores moved along to the second pass. Increasing window size improves recall, but results in a slower search.
Window size can also be adjusted directly from the search pane. Display of this value on the search pane is disabled by default. Use the toggle in the Display column to enable display.
Match Threshold
Once the match score is calculated for all values in the index, those with scores greater than or equal to the match threshold are highlighted in the search results.
Display Threshold
Once the match score is calculated for all values in the index, only those with scores greater than or equal to the display threshold are returned in the search results. If you aren't seeing results you expect, try lowering the display threshold value to return more results.
Compare
Compare two values of the same field type and view the match score, along with details about how the match score was determined.
The comparison can be between a search value and a matched value or two new terms.
View match scores and understand how the score was determined.
Modify the settings and see the resulting change in match scores.
There are two ways to access the Compare section:
Select the Compare tab from the navigation bar.
Select the compare icon
 in an expanded search result. This method allows you to automatically compare a searched name with a retrieved name.
To compare two values:
Enter two values to compare.
Note
The values might be the search value with a matched value, or two new values. These will be pre-filled for you when navigating from the search results list.
(Optional) If comparing Names, select the language of each value from the drop-down list. Adding the source languages may improve the match scores.
Select Compare.
Compare Names
When comparing two names, a match score will be displayed below the names being compared, along with a table including additional data about the names such as language, script, entity type, and what the names look like after normalization.
Below the match score, you will find the computation table matrix, a tabular representation of component scores and match types. For more details on how how name matching works, see Understanding name match scores.
For Name fields, the computation table matrix includes:
Tokens identified
Match phenomenon for the token pair
Raw score (score for the two tokens in a vacuum).
Context score (score with weight, token position, and token type considered).
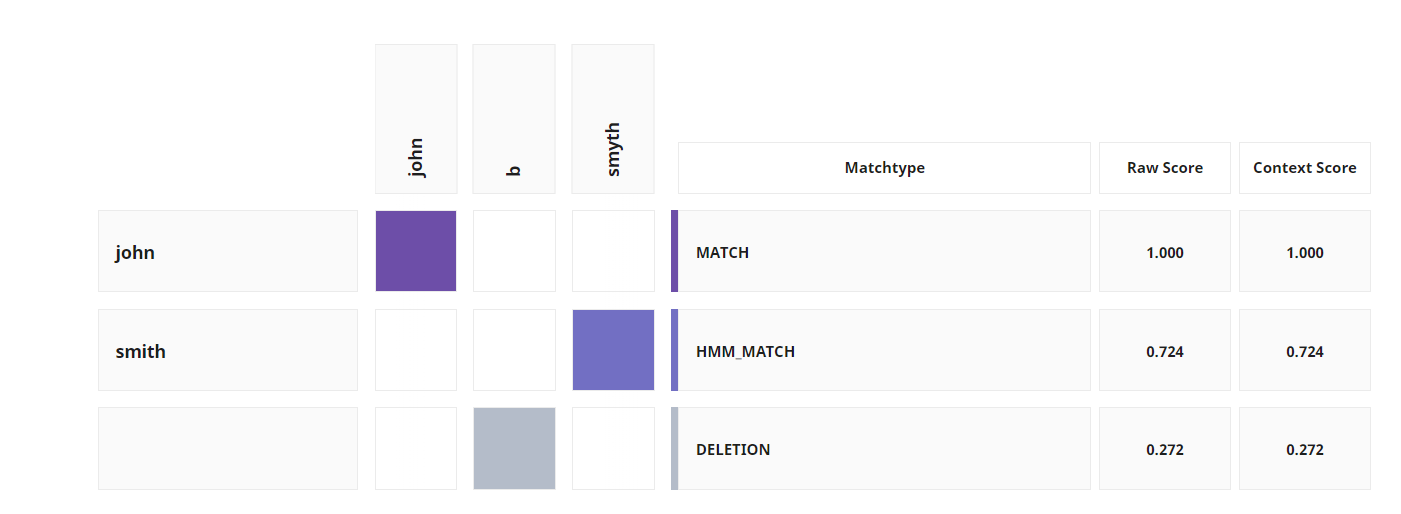
The tokens from Name 1 are listed down the first column, while the tokens from Name 2 are along the top row. The shaded boxes highlight the token pairs selected during matching that produce the best score. A token pair is a token from Name 1 and its matching token from Name 2. The matchtype column lists the match phenomenon for each token pair. The context score takes into consideration the placement of the token in the score calculation. A penalty is applied if the tokens are out of order. When the tokens line up on the diagonal, they are all in order.
Beneath the computation table matrix, the Tokens tab displays additional information about the weight of each token. Weight determines how important the token pair match is in calculating the final score. For example, unusual tokens get a higher weighting than common names because it is more significant when they match and initials are weighted less than full names. The bin value reflects how "unusual" a token is; the lower the bin, the higher the weight.
The Match Pairs tab displays a simplified list of token pairs along with their final score and match phenomena. This tab also displays whether a pair was used in the match (pairs are not used in a match if their score is too low).
The Score Calculation tab provides detailed information on the process of determining the match scores. This includes a breakdown of the parameters which played a part in determining the score, and what their exact impact on the score was.
Compare Names Configuration
Rosette Match Studio and Rosette Name Indexer are turned to perform well in a variety of name matching scenarios. However, every use case uses different data with distinct match requirements. In Rosette Match Studio, you can easily modify and tune match parameters, seeing how each value impacts the final match score in real-time, to improve the accuracy of matches.
To view and modify these settings, select Show Configurations above the match score.
With the Match Configuration tab selected, you can select a defined match configuration from the drop-down menu. With this method, you will not be able to manually change the parameter values.
With the Advanced Configuration tab selected, you can manually change the value of each parameter. The default parameter values are based on the entity type (person, organization, or location) and the language. If you want to undo a change you made to a parameter, select Reset in the Modified column.
Note
To save a set of parameter values, select the copy url icon
 in the upper right corner. The url contains the parameter values.
When you are finished editing the configuration, select Apply and Compare to see how your changes impact the match score of the names being compared.
Match phenomena
Match phenomena describe why token spans did or did not match. For example, some match phenomena, such as HMM_MATCH, occur when tokens are matched by a particular scorer. Others, such as DELETION, occur when tokens cannot be matched at all.
Name | Description | Example | |||||||||||||||||||||||||||||||||||||||||||||||
|---|---|---|---|---|---|---|---|---|---|---|---|---|---|---|---|---|---|---|---|---|---|---|---|---|---|---|---|---|---|---|---|---|---|---|---|---|---|---|---|---|---|---|---|---|---|---|---|---|---|
CONFLICT | The tokens do not match. | When comparing "William Omega Stephens" and "William Kappa Stephens", "Omega" and "Kappa" are a CONFLICT. | |||||||||||||||||||||||||||||||||||||||||||||||
DELETION | The token is unmatched. | When comparing "Richard William Smith" with "Richard Smith", "william" would be considered a DELETION. | |||||||||||||||||||||||||||||||||||||||||||||||
EMBEDDING_MATCH | The tokens are semantically similar as determined by word-embedding vectors. | When comparing "boston building company" and "boston construction company", "building" and "construction" are an EMBEDDING_MATCH. | |||||||||||||||||||||||||||||||||||||||||||||||
FIELD_BLOCKED | This field cannot be matched because of a cross-field match involving the same field in the other name. | When comparing "Bob|William|Smith" with "William||Smith", "bob" is a FIELD_BLOCKED since the cross-field william match prevents it from matching with its corresponding field. | |||||||||||||||||||||||||||||||||||||||||||||||
FIELD_CONFLICT | When comparing two names that are divided into fields, these fields do not match. | When comparing "Richard|William|Smith" with "Richard|Johnson|Smith", "william" and "johnson" would be considered a FIELD_CONFLICT. | |||||||||||||||||||||||||||||||||||||||||||||||
FIELD_DELETION | When comparing two names that are divided into fields, this field is unmatched. | When comparing "Richard|Xi|Smith" with "Richard||Smith", "xi" would be considered a FIELD_DELETION. | |||||||||||||||||||||||||||||||||||||||||||||||
GIVEN_NAME_DELETION | When comparing two names that are divided into fields, the GIVEN_NAME field is unmatched. | When comparing "Richard|William|Smith" and "||William|Scott", "Richard" will be a GIVEN_NAME_DELETION if that field in both names is marked as a | |||||||||||||||||||||||||||||||||||||||||||||||
HANI_ABBREVIATION | One Hani token appears to be an abbreviation of another Hani token. | "北京大学" and "北大" are a HANI_ABBREVIATION match. | |||||||||||||||||||||||||||||||||||||||||||||||
HMM_MATCH | The tokens are similar but not identical, and the match was determined by a particular model (hidden Markov model). This is a type of fuzzy match. | "richard" and "richerd" are an HMM_MATCH. | |||||||||||||||||||||||||||||||||||||||||||||||
INITIALISM | One token is a name and the other token is the initials of the words which make up the name. | "john fitzgerald kennedy" and "JFK" are an INITIALISM. "consumer value stores" and "CVS" are an INITIALISM. | |||||||||||||||||||||||||||||||||||||||||||||||
INITIAL_MATCH | One token is the first initial of the other. | "w" and "william" are an INITIAL_MATCH. | |||||||||||||||||||||||||||||||||||||||||||||||
LANGUAGE_SPECIFIC_MATCH | The match was determined by a language-specific matcher. | "laden" and "لادن" are a LANGUAGE_SPECIFIC_MATCH. | |||||||||||||||||||||||||||||||||||||||||||||||
MATCH | The tokens are identical (after stop word elimination and normalization). | "john" and "john" are a MATCH. | |||||||||||||||||||||||||||||||||||||||||||||||
NULL | The NULL phenomenon is only listed in this table for completeness. It is only used internally and will never be returned in the SpanMatch object. | N/A | |||||||||||||||||||||||||||||||||||||||||||||||
OUT_OF_ORDER_DELETION | This unmatched token still leaves the remaining tokens out of order when it is removed. | When comparing "George Herbert Walker Bush" with "George Bush Walker", "herbert" would be considered an OUT_OF_ORDER_DELETION. | |||||||||||||||||||||||||||||||||||||||||||||||
OVERRIDE | The tokens appear as a pair on the override list. This is often used for nicknames. | "john" and "jack" will be an OVERRIDE match if they appear as a pair on the override list. | |||||||||||||||||||||||||||||||||||||||||||||||
PREFIX_INITIAL | One token is an initial that matches a prefix in the other token. In practice, the PREFIX_INITIAL phenomenon is rare. | If the | |||||||||||||||||||||||||||||||||||||||||||||||
STRING_SIMILARITY | The tokens are similar in string edit distance (number of insertions, deletions, and substitutions) but not similar enough to be a fuzzy match. | "akcd" and "xkcd" are a STRING_SIMILARITY match. | |||||||||||||||||||||||||||||||||||||||||||||||
STUCK_INITIAL | One name appears to have an initial mistakenly attached to a preceding token. | "DavidK" and "David Keith" are a STUCK_INITIAL match. | |||||||||||||||||||||||||||||||||||||||||||||||
SURNAME_DELETION | When comparing two names that are divided into fields, the SURNAME field is unmatched. | When comparing "Richard|William|Smith" and "Richard|William||", "Smith" will be a SURNAME_DELETION if that field in both names is marked as a | |||||||||||||||||||||||||||||||||||||||||||||||
TRAILING_PATRONYMIC_DELETION[a] | The unmatched token is a patronymic which has been truncated in the other name. | When comparing "Faisal bin Fahd bin Abdullah" and "Faisal bin Fahd", "bin Abdullah" is considered a TRAILING_PATRONYMIC_DELETION. | |||||||||||||||||||||||||||||||||||||||||||||||
TRUNCATED_EXACT_MATCH | The tokens are identical except that one has been slightly truncated. | "murgatroyd" and "murgatroy" are a TRUNCATED_EXACT_MATCH. | |||||||||||||||||||||||||||||||||||||||||||||||
TRUNCATED_HMM_MATCH | The tokens are similar, but not identical, and one has been slightly truncated. | "gilpatrickz" and "gillpatrick" are a TRUNCATED_HMM_MATCH. | |||||||||||||||||||||||||||||||||||||||||||||||
UNKNOWN_FIELD_MATCH | One of the tokens is part of an "unknown" field in a fielded name. The UNKNOWN_FIELD_MATCH phenomenon is rare and usually requires use of the Java API. | When comparing "Richard|William|Smith" with "Richard|William|Scott", if the first field is an "unknown" field, "richard" and "richard" would be considered an UNKNOWN_FIELD_MATCH. | |||||||||||||||||||||||||||||||||||||||||||||||
[a] Only applies to Latin script names of Arabic origin. | |||||||||||||||||||||||||||||||||||||||||||||||||
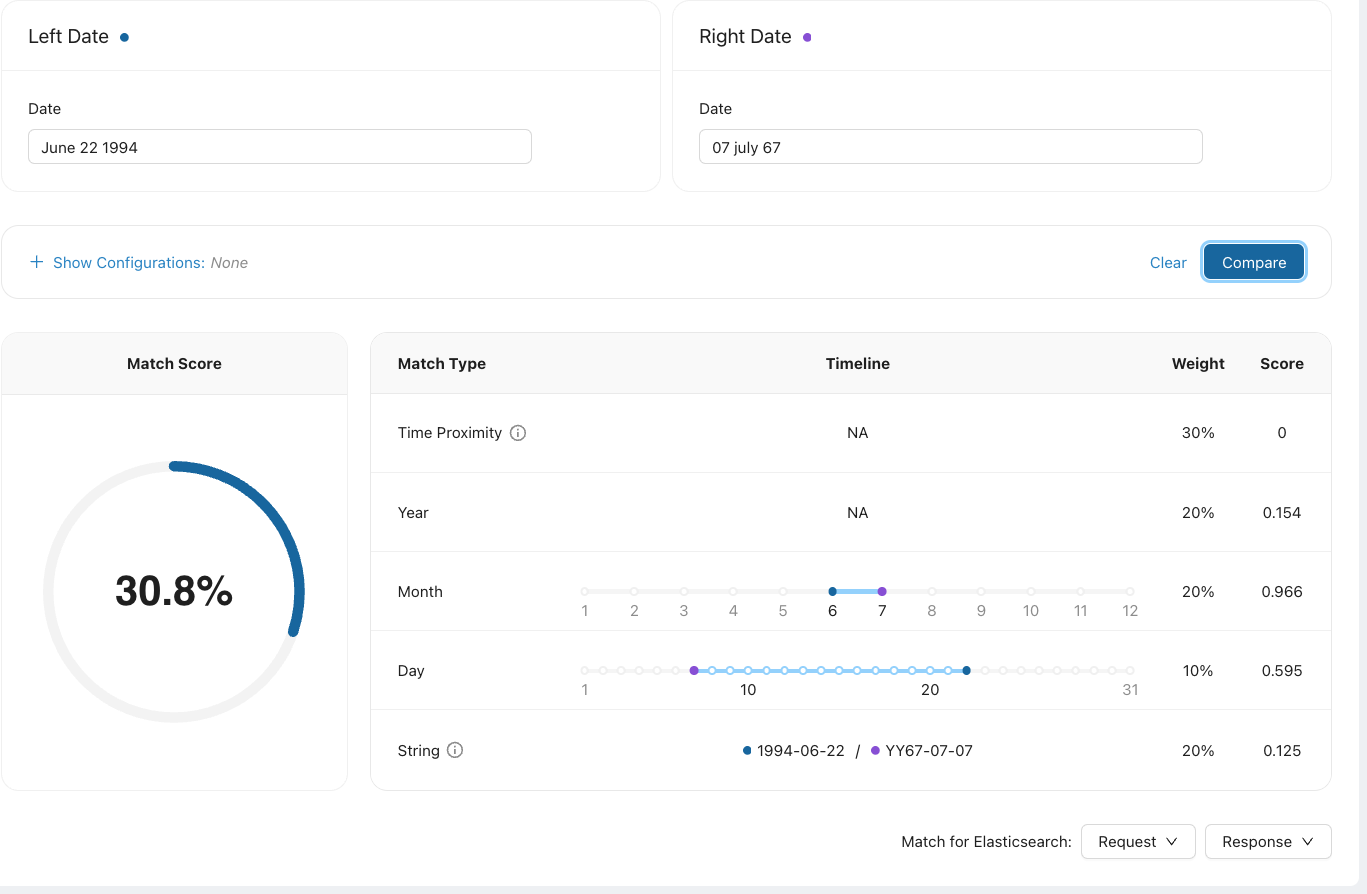
Compare Dates
RNI calculates the match score based on five different components:
Time Proximity: The number of days between Date 1 and Date 2.
Year: The difference of the year fields of Date 1 and Date 2.
Month: The difference of the month fields of Date 1 and Date 2.
Day: The difference of the day fields of Date 1 and Date 2. 1 and 30 are far apart in value, even if they are close in time.
String: The string distance is calculated by converting Date 1 and Date 2 to a standard format. The score is calculated on the edit distance between the two strings.
Supported date formats
RNI supports a wide variety of date formats.
Days can be represented by 1 or 2 digits.
Months can be numerics (1 or 2 digits) or English characters (full name or 3 character abbreviation).
Years can be represented by 1, 2, 3 or 4 digits.
Supported delimiters include
, . - /, as well as a space.Partial fields can be entered.
At this time, only English month names and abbreviations are recognized.
All words are case-insensitive; upper and lower case are interpreted the same.
The following table shows different acceptable formats for the date March 7, 1984.
Format | Valid Examples | Notes |
|---|---|---|
Y-M-D | 1984-03-07; 1984/3/7; 1984.3.07; 1984 Mar 07; 1984-March-7 | |
M-D | 03-07; 3/7; Mar-07; March 7 | |
Y-M | 1984-03; 1984 March; 1984-Mar | |
YYYYMMDD | 19840307 | All 8 digits must be included |
M-D-Y | 03-07-1984; 3/7/84; March 7 84; Mar. 7, 1984 | |
M-YYYY | 03-1984; March 1984; Mar-1984 | The year must include 4 digits. March-84 will not be recognized. |
D-M-Y | 07 03 1984; 7/3/84; 07 March 84; 7/Mar/1984 | |
D-M | 07-03; 7/3; 07-Mar; 7 March | |
D(MONTH)Y | 7MAR84; 07March1984 | The month is a word or abbreviation |
YYYY | 1984 | |
Month | March |
Compare Dates Configuration
As with names, you can apply different match configurations to a pairwise date match from the Compare page. You can also also modify the weights given to each type of date match to see how each value impacts the final match score.
To view and modify the weightings of date types:
Select Show Configurations.
Select Advanced Configuration.
Change the weightings of the date component matches. You can also choose to disable swap by de-selecting tryDayMonthSwap.
Select Apply and Compare.
Changes are applied to the date pair currently displayed; overall date search settings are not modified. Select Reset in the Modified column to set the values back to their default settings.
Note
To save a set of parameter values, select the copy url icon in the upper right corner. The url contains the parameter values.
Enable Swap
Because dates are sometimes written month day and other times written day month, swap tries matching the date fields as written as well as with the month and date fields switched. The best score is returned as the match score. For example, if the dates in question are 1970-3-5 and 1970-6-4, this feature will match the following four pairs:
1970-3-5 | ↔ | 1970-6-4 |
1970-3-5 | ↔ | 1970-4-6 |
1970-5-3 | ↔ | 1970-6-4 |
1970-5-3 | ↔ | 1970-4-6 |
The maximum score of the four pairs is then returned as the match score.
Check the tryDayMonthSwap box in the Advanced Configuration tab if you think there may be formatting inconsistencies in your dates and the dates you are matching may not always have days and months in the same positions.
If the selected match score is from a swapped pair, a penalty score is applied, indicating less certainty in the match. The displayed Pre Swap Penalty Score is the score returned for the selected swapped pair, before the penalty is applied.
Weighting Date Matches
The date weighting fields control the relative strength of each aspect of the date-matching algorithm. A separate score is calculated for each match type. The final match score is calculated by performing a weighted arithmetic mean over each of the similarity scores. If a field is missing from a record, that field is ignored and its weight evenly distributed across other fields.
Display Name | Parameter Name | Score based on | Example |
|---|---|---|---|
Time Weight | timeDistanceWeight | The number of days in between the two input dates | 1979-12-31 and 1980-1-1 look different, but their time difference is very close. They will have a high match score. |
Year Weight | yearDistanceWeight | The difference of the year fields | Close years will have a high match score. |
Month Weight | monthDistanceWeight | The difference of the month fields | 1 and 12 are far, even if they are close in time. They will have a low match score. |
Day Weight | dayDistanceWeight | The difference of the day fields | 1 and 30 are far, even if they are close in time. They will have a low match score. |
String Weight | stringDistanceWeight | The edit difference between the two dates, when converted to a standard string (05021974 for 5/2/1974) | 1979-12-31 and 1980-1-1 will be 19791231 and 198000101. They will have a low match score. |
Dates with a high time match score may have a very low string match score. Time finds dates that are close together; string gives high scores to similarly formatted dates.
Compare Addresses
Rosette Match Studio compares addresses by comparing the fields within each address. You can enter the address as a single field or as separate fields.
Select the format of the address: Single or Multi Field. There is also the Extended option for addresses with even more fields. Both address 1 and address 2 must be in the same format.
Enter the addresses.
Select Compare.
RMS optimizes the matching algorithm to the field type. Named entity fields, such as street name, city, and state are matched using an algorithm similar to name matching. Numeric and alphanumeric fields such as house number, postal code, and unit, are matched using numerically-based methods.
The Match Score Computation displays the match matrix for the address fields. Each field in address 1 is compared with each field in address 2, similar to how name tokens are scored.
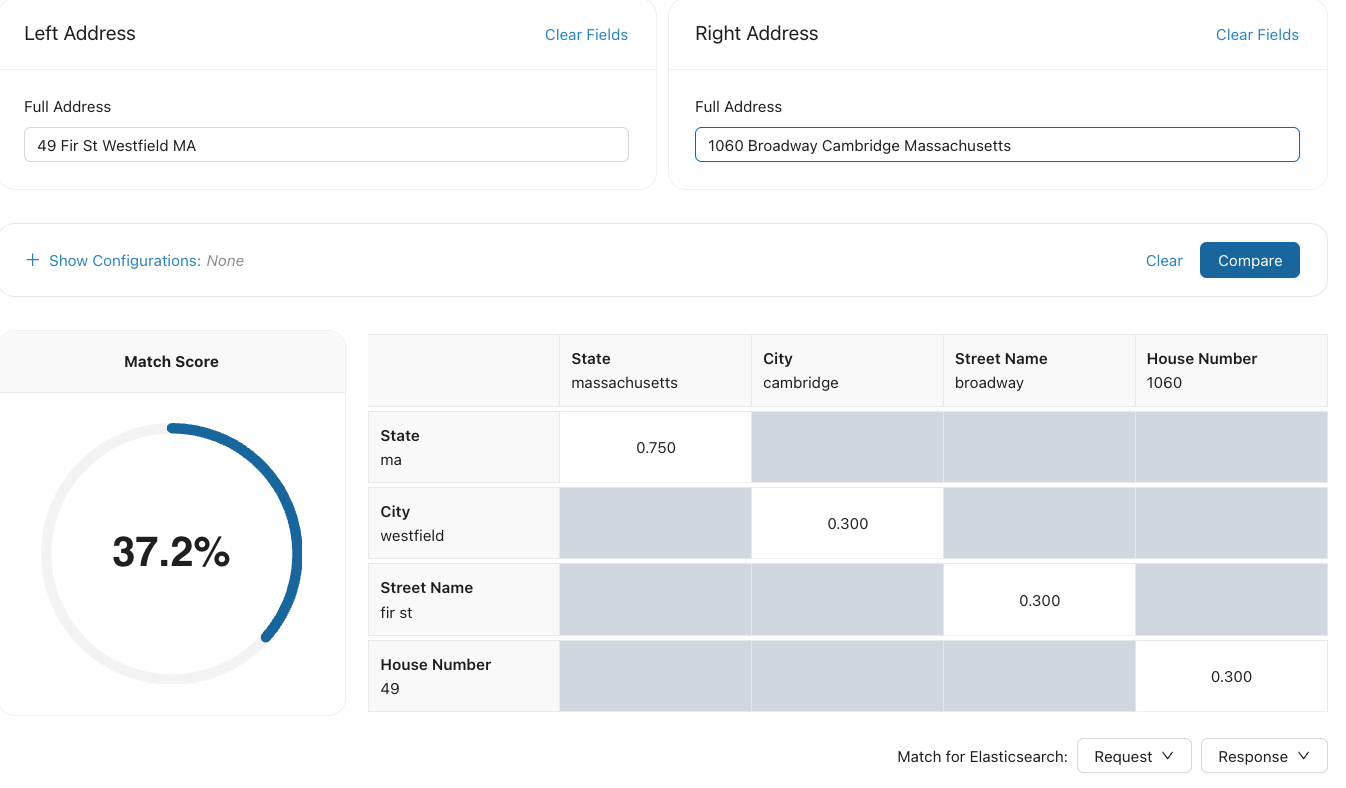
You can also use the Match Configuration and Advanced Configuration tabs to apply different match configurations or edit individual address matching parameters, respectively, similar to name and date matching.
Supported Address Fields
Addresses can be defined either as a single field or as a set of address fields. When defined as a single field, the jpostal library is used to parse the address string into address fields.
When entered as a set of fields, the address may include any of the fields below. At least one field must be specified, but no specific fields are required.
Field Name | Description | Example(s) |
|---|---|---|
| venue and building names | "Brooklyn Academy of Music", "Empire State Building" |
| usually refers to the external (street-facing) building number | "123" |
| street name(s) | "Harrison Avenue" |
| an apartment, unit, office, lot, or other secondary unit designator | "Apt. 123" |
| expressions indicating a floor number | "3rd Floor", "Ground Floor" |
| numbered/lettered staircase | "2" |
| numbered/lettered entrance | "front gate" |
| usually an unofficial neighborhood name | "Harlem", "South Bronx", "Crown Heights" |
| these are usually boroughs or districts within a city that serve some official purpose | "Brooklyn", "Hackney", "Bratislava IV" |
| any human settlement including cities, towns, villages, hamlets, localities, etc. | "Boston" |
| named islands | "Maui" |
| usually a second-level administrative division or county | "Saratoga" |
| a first-level administrative division | "Massachusetts" |
| informal subdivision of a country without any political status | "South/Latin America" |
| sovereign nations and their dependent territories, which have a designated ISO-3166 code | "United States of America" |
| currently only used for appending "West Indies" after the country name, a pattern frequently used in the English-speaking Caribbean | "Jamaica, West Indies" |
| postal codes used for mail sorting | "02110" |
| post office box: typically found in non-physical (mail-only) addresses | "28" |
Evaluate
Select the Evaluate tab from the navigation bar to start an accuracy evaluation. This allows you to:
Calculate the accuracy of RNI using your gold data.
Test different parameter configurations to determine the best settings for your data.
Determine the best threshold value for your data.
Evaluate requires the following inputs:
A file containing your gold data, which is a set of annotated name match pairs.
A match configuration, which includes a set of configuration parameter values.
Evaluating Name Matching Accuracy
Matching records which include names is a challenging problem because name spellings can differ in so many ways, including simple misspellings, to nicknames, truncations, variable spaces (Mary Ellen, Maryellen), spelling variations, and names written in different languages. Nicknames have a strong cultural component. The terminology itself is problematic because matching implies two things that are the same or equal, but name matching is more about how similar two entities are. Once you have a measure of similarity, you may need additional rules or human analysis to determine if it is a match. It is important to understand these challenges when evaluating name accuracy.
Evaluation Data
Data used to measure accuracy should include a wide variety of phenomena that make name matching challenging, including misspellings, aliases or nicknames, initials, and non-Latin scripts. Applying organizational domain knowledge to curating name data that contains specific phenomena found in your real world cases is an ideal starting point for crafting this data set.
Your data for testing accuracy should contain labeled or annotated data. This is often called gold data, referring to the accuracy of the training set's classification for supervised learning techniques. For name matching, it is a list of name pairs, where each pair is labeled as a match or not a match. You can’t calculate accuracy without labeled data. Since assigning classification labels to data can be subjective, you should use multiple annotators on the same data set, determining positive and negative name matches. Establishing a set of annotation guidelines for scoring a classification is necessary, as it provides consistency when classifying the data.
Once you've collected and annotated your gold data, create an evaluation file of name pairs to be imported and used in evaluation.
Evaluation Data File
The evaluation data file is a .csv file of annotated name pairs (gold data). It should include both positive (the names are considered a match) and negative (the names are not considered a match) name pairs. All name pairs must be the same entity type.
Column Name | Description | Required? | Example |
|---|---|---|---|
Name1 | First name in the name comparison | Yes | John R. Smith |
Name1_Lang | 3 letter ISO 693-3 language code | No | eng |
Name2 | Second name in the name comparison | Yes | Smith John |
Name2_Lang | 3 letter ISO 693-3 language code | No | eng |
Entity_Type | What type of name is this? Person, Organization, Location, Date, or Address | Yes | PERSON |
Match | Does Name1 match Name2? | Yes | Y |
The first row of the file is a header row, containing the column names of the fields in the file. Each column is separated by a comma; if a value is not provided, that field is left blank but the column must still be included.
Sample File - PERSON
NAME1,NAME1_LANG,NAME2,NAME2_LANG,ENTITY_TYPE,MATCH
Peter Harding,eng,Pete Harding,eng,PERSON,Y
Peter Harding,eng,Harding Peter,eng,PERSON,Y
Peter Harding,,Pete Michael Harding,eng,PERSON,Y
Peter Harding,eng,P. M. Harding,eng,PERSON,N
Peter Harding,eng,Pat Harding,,PERSON,N
Peter Harding,eng,P. B. Harding,eng,PERSON,N
Peter Harding,eng,Pietro Hardin,eng,PERSON,N
Sample File - Address
123 Fake Street Springfield MO,,123 Fake St Springfield IL,,ADDRESS,N
820 Forest Road,,820 Forrest Rd,,ADDRESS,Y
To upload an evaluation data file:
Select the Evaluate tab from the navigation bar.
Drag or browse for the desired evaluation data file. When it has finished uploading, it will appear in the file list.
Measuring Accuracy
Precision, recall, and F1 score are metrics used to evaluate NLP tools. Accuracy is measured as a combination of the three values.
Precision answers the question "of the answers you found, what percentage were correct?" Precision is sensitive to false positives; higher is more precise.
Recall answers the question "of all possible correct answers, what percentage did you find?" Recall is sensitive to false negatives; higher is better recall.
F1 measure is the harmonic mean of precision and recall. The F1 measure is sensitive to both false positives and false negatives; a higher value means better accuracy. It isn't quite an average of the two scores, as it penalizes the case where the precision or recall scores are far apart. For example, if the system finds 10 answers that are correct (high precision), but misses 1,000 correct answers (low recall), you wouldn't want the F1 measure to be misleadingly high.
Export Match Configuration
Exported match configurations can be re-imported into RMS or used as a reference for making a configuration in RNI.
Important
The exported .yaml file cannot be imported directly into RNI.
Select Configure from the navigation bar.
Select Export in the Options column for the desired match configuration.
Calculating Precision, Recall, and F1
Let's look at how precision, recall, and F1-score are calculated. We have a set of name comparisons. From this we can calculate:
TPs: True positives. Number of matching name pairs that were labeled a match.
FPs: False positives. Number of matching name pairs that were not labeled a match.
FNs: False negatives. Number of name pairs that did not match and were labeled a match.
Pairs: Number of rows in the gold data file; the number of name pairs compared = TP + FP
Matches: Number of records that are marked as matches in the gold data file. = TP + FN
Precision is an indication of how many of the matches are correct. If there are 2 correct matches, but 6 were identified as matches, P = .33. The name pair is correctly matched 1/3 of the time. If there are no false positives, the precision is 1.
Recall is an indication of how many matches were found. If 2 pairs are identified as matches, but there are 4 pairs that are actual matches, R = .5. This means that RMS found the correct match 1/2 the time. If there are no false negatives, the recall is 1.
F1-score is the harmonic mean of precision and recall
A major benefit of RMS is that you can define a threshold for name matching, optimizing for what is most relevant to your use case. For name matching, consider the case where a query name is expected to match one and only one name in the index. If there are three names returned above the threshold, including the correct match, then one name is a true positive (TP), two names are false positives (FP), and there are no false negatives (FN). If the correct match is not returned above the threshold, the number of false negatives will be one.
In this example, where the correct match is returned along with two other matches:
The precision is 1/3, since there is one correct match returned with two other matches.
The recall is 1.0, since there are no false negatives.
New Evaluation
Creates a new evaluation to run RNI against a data set along with a selected configuration, helping you configure RNI for your environment.
Before you can run a new evaluation, you must:
Define a match configuration. RMS comes configured with a default configuration. You can use the default or define your own.
Upload an evaluation data file.
Select the Evaluate tab from the navigation bar if you are not already on the Accuracy Evaluations screen.
Select New Evaluation in the Options column for the gold data file you want to use.
Verify that you have the desired evaluation data file selected from the drop-down menu.
Select a match configuration from the drop-down menu. You can use the default configuration.
Select Start Evaluation.
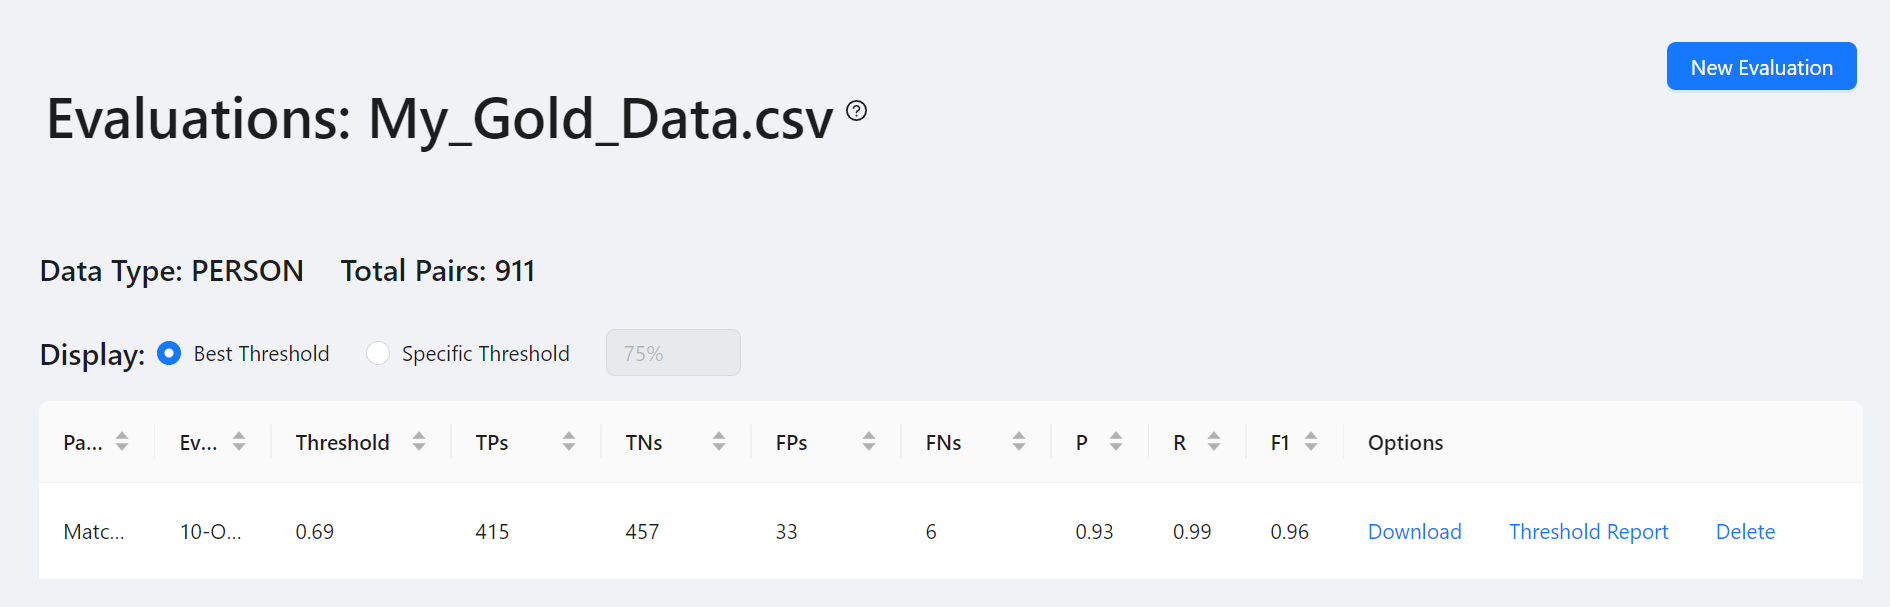
View Evaluation Data
Select View Evaluations to display all evaluations performed for a given evaluation data file. Use the Display settings to view the evaluation results for the best threshold, or for a specific threshold. Once you have specified the threshold, you can download the evaluation results for that threshold. Use Threshold Report to visualize how the results change as the threshold increases or decreases.
Threshold Report
A key feature of RNI is that it returns a normalized score between 0 and 1 indicating how similar two names are. This makes integrating RNI into existing workflows powerful. However, it leads to the inevitable question: “What threshold should I use?” Without quantitative error analysis, this question is difficult to answer. RMS determines the correct value by processing your evaluation data against various thresholds, calculating precision, recall, and F1 for each data type.
The threshold report graphs the precision, recall, and F1 for each threshold value and each data type. As you can see from the graph, the threshold can be adjusted to favor precision or recall. With a high threshold, false positives will be less likely, leading to a higher precision. With a low threshold, false negatives will be less likely, leading to a higher recall. For applications involving border checking, you may be inclined to favor recall to avoid allowing potential threats into a country. Conversely, for Know Your Customer(KYC) applications, leaning your threshold towards precision may be best to reduce false positives. Your choice of threshold should ultimately be based on an analysis of accuracy as a function of threshold for your particular data, as well as your business requirements.
The threshold report page contains a table listing the Precision, Recall, and F1 values for each data type, along with the threshold value, along with a threshold graph. The threshold is the value which produces the best F1 score.
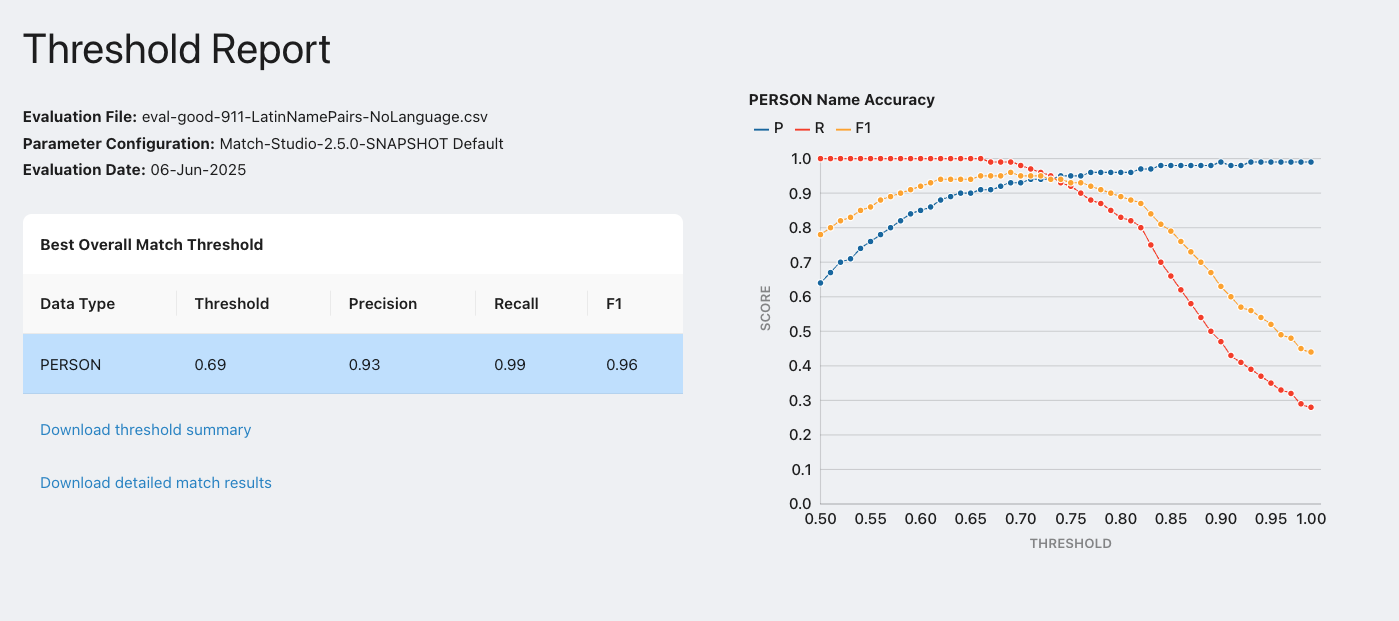
From this page, you can download the following reports as .csv files:
Threshold summary, listing the TP, TN, FP, FN, precision, recall, and F-scores for each threshold and entity type.
Detailed match results, listing the RNI score for each pair, along with the result (TP, TN, FP, or FN) for each threshold value.
Configure 
Note
If you are using RMS Lite, configurations are read-only, and you will not be able to edit them or create new ones. This comes with performance gains, since RNI's dynamic configuration endpoints do not have to be enabled. Overrides and stop words are not editable or viewable in RMS Lite.
Hover over the Configure tab on the navigation bar to see configuration options. The options are:
Match Configurations: Adjust the parameters that determine the match score between two tokens. Sets of parameter values can be saved as match configurations and applied to indices.
Overrides: Add or remove token pairs that are considered a match regardless of similarity.
Stop Words: Add or remove words that are ignored during string matching so that they do not affect the match score.
Match Configurations
Hover over the Configure tab and select Match Configurations to view the Match Configurations page.
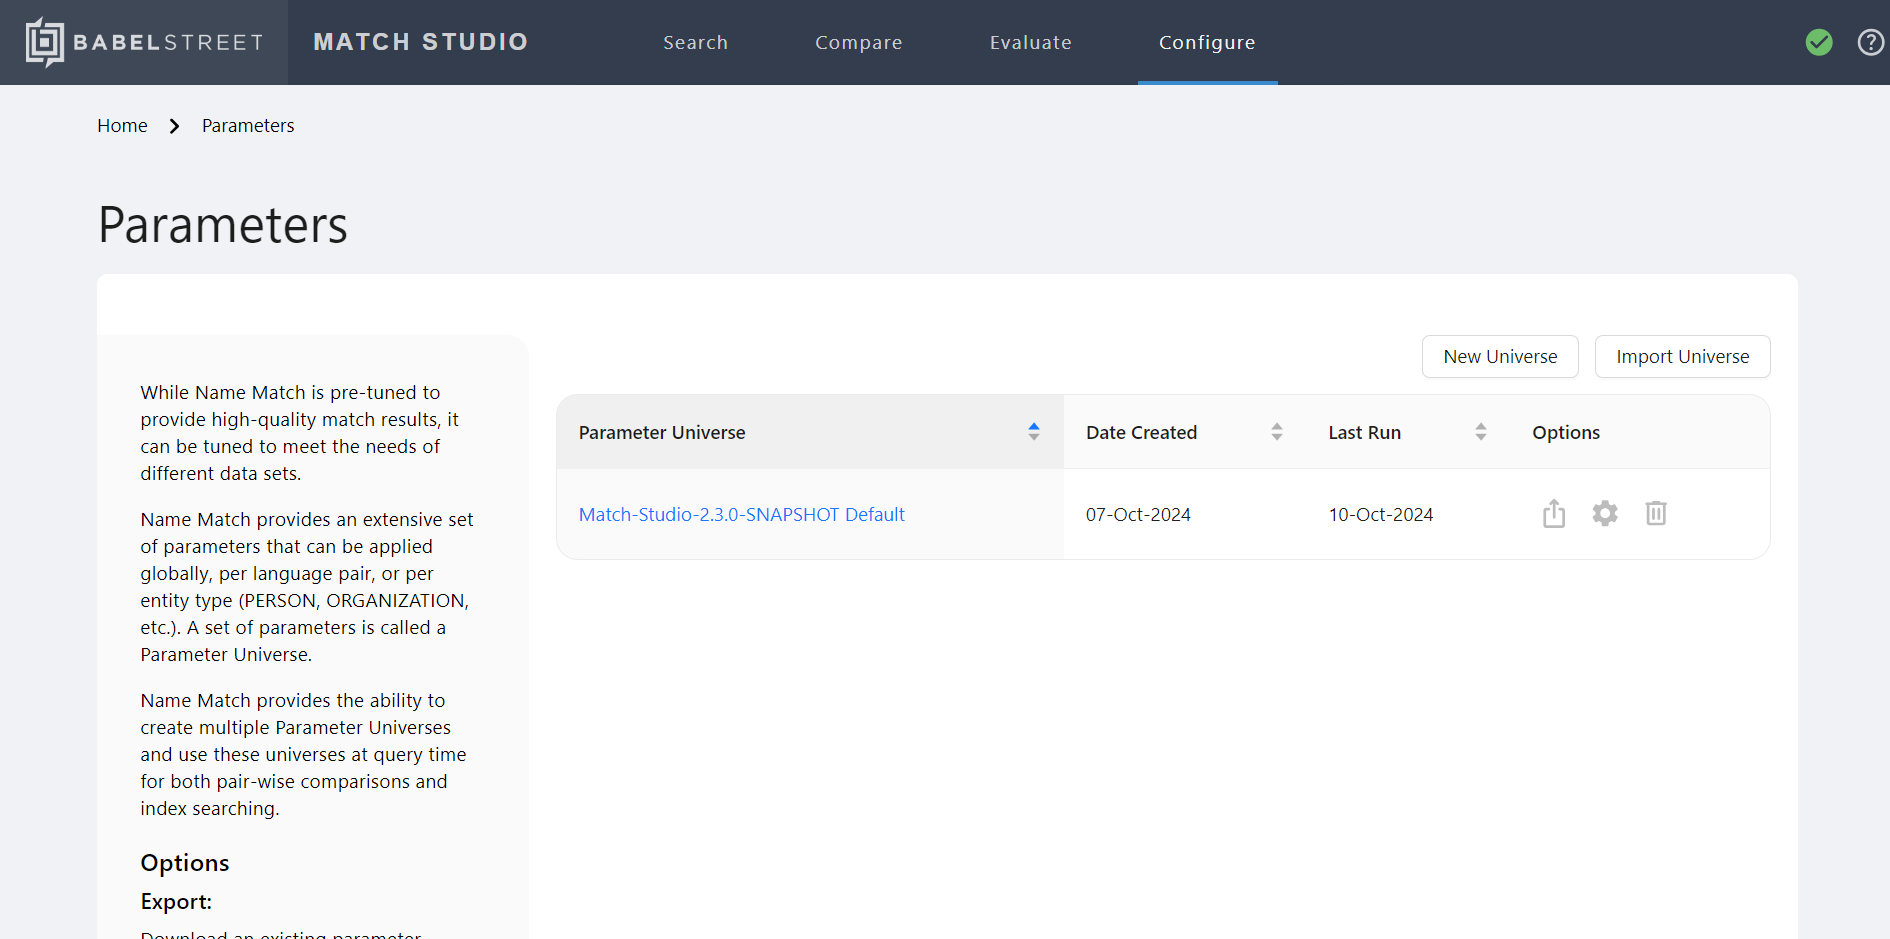
Individual name tokens are scored by a number of algorithms. These algorithms can be optimized by modifying configuration parameters, thus changing the final match score. RMS provides an easy way to compare and test different parameter settings based on your data.
A match configuration contains a set of parameters. Each named match configuration contains parameter values for a specific language pair and entity type. A single named match configuration can contain multiple language pairs and entity types.
The Configure page contains a list of existing match configuration files. You can:
Configure (or edit) an existing match configuration. You cannot edit a match configuration if an evaluation has already been created using the configuration. For the default match configuration, which cannot be edited, this option is replaced with View.
Export the match configuration as a .yaml file. This file can be re-imported into RMS or used as a reference for making a configuration in RNI.
Important
The exported .yaml file cannot be imported directly into RNI.
Delete a match configuration. This option is disabled for the default configuration.
Create a New Configuration.
Import Configuration from valid .yaml file.
Parameters
Match configuration parameters are separated into common and advanced parameters. RNI contains over 100 parameters, but the common parameters (listed in the table below) are the most likely to have an impact on your data. The advanced parameters, on the other hand, have default values which are already tuned to perform well on most queries and datasets. Users should exercise caution when modifying advanced parameters.
Tip
When adjusting parameters, if you encounter one you are unfamiliar with, hover over the parameter name for a description of the parameter.
Parameter Name | Description | Behavior |
|---|---|---|
| The score that is assigned to an initial matching a token. | Increasing leads to higher final score when there is a match between an initial and a token. |
| The score applied to an unmatched token when surrounding tokens are matched. | Increasing leads to higher final score when there is an unmatched token. |
| A penalty applied when two tokens match, but are in different positions in each name. | Increasing leads to lower final score when the tokens aren't in the same position. |
| The score that is assigned to unmatched conflict tokens. | Increasing leads to higher final score. |
| A boost applied to the final score applied to the weights of tokens at the right end of the name. | Increasing leads to a higher score for matches between the surnames in English and other languages where the end of the name is more meaningful. It makes the last token more important. |
| The score that overrides the usual conflict score when initials conflict. | Increasing leads to higher final score when initials conflict. |
| The score that gets assigned to an initialism matching a name. | Increasing leads to a higher score for matches between initialisms and names. |
| The score that gets applied when an initial is "stuck" to the preceding token. | Increasing leads to a higher score when there is a stuck initial. |
| The score that gets assigned to an unmatched token which, when removed, leaves the remaining tokens out of order. | Increasing leads to a higher score when there is an out of order deletion. |
| Adjusts the usual deletion score when initials are deleted by multiplying by this amount. | Increasing leads to a higher score when initials are deleted. |
| A penalty applied when the gender of the names doesn't match. | Increasing leads to a lower score when the genders of the names do not match. |
| A penalty applied for cross language name matching. This should usually be lower than the Gender Conflict Penalty because some first names appear as different genders in different languages. | Increasing leads to a lower score when the genders of the names do not match across languages. |
| A boost applied when the tokens at the beginning and end match. If set too high, middle names may not be matched correctly or may be ignored. | Increasing leads to a higher score when tokens at the beginning and end match. |
| Multiplies token scores of deleted tokens by this amount if they only occur in only one of the names (but more than one token remains). | Increasing leads to higher scores for deleted tokens if they only occur in one name and more than one token remains. |
| Adjustment made when the tokens in one of the names have been rotated with respect to the other (e.g. A B C D vs D A B C). | Increasing leads to a higher score when tokens have been rotated. |
| This is used to normalize the scores so that they have roughly the same value from one release to the next, as well as between language pairs. | Increasing leads to a higher final score. |
Configuring Language Pairs and Types
When editing a match configuration, you can edit parameters for all language pairs and entity types, or for specific language pairs and entity types. Control which pairs and types you are configuring using the tree in the upper-left corner of the Match Configuration page.
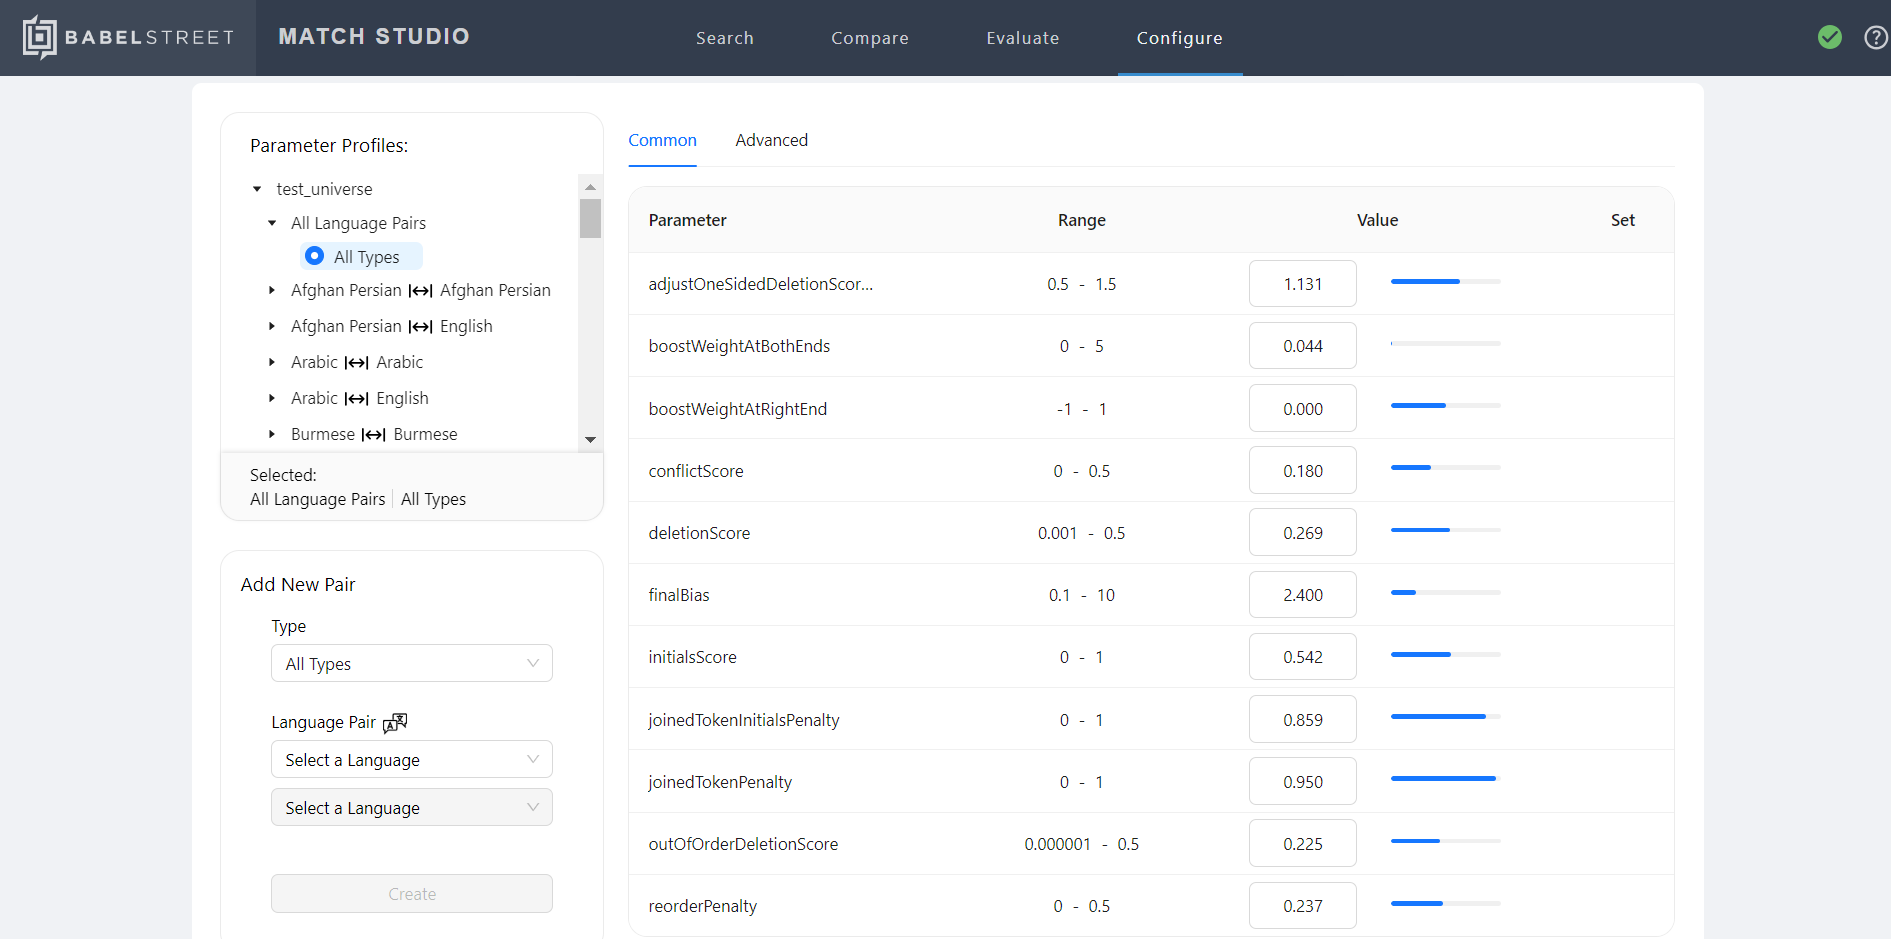
If you want to edit parameters for a specific language pair and entity type that is not included in the tree, you can add it using the Add New Pair section in the lower-left corner of the Match Configuration page.
When you edit a parameter in your match configuration, that parameter's value will be inherited by any language-pair-specific or type-specific parameters "below" it in the hierarchy. For example, if you change adjustOneSidedDeletionScores to "1" for all language pairs and types, the adjustOneSidedDeletionScores parameter will also be set to "1" for English to English matching, and that parameter will be marked as "Inherited" when viewing it in the context of that language pair. Select Jump To to go where the value is inherited from.
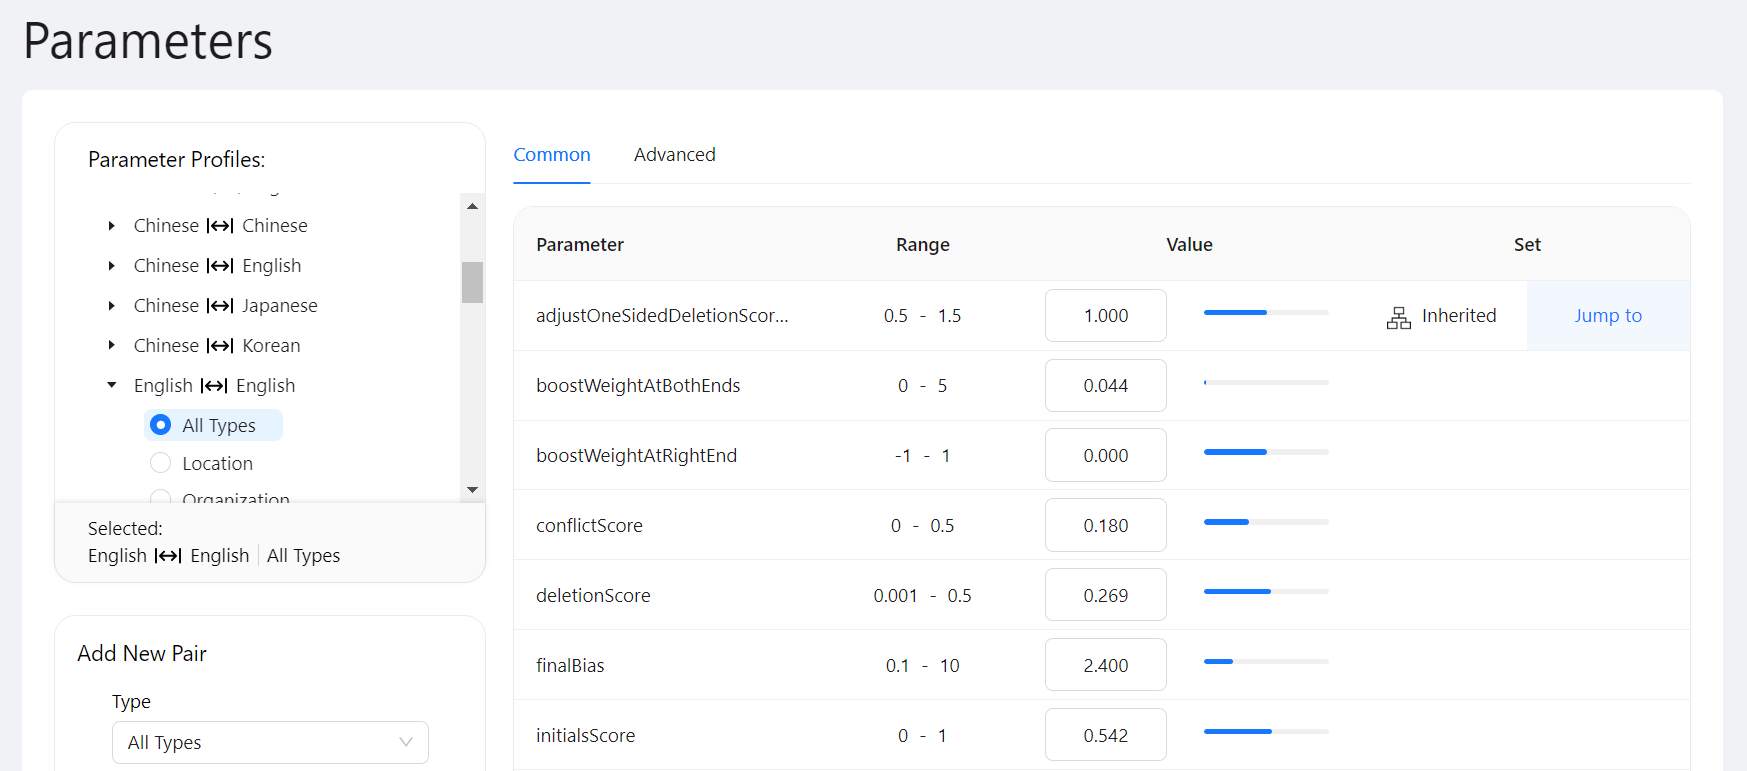
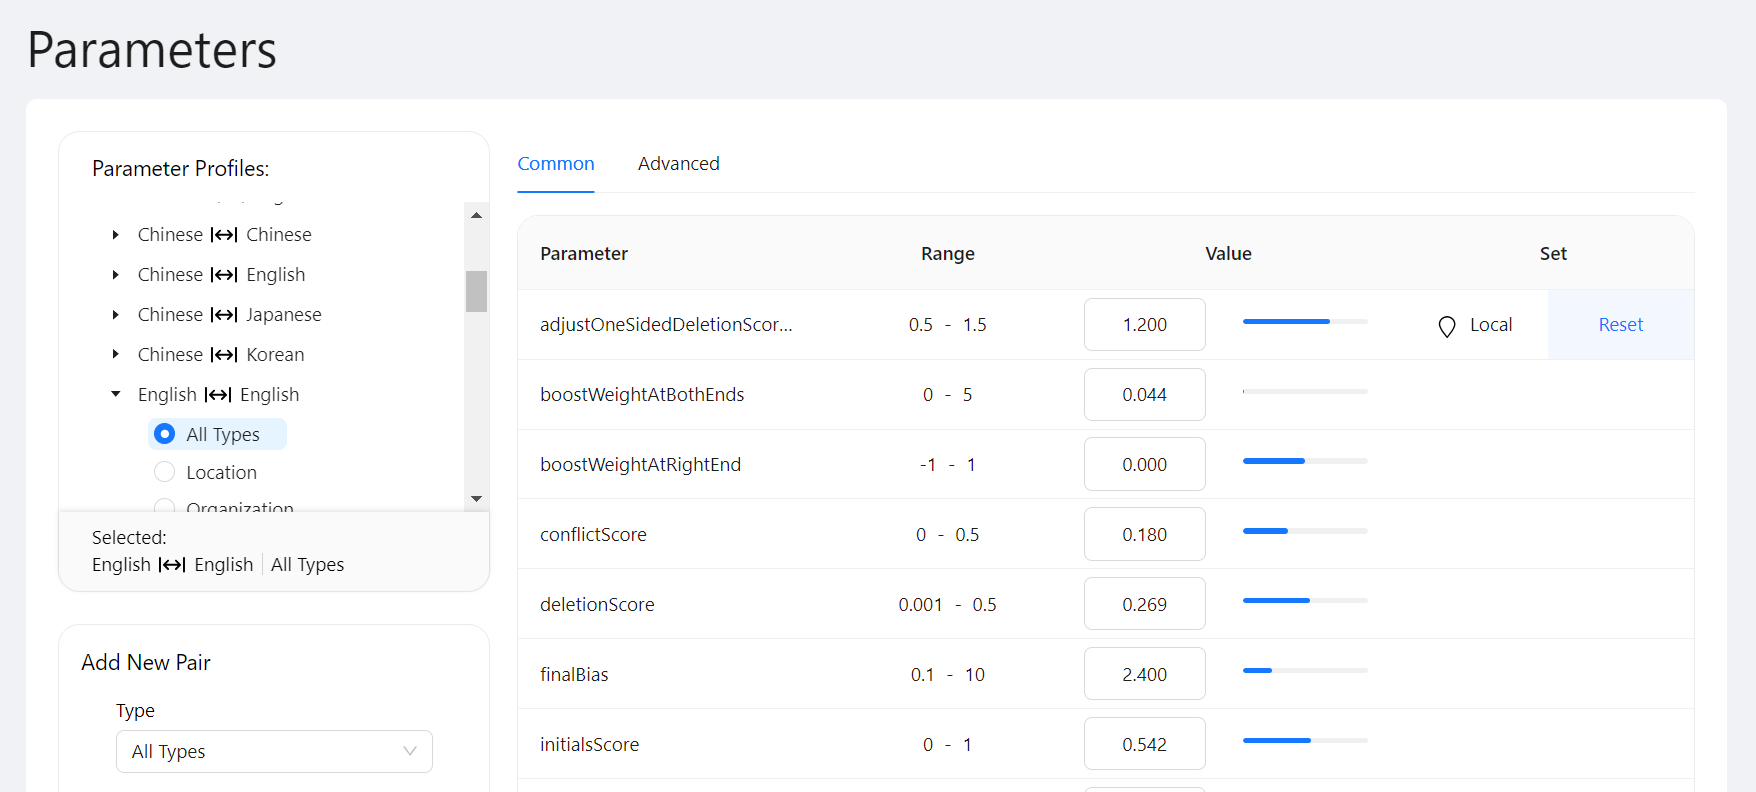
If you then set that parameter to "1.2" for English to English Person matching, the parameter value will not change for any other language pairs or types. The parameter will be marked as "Local" to indicate that the value was specified for this language pair and type, and not inherited from anywhere. Select Reset to reset the parameter to the value it would inherit from "above" in the hierarchy.
New Match Configuration
Select New Configuration.
Select an existing match configuration to serve as a starting point for the new configuration.
Name the new match configuration.
Select Create.
Import Match Configuration
You can create a new match configuration by importing a valid import file. A match configuration created in this way will have all parameters defined in the file, including parameters not exposed in the RMS UI.
Note
You must have a valid import file. A valid import file is in .yaml format and follows the structure of a RNI-ES parameter configuration file. You can create a valid import file by exporting the default configuration and editing it by adding or modifying parameters.
Select Configure from the navigation bar.
Select Import Configuration.
Name the match configuration.
Note
If the name of an existing configuration is provided and the configuration is editable, its values will be overwritten by the import. If the name of an existing configuration is provided and the configuration is not editable, the import will fail. Otherwise, a new match configuration will be created with values from the imported file.
A match configuration is not editable if an evaluation has already been created using the configuration.
Select OK. The new match configuration appears in the match configuration list.
Export Match Configuration
Exported match configurations can be re-imported into RMS or used as a reference for making a configuration in RNI.
Important
The exported .yaml file cannot be imported directly into RNI.
Select Configure from the navigation bar.
Select Export in the Options column for the desired match configuration.
Overrides
Note
Overrides and stop words are not editable or viewable in RMS Lite.
Hover over the Configure tab and select Overrides to view the Overrides page. This page allows you to add or remove token pairs that are considered a match regardless of similarity. You can use this list for things like names with unusual nicknames, such as "Margaret" and "Peggy."
To add a new override set:
Select New Set.
Select the language pair. This is the language of each token in the pair. A pair can be two tokens in the same language.
Enter the name and language of the first token and select Next.
For each token in the second language in the pair, enter the token name, type (cognate, nickname, suppress, or variant), and select an entity type. When you are finished, select Save.
To find an override set:
Select the language pair for the override.
Search for a token that is part of that set in the Enter Keyword field in the upper right.
To delete an override set:
Find the override set using the procedure above.
Select the vertical ellpisis and select Delete Set.
To add a token to an existing override set:
Find the override set using the procedure above.
Select the vertical ellpisis and select Add Token.
Enter the token name, type, and entity type, then select Save.
To remove a token from an existing override set:
Find the override set using the procedure above.
Select the carrot icon to expand the override set.
Select the x icon next to the token you would like to remove from the set, then select Save.
Stop Words
Note
Overrides and stop words are not editable or viewable in RMS Lite.
Hover over the Configure tab and select Stop Words to view the Stop Words page. This page allows you to add or remove words that are ignored during string matching so that they do not affect the match score. You can use this list for parts of names or titles that are not significant when determining a match, such as "Mr." or "Prime Minister."
You can create new stop words as prefixes to names. To add a new prefix stopword:
Select New Stop Word.
Enter the language, prefix name, and entity type.
Select Save or Save and Add Another.
To find a stop word:
Select the stop word's language.
Search for the stop word using the Enter Keyword field.
To delete a stopword:
Find the stopword using the procedure above.
Select the x icon in the Delete column for that stop word.
Servers
The server is what connects Match Studio to RNI-ES, which powers its matching and indexing capabilities. By default, RMS connects to RMS Elasticsearch Server. You can also choose to connect to a different external Elasticsearch server. This is useful if you want to use a different version of RNI-ES or utilize an existing server you already have. RMS checks the server connection status every 30 seconds.
Note
RMS Lite must be connected to a different external Elasticsearch server.
Use the server dropdown menu on the right of the navigation bar to switch between servers and access the Manage Servers page. You can only be connected to one server at a time.
Additional servers are supported for RNI-ES version 8.12.2.
Required Elasticsearch Parameters
For servers without authentication, the following parameters must be set in elasticsearch-<version>/config/elasticsearch.yml:
network.host: 0.0.0.0
http.max_content_length: 400mb
xpack.security.enabled: false
For servers with basic authentication, the following parameters must be set in elasticsearch-<version>/config/elasticsearch.yml:
network.host: 0.0.0.0
http.max_content_length: 400mb
xpack.security.enabled: true
For all servers, the following parameters must be set in elasticsearch-<version>/plugins/rni/bt_root/rlpnc/data/etc/parameter_defs.yaml:
enableDynamicConfigurationEndpoints:
type: boolean
static: true
default: true
Add External Server
To add a new external server:
Select the Server dropdown in the navigation bar and then select Configure Servers. The Manage Servers page appears.
Select the Add Server button. The Add Server window appears.
Name the server.
Enter the server address. This can be an IP address or a URL.
Enter the server port. This is usually 9200.
Select the server connection type (HTTP or HTTPS).
Select authentication type (No Authentication, Basic Authentication, or API Key Authentication).
If you select Basic Authentication, enter the user name and password. As an additional layer of security, you can also save your username and password as environmental variables, and enter them here.
Select Next.
Wait for RMS to verify the connection and select Close. (For RMS Lite, the button will instead read Proceed to Import Indices.)
After you finish adding the server, RMS will automatically switch to it, and it will be visible in both the Manage Servers page and the server dropdown menu on the navigation bar. Any parameter universes will automatically be imported into RMS as Match Configurations. If you are adding a server to RMS Lite, you will next be asked to link the desired indices from the new server.
Connect to a Server
If there are external servers added to your instance of RMS, you can connect to them at any time by completing the following steps:
Hover over the server dropdown menu to the right of the navigation bar.
Select the server you want to connect to from the list.
You can also connect to a server from the Manage Servers page by hovering over the vertical ellipsis in the Action column for that server and selecting Connect.
Link Indices (RMS Lite Only)
While RMS Lite does not allow you to create new indices within RMS, you can link indices from the connected server(s). You will be prompted to do this the first time you use RMS Lite, but you can also do it at any time afterwards.
Navigate to the Manage Servers page.
Select the kebab icon next to the desired server, then select Details.
Link or unlink any desired indices using the toggle in the Status column, then select Next.
Map the fields for each index, then select Import.
Wait for the Import Successful notification, then select Close. The linked index will now appear in the index list.