Adaptation Studio User Guide
Adaptation Studio User Guide
This guide is for the annotators, adjudicators, and managers using Adaptation Studio.
Overview of Adaptation Studio
Adaptation Studio is a web-based tool. Your site administrator can provide you with the web address of your installation, user id, and password.
Note
Chrome and Firefox are the supported browsers for Adaptation Studio.
The top navigation bar provides access to the tools contained in the Studio.
Projects: Lists the projects you have access to. Superusers will see all projects on the server. Managers see the projects they have created or are assigned to. Annotators and adjudicators see the projects they are assigned to.
Manage: Menu to access the features within the Studio.
NER and Events Projects Create or import named entity and event extraction projects.
Event Schema Template: Allows managers or superusers to create, modify, and edit schema templates for event extraction projects.
Custom Knowledge Base: Features for training disambiguation models used to resolve similarly named entities with Entity Extractor.
Gazetteers: Features for compiling a list of exact matches into a binary file to improve performance.
Users: Allows superusers to add, modify, or delete users.
On the far right side of the menu bar are three icons:
 System Health: Shows each installed server. A green dot indicates the server is up and running.
 Help: Select Help to open this guide in a new tab. Select About to view version information.
 User: Information about the current user. Select Settings to update your password or other user data.
All Projects page
If you want to open a specific project in Adaptation Studio, select Projects from the top navigation bar. This takes you to the All Projects page, where you can view all projects you have access to.
On servers with many projects, you may want to use the Search projects panel at the top of the project list to filter the projects displayed. After entering your search criteria, click the  icon to display the projects meeting the criteria.
Use the files drop-down to select a project type (All, Events, or NER).
Select the language to display. Each model is for only 1 language.
Enter a project name or part of the name, and by name.
Enter a date range to search based on the date of the last activity in the project.
Click on a project to open that project.
The project dashboard
Select a project to access the dashboard for that project. The dashboard displays the current state of the project and provides access to project-related tasks. Your user type will determine the information displayed and the tasks you can perform.
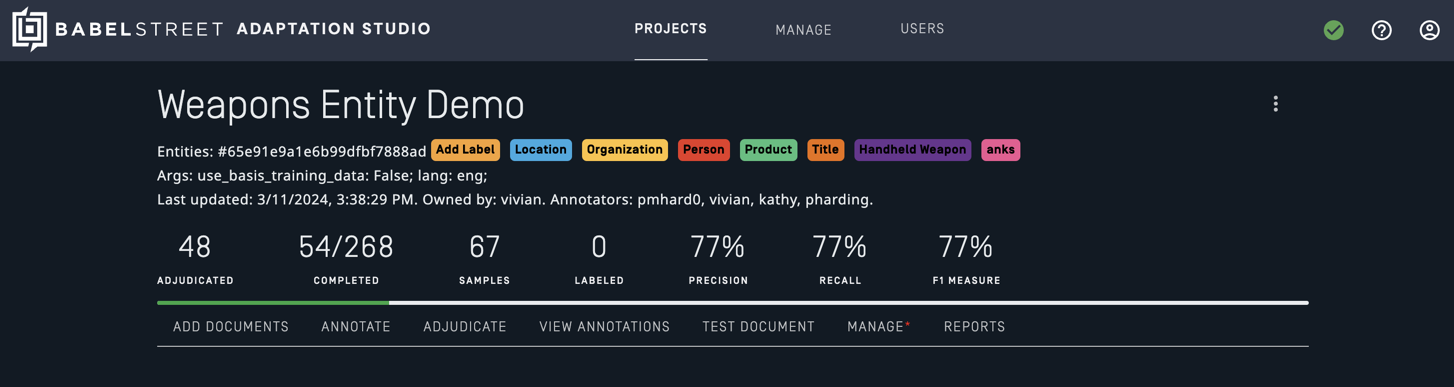
Common tasks are accessed from the project navigation bar on the bottom of the dashboard. Less-frequent tasks are accessed from the project menu in the upper right-hand corner of the project dashboard. Some tasks, such as Delete, are only available in the project menu.
User types
When you log into Adaptation Studio, you will be one of the following types of users:
Superuser: Creates users in addition to all other tasks.
Manager: Creates and manages new projects.
Adjudicator: Reviews annotations by multiple users and settles conflicts when samples are annotated differently.
Annotator: Annotates samples from documents in one or more projects.
Each user type has all permissions of the users below them on the list. For example, a manager has access to all adjudicator and annotator permissions.
To add and manage users, select Users (superuser only) from the top navigation bar.
Add users
Note
You must be registered as a superuser. Only a superuser can add new users. The superuser can access and manage all projects.
Once Adaptation Studio is installed and running, go to Users to create users. User annotations are tied to the user id. If you change a user id, the user will lose access to any annotations they’ve made.
Select Users from the top navigation bar.
Select Add user to create an id for each user. Assign a role to each user.
Note
User ids must be alphanumeric latin script strings. They can include - and _. They cannot include any of the following characters: \ / . \" $ * < > : | ?.
Superuser password
Important
The initial superuser password for Adaptation Studio is set on install and must be changed on first login.
The superuser can create users and perform all tasks. At install, the superuser is set to admin.
The first time you log in as admin, you will be forced to change the password. The initial login information is:
Name: admin
Password: admin
The superuser password can be reset by running the reset_admin.sh in /basis/ras/scripts. After reset, you will be prompted to change the password when you log in the first time.
Note
If the superuser password contains the special characters $ or \, the password must be in quotes when sent to the reset_admin.sh script. Example:
./reset_admin.sh '2^$4bu\Qm$4C'
Headless installer
When using the headless installer, you can set the initial superuser password in the properties file.
To override the admin password, set the admin_password property to the plain text password to use in the install-ras-headless.properties file. On install, this password will be hashed and inserted into the authentication database of Adaptation Studio. Once installed the value can be deleted from the properties file.
You will not be prompted to change the password on the first login.
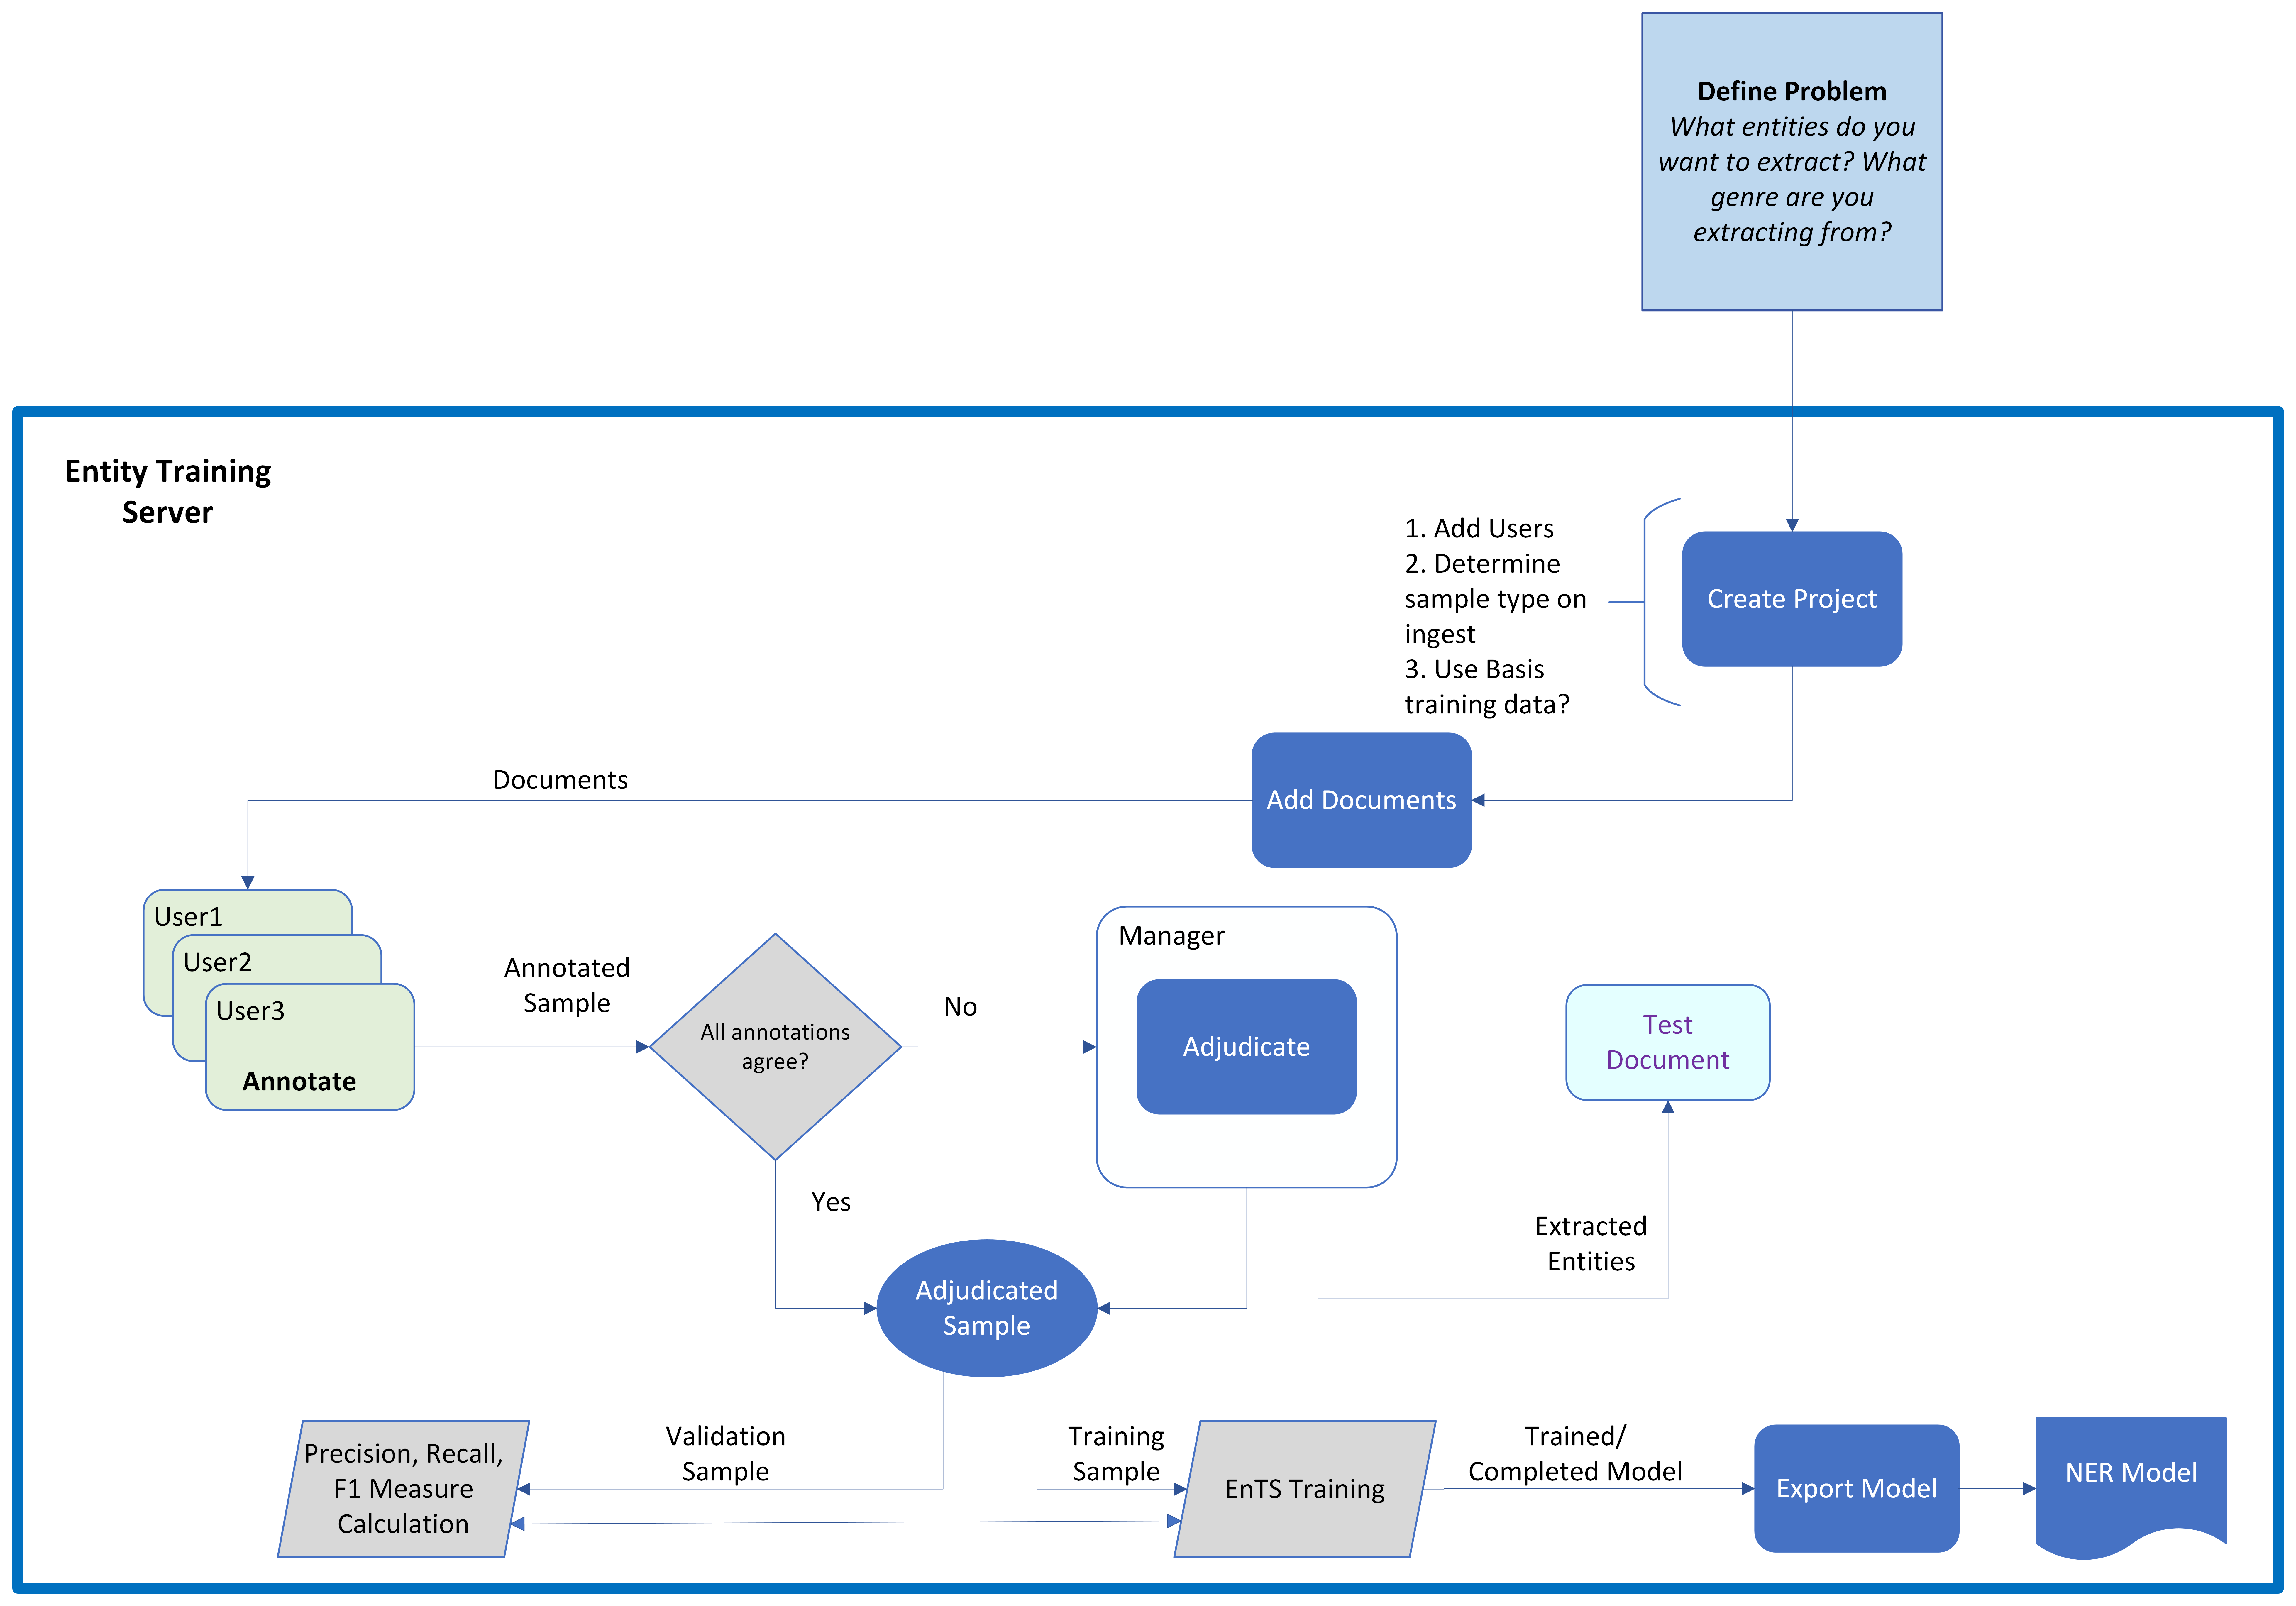
Active learning
Active learning is a form of supervised machine learning in which the learning algorithm guides the order of samples presented to the annotator. This can lead to significant reductions in annotation time and expense.
Active learning accelerates the annotation process in two ways:
It presents the most uncertain sample for annotation, ensuring that the next sample you annotate will provide the most useful annotations.
The engine provides its best guess or prediction for an annotation, where possible.
When you upload a document, it is divided into samples for annotation. A document is made up of multiple samples, where each sample is a sentence in the document. The active learning module selects the "best" document for annotation. The best document is the one which has the lowest certainty for predicting annotations.
Active learning can ensure that samples containing unique or uncommon terms are annotated early in the process. Each time a sample is completed, the engine looks for the sample with the lowest confidence, that is, the sample that is the most unfamiliar to the system. By selecting the unfamiliar samples, Annotation Studio reduces skewing of results towards more common and represented terms.
Tip
Annotators must be careful to review suggested annotations, especially early in the annotation process, when they are more error-prone. You may want to suppress these suggestions to avoid biasing the human annotators. Set the configuration option Hide Eval Predictions to suppress suggested annotations for samples in the evaluation set. Suggestions are still displayed for the training set.
Labels
Annotation is a process of assigning labels to parts of documents. The set of labels, as well as the words or parts of words assigned to the label, depends on the type of annotation task.
For named entity recognition (NER), the labels are the entity types the model is being trained to extract. Entity Extractor has a set of predefined entity types, defined by language. They are automatically defined when the project is created.
Note
If Use Basis Training Data was enabled during initial project configuration, you cannot add new labels to the project.
For events, the labels are the key phrase and the roles. They are defined by the schema.
Named entity extraction projects
New project
Note
You must be registered as a manager.
The options to create a project are on the Manage menu on the top navigation bar. There are two options to create a new project:
Create: Start from a template.
Import: Import an existing project from an export file. This will import all settings, samples, and annotations. You can choose to import only annotated samples.
Create an entity project
Note
You must be registered as a manager.
Select Manage then Create in the top navigation bar.
Enter a name for the project. Choose a name that will be meaningful to you and your annotation team.
Select the NER-Rosette template type from the drop-down menu. The templates are predefined and customized for each type of project.
Add annotators and adjudicators to the project. Select Add/edit roles and permissions to select from the users in the system. Users must be added to the system before you can add them to a project.
Configure the project. Each template type has its own set of configuration options.
Select Create. Your new project appears in the project list.
Before starting annotation, add new labels, if necessary.
NER-Rosette options
The NER-Rosette template is for annotating documents to train models for named entity recognition with Entity Extractor and Analytics Server.
Model language: The language of the samples.
The following parameters are used to improve performance during annotation:
Compute IAA only during overnight processing: Inter-annotator agreement (IAA) is a measure of the reliability of the annotators. Calculating IAA can be resource-intensive. Check this box to schedule IAA only during the night. By default, IAA is computed as annotations are completed.
Minimum number of untrained annotated samples that will trigger training: Increase this value to train less frequently. Default: 1.
Minimum number of elapsed seconds without crossing the training threshold that will trigger training: Increase this value to train less frequently. Default: 60.
Show token boundaries: When enabled, each unannotated span is underlined to make it easier to see the token spans. This option only affects the presentation of the text samples. This option is disabled by default.
Mouse full token selection: When enabled, selecting part of a token causes the entire token to be selected. This option is enabled by default.
Use Basis training data: When enabled, while training the model, Adaptation Studio includes the Basis-provided training data that was used to train the statistical model shipped with Entity Extractor. When this option is enabled, new labels cannot be added to the project. This option is enabled by default.
Note
If you are creating a project to train a model to extract new entity types (defining new labels), do not select this option.
Note
The time to train the model when Use Basis training data is enabled may be a few minutes longer than without the extra training data. The time is determined by the number of annotated documents as well as the language.
Train case sensitive model: When enabled, the trained model is case-sensitive. This option is enabled by default.
Enable link annotation: When enabled, allows the annotator to select a link ID in addition to a label for an entity.
Sample type on Ingest: Determines how documents will be divided into samples for annotation after being uploaded.
Sentence: Each sentence in a document becomes a sample. This is a good choice for NER projects because it increases the effectiveness on active learning. By dividing documents into many small samples, Adaptation Studio can more easily select the most uncertain sample for annotation, which allows the model to train on "difficult" samples faster.
Paragraph: When a section of text in a document is separated from surrounding text by empty rows, that section becomes its own sample.
Document: Each document is its own sample. It ensures annotators have the complete context for each document.
Sample ingest ratio: When you add documents, you can select the ratio used by auto-split to automatically assign documents to either the training or the validation set. The training documents are used to train the model. The validation set is used to evaluate the performance of the model and calculate the precision, recall, and F1 measure for the model. For most NER models, you will want to use the 80/20 ratio. You can change the ratio by selecting a different value from the drop-down list.
Hide eval predictions: When enabled, Adaptation Studio suppresses annotation suggestions on the samples in the evaluation set to avoid biasing the human annotators. This option only affects suggestions for samples in the evaluation set; Adaptation Studio still displays suggestions for samples in the training set if this option is enabled. This option is disabled by default.
Prioritize partially annotated docs: When enabled, Adaptation Studio prioritizes the samples presented for annotation such that full documents are completely annotated. This option is disabled by default.
In-line annotation tags: The annotation labels are displayed next to the selected span. If not checked, the labels are displayed above or below the span.
Auto project backup limit: Each version saved for a project requires resources. This option is set to 5 by default.
Most project configuration options can be changed after the project is created. Select the project menu in the upper right corner of the project and select Configure to change configuration options. Some options, such as model language and use Basis training data, cannot be changed once the project has been created.
Import a project
Note
You must be registered as a manager.
To import a project, you must have an exported project file.
Select Manage then Import in the top navigation bar.
Drop the desired project file into the box, or select Browse to select it manually.
It may take a few minutes for an imported project to appear in the Project list, especially if it is a large project. The imported project will only be visible in the Project list to superusers and users assigned to the project.
Note
If a user on an exported project does not exist on the destination server, that user is created on the new server when the project is imported.
The project owner is created on the new server as a manager.
Any adjudicators are created on the new server as adjudicators.
Any other users are created on the new server as annotators.
Users added in this fashion are unable to log into the new server until an admin manually sets their password via the Users option on the top navigation bar.
Add entity labels
Note
You must be registered as a manager.
Add new labels to the project immediately after creating the project.
If Use Basis Training Data was enabled during initial project configuration, you cannot add new labels to the project.
Select Add Label in the list of labels on the project dashboard.
Fill in the Add New Label form.
Code: A brief name for the label. By convention, it is usually uppercase and about three letters. This will be used internally and in places where the UI shows a label in a brief form.
Caption: A longer user-friendly name for this label, usually one or two words long. It should be descriptive, but reasonably short.
Color: The color used for annotations of this label. You can accept the default color or assign a color.
Include in Model Training: Enable this if the model being trained should use the annotations which use this label.
Check the box for Include in Model Training if the annotations with the label should be used in training.
Select Add.
Note
The Studio will not prompt you to re-annotate samples when a new label is added.
Edit entity labels
You can edit existing NER labels after the project has been created.
Select the label you want to edit in the list of labels on the project dashboard.
Edit any of the fields. The code cannot be edited after the project has been created.
Select Save.
Note
De-select Include in Model Training if you do not want annotations with this label to affect the model being trained. This is useful if you decide you no longer want to train the model using a label, but cannot delete it because it has already been assigned during annotations.
Delete entity labels
Note
You can only delete a label if there are no annotations for it. Once the label has been assigned during annotations, it cannot be deleted from that project. De-select Include in Model Training if you do not want annotations with this label to affect the model being trained.
Select the label you want to delete in the list of labels on the project dashboard.
Select Delete.
Add documents
Note
You must be registered as a manager.
Tip
Uploading a large set of documents can be very time-intensive. Packaging the documents into a zip file will greatly improve upload speed.
Select Projects from the top navigation bar to display the projects you have access to.
Select the desired project.
Select Add Document from the project navigation bar.
(Optional) Modify annotators and/or adjudicators. By default, each added document will be assigned to all annotators currently assigned to the project. If you add annotators to the project later, they will not automatically be given documents that were added earlier.
Adjust project document ingest auto-split ratio: When you select auto-split, the documents are automatically assigned to either the training or validation set. The default ratio is set in the project configuration. You can change the default when you add documents.
Add one or more documents.
Type or cut/paste text into the Document text box.
Or upload files into the project. These files should be text or .adm files. You can also upload zip archives containing a collection of files.
To add the documents into the project, select whether the document(s) will be used for training or validation.
Add for training: Documents used to train the model.
Add for validation: Gold data used to test the model's accuracy.
Add (auto-split): Automatically assign documents to the training and validation sets.
To view the documents added to the project:
Select Manage from the action bar.
Scroll down to the Documents panel. If any documents appear to be missing, verify that they were unique. Identical documents are merged during the upload.
Annotate entities
Annotation is the process of applying labels to text. Annotated text is used to train the model; you can think of it as the "supervision" portion of supervised learning. Entity Extractor will suggest annotations for each sample, but it is up to human annotators to correct and supplement it. Annotators will annotate one sample at a time. The size of each sample is determined by the sample type on ingest configuration setting during project creation.
Note
Once the project has been created, the sample type on ingest setting cannot be changed.
Select Annotate in the project navigation bar to start annotating. Entity Extractor suggests annotations from the start. As soon as you annotate a sample, the system starts training a new model based on your annotations.
Note
You can ask the engine to suggest annotations for only samples in the training set and not those in the evaluation set. To disable suggested annotations from the evaluation set, enable the project configuration option hide eval predictions.
Select words or phrases in the sentence, and then select the correct label for the selected words.
To select a word, click anywhere on the word.
To select a phrase, highlight the desired text.
Note
To remove a label, select it and then select the x icon to the right of the label name. You can then add a new label.
Select Annotate when you are satisfied that the sample is correctly annotated.
Note
If the sample does not contain anything that should be annotated, you must still select Annotate so that the sample status is changed to annotated. This is a negative annotation; an example of when the key phrase does not identify an event.
Other options are:
Undo: Undo changes made in the sample.
Clear Annotations: Erase all tags and start afresh.
Note
If you clear annotations using this button, the sample status will remain as annotated. You must still select Annotate to save the sample with no annotations.
Discard: Remove the sample from annotation and training. Sometimes samples provide no value to the model, in which case it can be helpful to discard the sample. The discard button is not available if the sample has been annotated by another user.
Skip for now: Skip this sample and annotate a different sample.
Previous: Go back to a previously annotated sample from this session.
To move a sample between the validation and training sets, select the appropriate radio button.
Once you've created your data corpus and loaded the documents, at any point in the annotation process, you can review the corpus and the annotations. Select View Annotations to see a detailed view of your work.
Add comments to annotations
Comments allow you to pose questions or provide clarifications about the sample being edited to adjudicators and managers. Adjudicators and managers can view the comments for each sample via View Annotations. Comments do not affect model training in any way. To add a comment while annotating, follow these steps:
Select any annotation.
Select Add Comment.
Type desired text in the Comment field.
Select the green checkmark icon.
You can edit comments you have made by selecting the commented annotation and selecting Edit Comment. From here you can also delete the comment by selecting the trash can icon.
Add links to annotations
When the Enable link annotation option is selected, you can add a link ID to the entity, along with the label. The link IDs are used to train a linking knowledge base. Entity extractor supports linking to a default Wikidata knowledge base. You can also train it to link to a custom knowledge base with Model Training Suite.
When you select a word or phrase, an annotation panel will open.
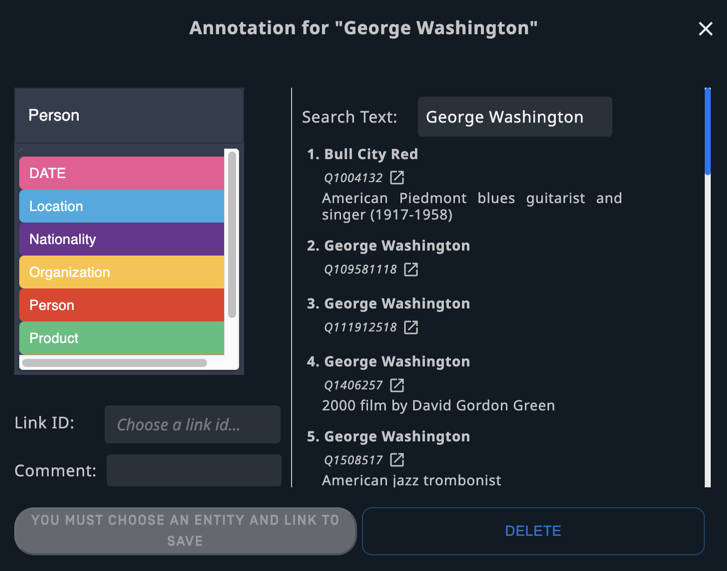
Select or correct the label.
Select the correct link ID.
Save the values.
When all annotations in the sample are correct, select Annotate.
Adjudicate
Note
You must be registered as an adjudicator for the project.
Adjudication is the process of reviewing annotations that have disagreements and determining which is correct. If there are no disagreements between the annotators, the sample is marked as auto-adjudicated, accelerating the annotation process.
Samples are not sent to training until they are adjudicated, either by an adjudicator or auto-adjudicated.
Adjudication can be initiated via View Annotations or directly from the project navigation bar. From the View Annotations page, select Adjudicate under a sample to navigate to the adjudication page.
To adjudicate a sample:
Select an entity with disagreeing annotations.
Apply the correct label
Repeat until you have applied the correct label to entities with disagreeing annotations.
Select Adjudicate.
The following actions are available:
Undo: Undo your most recent annotation.
Skip for now: Proceed to another sample without adjudicating the current sample.
Previous: Return to the previous sample.
Adjudicate: Save any labels applied to entities in the sample as adjudications.
Auto-adjudication
The annotations in Adaptation Studio are sent to the Entity Training Server and provide the data for training a new model. Only adjudicated annotations are included in training. The system will auto-adjudicate samples.
The rules for auto adjudication are:
If only one annotator has annotated a sample, the work is assumed to be correct and adjudicated.
If multiple annotators have supplied identical annotations for a sample, the work is assumed to be correct and adjudicated.
If multiple annotators have supplied contradictory annotations for a sample, then it is marked as "needs adjudication". It is not supplied for training until it has been manually adjudicated.
The system only considers work that has been completed by annotators. If additional annotators have been assigned to work on a document, but they have not completed their work yet, the samples may still be marked as adjudicated.
The system is an interactive environment. At any time, additional work can be done on a sample (a new annotator annotates the sample, an existing annotator revises their work). The modified sample replaces any earlier versions of the sample. Once adjudicated (manually or auto-adjudicated), it will be sent to training with the new annotations.
View annotations
Once you've created your data corpus and loaded the documents, at any point in the annotation process, you can review the corpus and the annotations. Select View Annotations to see a detailed view of your work.
View annotations provides a detailed view of annotations and adjudication. It consists of the Filters panel and the Sample list.
Filters panel
Select Filters on the View Annotations page to expand the Filters panel. To view the filter criteria, click on the down arrow to expand the section. The Filters panel allows you to select which samples to display in the sample list.
Annotated by
Allows adjudicators and managers to select which annotated samples to display based on who annotated them. If you select All selected annotators or Any selected annotators, select annotators with the drop-down menu above.
Samples annotated within a specific date range.
Assigned to
Allows adjudicators and managers to select which unannotated samples to display based on their assigned annotator(s). If you select All selected annotators or Any selected annotators, select annotators with the drop-down menu above.
Adjudication status
Select an adjudication status from the drop-down menu.
Additional filters
Only samples with comments.
Samples removed (discarded) from training and validation.
Samples containing specific terms within the sample text. The text field supports regular expression searches.
Samples with a specified doc id.
Samples from the training dataset.
Samples from the validation dataset.
Adjudicated samples based on the label(s) they are annotated with. The labels are selected from the drop-down box. Select one of:
All selected labels.
One or more selected labels.
No labels.
Select Update results to filter the sample list so that it only displays samples with all chosen criteria.
Sample list
All samples in the project that match the applied filters are listed below the filters panel.
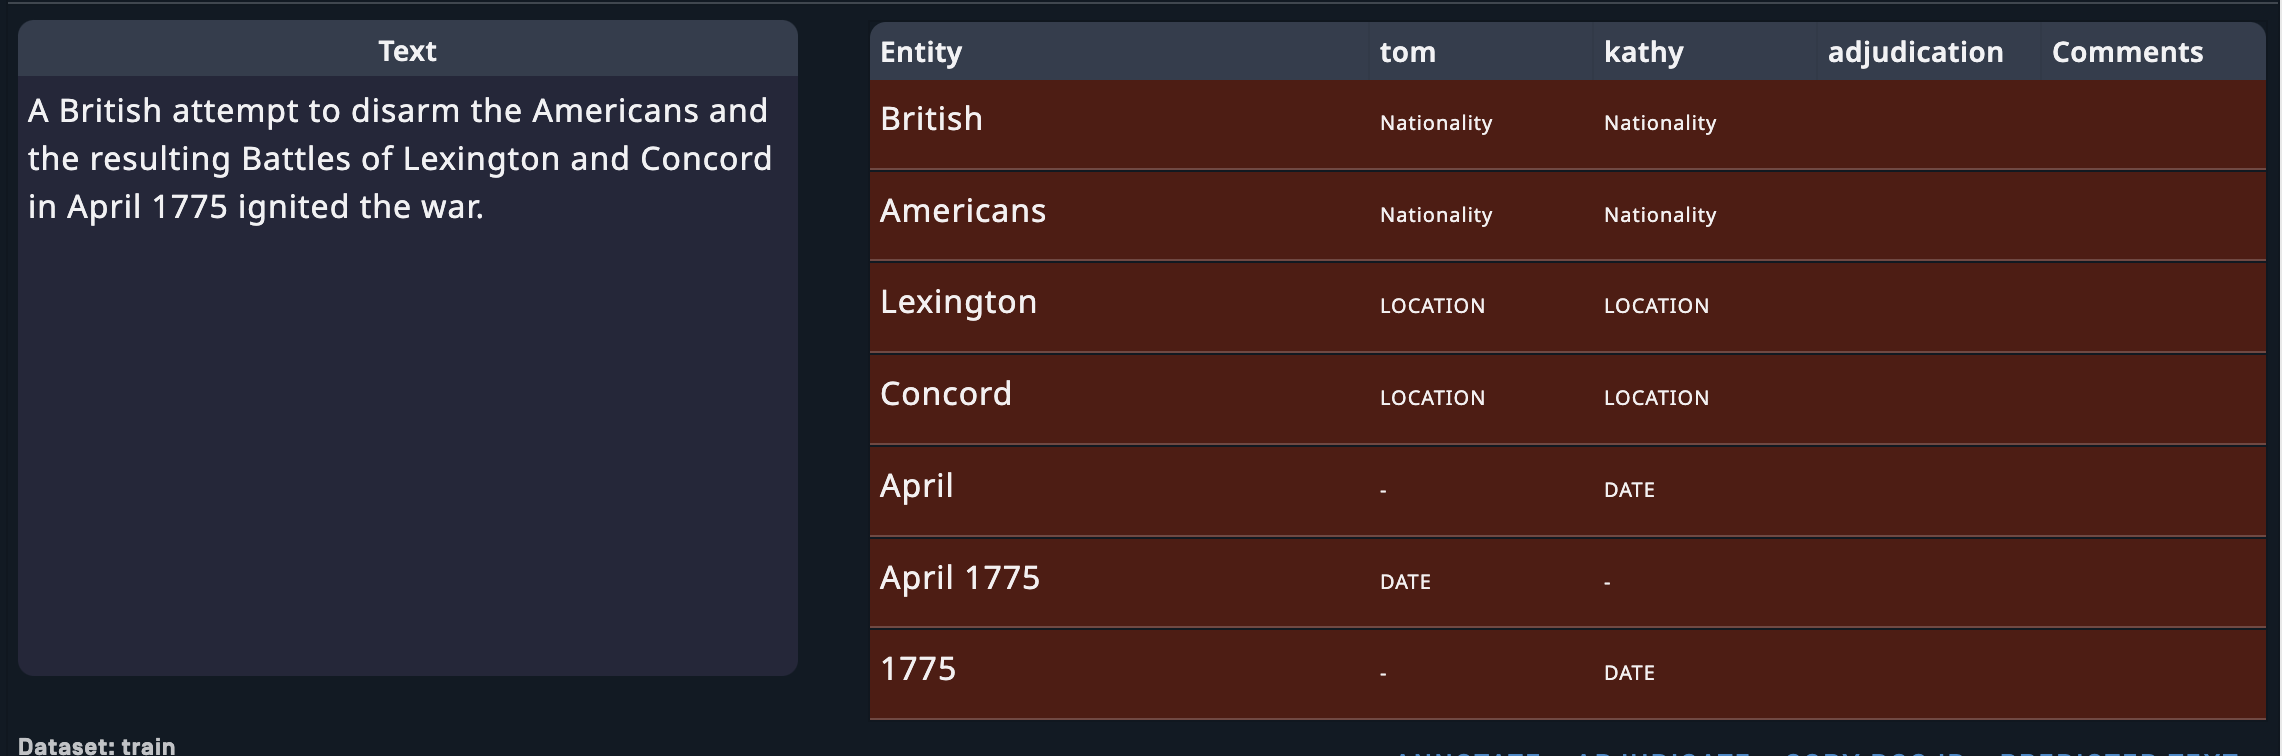
Each sample is displayed next to a table showing the tags selected by each annotator for each entity. If you are a project manager, this view is useful for identifying and inspecting specific points of high annotator disagreement. Samples with disagreements are highlighted in red. Adjudicators and managers can also see any comments added by annotators on the rightmost column of the table.
The following are displayed below each sample:
The sample’s dataset (training or evaluation) and the annotation dates.
Links to perform any available actions
Annotate: Review the annotation and, if desired, clear and modify the annotations.
Adjudicate: View and resolve annotation differences. This option is only available to adjudicators and managers.
Copy doc ID: Copy the Document ID to your clipboard.
A link to view annotation predictions. Predictions are the tags suggested by the currently trained model.
If there are two or more identical entities, each will be labeled with a corresponding id in the sample text and the Entity column. Mouse over any entity in the Entity column to highlight that entity in the sample text.
Manage
Note
You must be registered as a manager.
Manager options can be accessed from the Manage option on the project navigation bar.
Management tasks
The following management tasks and information are accessed by selecting Manage from the project navigation bar.
Model Training Status: Displays project statuses and allows you to export the model being trained.
Model: The status of the model being trained.
Project: The reconciliation status. When reconciled, the latest model is current with all adjudicated samples.
Export model: This button downloads the model trained from the annotations in the project. This file can then be loaded into Analytics Server in your production environment to deploy the model. The option is disabled while the model is actively training and being written to disk. It will become enabled once the model is ready for export, which is approximately 10 minutes after the last annotations.
Exported Versions: A list of projects exported. You can download or delete the export files from here. This section is only visible when there is at least one exported project.
Users: This section allows you to add and remove annotators and adjudicators from the project. You can also see how many samples have been assigned to each annotator, as well as how many they have completed.
Documents: A list of all uploaded documents along with assigned annotators and annotation statistics. For each document you can copy the Doc ID, view the original document, rename the document, reassign annotators and adjudicators, or delete the document from the project. You can also edit annotator and adjudicator assignment on a project level by selecting Annotator assignment or Adjudicator assignment at the top of the Documents panel.
Clear Annotations: Remove all annotations from one or more annotators for a selected entity type. You can use this feature to remove the work of annotators who have very low agreement with other annotators from the project. For more information on annotator agreement and its importance to model training, see Inter-annotator agreement.
Note
Clearing annotations via the Manage page changes the status of all affected samples to unannotated.
Guidelines File: Add the URL of your written annotation or other project guidelines. The guidelines can be in any format, such as google doc, pdf, or html page. The guidelines should be available to all users of the Studio. The url should include the full web address, including
http/https.
Add users to existing project
Before you can add a user to a project, they must be created in the system and added to the project. If the user already exists in the system, skip step 1.
Before assigning the user to documents, add them to the system.
In the Manage page, add users in the Users panel by selecting Add/edit roles and permissions.
Assign documents to the new users in the Documents panel.
Assign users by project
Note
Before you can assign tasks to a user, they must be in the system and added to the project.
For projects containing a large volume of annotators and documents, it is easiest to edit user assignments on a project level. For example, if you want to add a new annotator to a project after many documents have already been added, you can use this feature to quickly assign all documents to that annotator.
Select Annotator assignment or Adjudicator assignment at the top of the Documents panel.
Select/deselect a checkbox to assign the corresponding document to that user.
Select Assign all or Unassign all in the rightmost column of a document's row to cycle between assigning and unassigning all users for that document.
Select the checkbox by a user's name to cycle between assigning and unassigning all documents for that user, including documents on other pages of the table.
Save your changes.
Note
If you want to discard your changes, you can select Back to return to the Manage screen without making your changes effective.
Assign users by document
Note
A user must be added to the project as an annotator before they can be added to a document as an annotator.
A user must be added to the project as an adjudicator before they can be added to a document as an adjudicator.
You can add or delete user assignments by editing a document. This impacts just the selected document.
Select the pencil icon in the Action column for the desired document in the Documents panel.
Select annotators.
Select an adjudicator. Each document can only have 1 adjudicator.
Save.
Export models
Note
If using Chrome, you must disable popup blocking to allow multiple files to download.
Once a model has been trained, you can move it from the training server to your production instance of Analytics Server. The trained models are used by Analytics Server endpoints.
Tip
The models trained to perform entity extraction are consumed by the entities endpoint.
To export a model:
Open the project that trained the model you are interested in.
Select Manage from the project navigation bar.
From the Model Training Status block, select Export Model.
Tip
If Export Model is not enabled, the model is not ready to be exported.
The trained model will download to your machine.
Note
Samples with tentative transactors are not used for training. If you try to export a model that contains tentative extractors, a message will appear warning you that the model contains tentative extractors.
Two files are downloaded when the model is exported. The model name is part of the file name for both files.
The model file. This is the file that gets uploaded to the production server.
An information file with information about the model. This is a json text file.
Files:
model.6178335ba1695d93f64553fe-20211122_11_39_09-LE.bin
model.6178335ba1695d93f64553fe-20211122_11_39_09-LE.bin.export-info
Info File:
{
  "export_time": "2021-11-15 11:37:49",
  "language": "eng",
  "labels": [
    {
      "type": "PERSON",
      "label": "Person"
    },
    {
      "type": "LOCATION",
      "label": "Location"
    },
    {
      "type": "ORGANIZATION",
      "label": "Organization"
    },
    {
      "type": "TITLE",
      "label": "Title"
    },
    {
      "type": "PRODUCT",
      "label": "Product"
    }
  ],
  "training_count": 795,
  "eval_count": 75,
  "scores": {
    "precision": 1,
    "recall": 1,
    "f1": 1
  }
}
Complete NER scores will be available in a future release.
Export project and extract ADMs
From the project menu, you can export a project or extract ADMs. The annotated data model (ADM) is a format used to represent the objects in a model.
Export: Exports a project to the server as a zip file. This file can then be used to reload the project to the same or a new instance of the studio. The directories in the zip file are:
model: The trained model.
adjudicated: The sample files with associated adjudications and adjudication data.
annotations: The sample files with associated annotations and annotation data.
project: ADM files for each sample in the project.
documents: The sample documents.
project-info.json: a json text file containing information about the project.
Select Export from the project menu. The .zip file can be downloaded from the Exported Versions table in the Manage page.
Extract ADMs: Exports to the server a zip file containing all annotated and adjudicated samples in json ADM format. Each annotator's work is in a separate directory.
Select Extract ADMs from the project menu. The .zip file can be downloaded from the Exported Versions table in the Manage page.
Reports and metrics
Note
You must be registered as a manager.
The macro precision, recall, and F1 measure for a project is displayed on the project dashboard. Reports provide additional detail about the model and annotation progress.
Reports
Reports provide information to project managers pertaining to the quantity and quality of the data being created by annotators and adjudicators. When training a model, it is critical to have the correct volume and distribution of high-quality data. Only managers have access to reports.
Annotation/Adjudication: Shows the distribution of annotations and adjudications among all labels. Select Download CSV to download the data.
Annotation progress: Displays the number of annotations per label. The top row displays the total number of annotations for each label in parentheses next to the label name. Use these numbers to monitor how balanced your data set is. For example, if you are training a model to retrieve location entities, you should use this report to make sure there is a significant number of location annotations.
Adjudication progress: Displays the number of adjudications per label.
Adjudicator progress: Displays the number of adjudicated samples for each adjudicator. This is useful for project managers who want to measure the progress and speed of adjudicators.
Inter-Annotator Agreement: Shows Krippendorff's Alpha for all annotators and for each pair of annotators. Krippendorff's Alpha is a number between -1.0 and 1.0 that quantifies how much annotators agreed with each other. A higher score indicates higher agreement and therefore better data. This score should ideally be 0.80 or greater.
IAA History: Displays inter-annotator agreement for all annotators (represented by Krippendorff's Alpha on the y-axis) over time (represented by day on the x-axis). Hover your cursor over the data point for each day to see the Krippendorff's Alpha for each pair of annotators for that day. Ideally, IAA should increase at the beginning as initial points of disagreement are resolved, and then level off as annotators improve and approach a consistently high level of agreement.
Precision, recall, and F1 measure
Most NLP tools are evaluated based on their precision and recall. Accuracy is measured as a combination of precision, recall, and F1 measure.
Precision answers the question "of the answers you found, what percentage were correct?" Precision is sensitive to false positives; higher is more precise.
Recall answers the question "of all possible correct answers, what percentage did you find?" Recall is sensitive to false negatives; higher is better recall.
F1 measure is the harmonic mean of precision and recall. The F1 measure is sensitive to both false positives and false negatives; a higher value means better accuracy. It isn't quite an average of the two scores, as it penalizes the case where the precision or recall scores are far apart. For example, if the system finds 10 answers that are correct (high precision), but misses 1,000 correct answers (low recall), you wouldn't want the F1 measure to be misleadingly high.
The correct measure depends on your application. In applications where you can only handle a few responses, such as voice applications (e.g. Amazon's Alexa), high precision with low recall is ideal, because the system can only present the user with a few options in a reasonable time frame. However, other applications, such as redacting text to remove personally identifiable information, redacting too much (low precision) is much better than missing even one item that should have been redacted. In that case, high recall is preferred.
Notice
The precision, recall, and F1 measures are based only on the samples in the validation set. The values are not calculated for the training set samples.
The values displayed on the project dashboard are calculated using the annotated validation data as the gold data. As the model is trained, it generates new predictions and the scores are recalculated. The predictions generated by the model for the validation samples are compared with the annotated values in the samples.
Calculating precision, recall, and f-scores
Let's look at how precision, recall, and f-score are calculated. Let's assume a search system, where a number of items were retrieved.
TP: True positive. A correctly extracted entity.
FP: False positive. An incorrectly extracted entity.
FN: False negative. Number of entities that should have been extracted, but weren't.
Retrieved: All entities retrieved = TP + FP
Relevant: All entities that should have been retrieved = TP + FN
Precision is the fraction of correct retrievals among all retrieved instances.
Recall is the fraction of relevant entities that are successfully retrieved.
F-score is the harmonic mean of precision and recall
Averages
The project dashboard displays precision, recall, and F1 measures for the labels. There are several ways of calculating these scores across multiple labels.
An important concept here is support: the frequency of a label in the dataset.
Macro Average: The macro average for precision and recall is an unweighted average of the per-label precision and recall scores. The macro F1 is the harmonic mean of the macro precision and macro recall scores. All labels contribute equally to the average.
Weighted Average: The average of the metric for all classes, weighted by their support. The most frequent label will have the greatest impact on the average, while less frequent labels will impact the score less. Weighted metrics assume that labels with fewer samples are less important.
Named entity recognition models are trained to recognize and extract entity mentions. Each annotated sample may contain multiple entities.
The statistics displayed on the project dashboard are the macro averages of the precision, recall, and F1 measures for the labels.
Inter-annotator agreement
Note
You must be registered as a manager.
Machine-learning models are completely dependent on the quality of the data used for training. Inconsistent annotation or lack of adherence to the project annotation guidelines will lead to less accurate models. Especially when starting a new project or on-boarding new human annotators, check for reliable annotations by having a subset of data annotated in parallel by multiple human annotators.
Krippendorff’s alpha is a statistical inter-rater reliability metric used to measure inter-annotator agreement. Krippendorff’s alpha scores range from -1.0 to 1.0 with 1.0 indicating perfect agreement between annotators. A score of 0.0 indicates agreement no better than random chance (as if your annotators picked their labels randomly out of a hat). A reliability score of 0.80 or greater is generally considered sufficient (though, the higher the better). Lower scores may indicate potential issues with your data, your annotation guidelines, or your annotators’ understanding of the task. A low level of inter-annotator agreement will ultimately lead to a less accurate model, so we recommend repeatedly measuring the reliability of your annotators until they achieve a satisfactory level of agreement. The cases where annotators disagree are usually good examples to include in your annotation guidelines. It can be useful to have a discussion about points of disagreement with your annotators as a group to reach a consensus.
The IAA history report displays the progress of the inter-annotator agreement over time.
Event projects
Event schema
Important
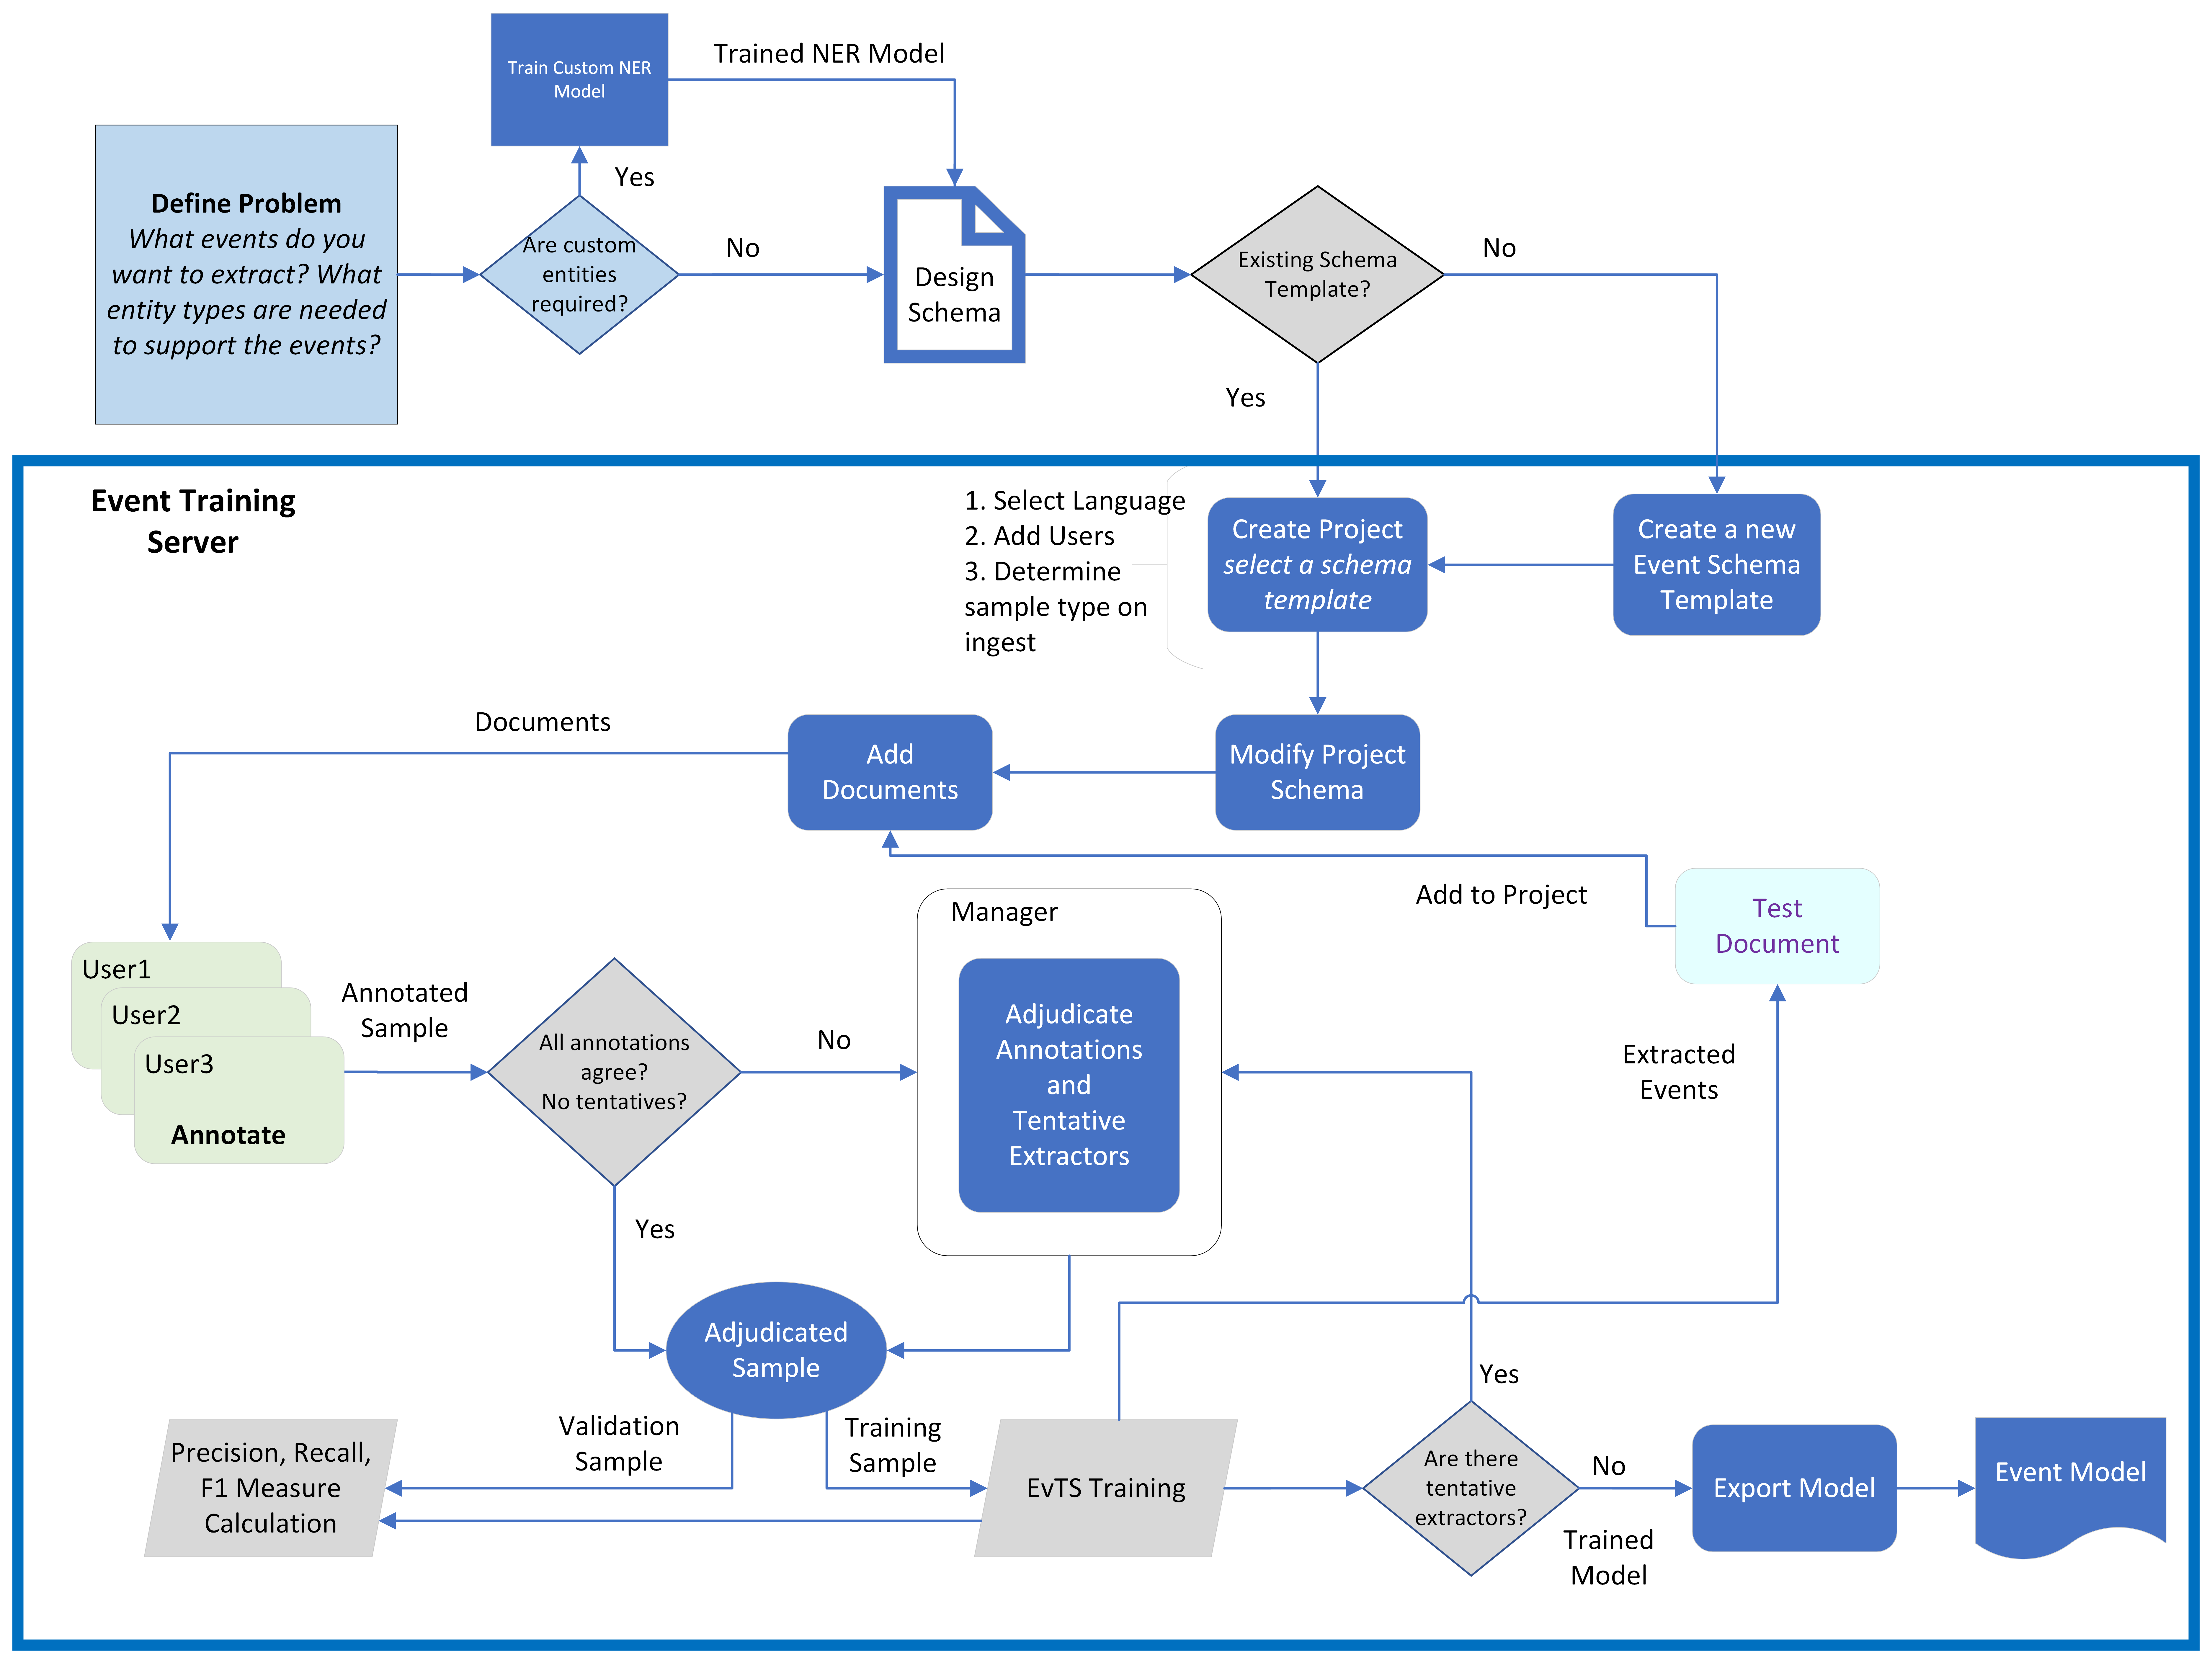
The event schema is created before starting annotation and should be carefully designed by a model architect. Refer to the Developing Models guide for a detailed explanation of events and how to design your schema for event extraction.
An event model is trained to extract specific types of event mentions. Before starting any type of event recognition project, you must identify the types of event mentions you want to extract and then define the structure or schema of each event type. Plan on spending a good amount of time and effort defining your event types and the schema for each type before beginning a project.
Tutorial
Event modeling can be complex. To help you learn about event modeling, look for tutorials on our support site. Events tutorials guide you through creating a schema and annotating data. They include sample data and basic annotation guidelines.
Schema types
There are two types of event schema, they both contain the same objects and definitions. The difference is whether the schema is attached to a project.
Schema templates
A schema template is a reusable set of event types, roles, role types, and extractors and is not associated with a project.
Accessed from the Manage option on the top navigation bar.
Project schema
The project schema is associated with one and only one project. This schema may be modified as documents are annotated. The changes will be for that project only.
Accessed from the Project Schema option on the project dashboard.
Important
Changes made to a project schema do not modify the template the schema was created from. Changes are made to the project only.
Events schema template
To use the schema editor to create a template schema, select Manage from the top navigation bar. Then select Create under Event Schema Template.
Note
You must be a manager or superuser.
You can create a schema from nothing, or modify an existing schema as a starting point. The schema created in this dialogue should be considered a template for an events project. When you create a project, the project schema will use the template.
Any updates to the project schema will modify the project version only; the template will not be changed. The same template can be used by multiple projects, each of which will have its own version.
Once complete, Save the schema definition. You can then use the schema template in a project. To modify a project schema, select Project Schema from the project dashboard options.
Modify an existing schema
Schemas already defined may contain event types, roles, role types, and/or extractors which you'd like to use in a new schema template. You can take some or all of the objects in an existing schema template and create a new template. You can also import a .json file definition of an existing schema.
From the top navigation bar, select Manage then select Modify from the Event Schema Template section.
Select an existing schema.
Select a schema from the list in the Existing schemas box. The objects in the schema will be displayed in the Preview box.
At the bottom of the screen, choose which elements from the schema you would like in your new schema. Select Everything to edit the entire schema or Let me select to choose a subset of schema objects to use.
Next.
Select the objects you want to import. If you selected Everything, all objects will be selected. You can modify your choices at this time.
Load.
Complete defining the schema. If you want to retain the original schema, modify the schema name in the General Information section. Otherwise, you will overwrite the original schema template definition.
Project schema
When you create a new project, you must select a template schema for the project. This template could contain general extractors and role types that your organization is using for event extraction. It may also contain event types and roles for your project.
Once the schema template has been associated with the project, you can modify it by selecting Project Schema from the project dashboard menu. The project schema is a copy of the schema template which is now associated with the project.
Once annotation has begun, you cannot change or delete any event types, key phrases, or role types which have been used in annotation. You can add new event types, key phrases, and role types. You can delete objects which have not been used. But once used in annotation, most changes are not permitted. The one permitted change is to add a new extractor to a key phrase or role type.
Important
Changes made to a project schema do not modify the template the schema was created from. Changes are made to the project only.
Define the schema
Both the schema template and project schema use the same dialog to define and configure the schema.
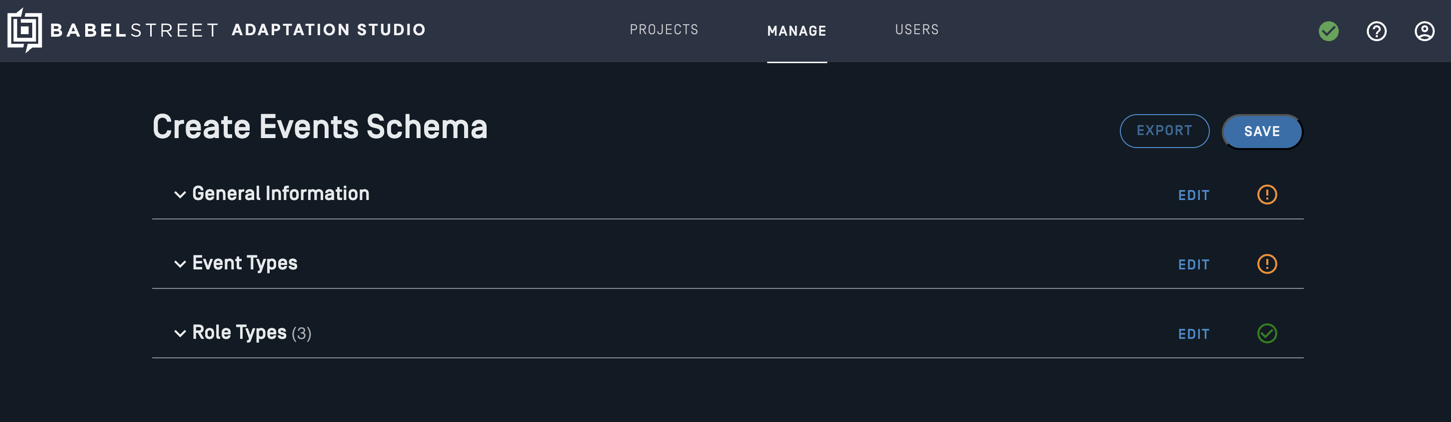
The schema definition is broken up into 3 sections:
General information
Event Types
Role Types
Once the objects in a section are defined completely, the indicator in the right corner will change to a green checkmark.
General information
Each schema is identified by a unique name. When creating schemas, you can assign them to a category. Categories organize schemas and can make it easier to locate a particular schema.
Schema template: If you import an existing template, the name will default to the name of the imported schema.
If you are modifying an existing schema template, you can use the same name.
If you are creating a new schema template by importing an existing template, you must change the name.
Project schema: The name will default to the name of the template selected when creating the project. You may want to change the name to reflect the project.
Each schema template has a profile id attached to it. The profile id specifies a custom entity extraction model, allowing entity extractors to use custom entity types. The drop-down list box lists all custom profiles available on Analytics Server. If you do not have custom entities and are not using a custom profile, select default.
Note
Any models, gazetteers, and regular expressions used when training a model must also be used when performing event extraction. Use the same custom profile to configure Entity Extractor for model training and event extraction. The custom profile is set in the schema definition for event model training.
A schema is for one and only one language. Select the language from the drop-down list box.
Event types
The first task in defining your event schema is defining the set of event types you want to recognize. When extracting events, you don't extract all possible event types; you only extract the event types of interest. It's important to recognize which sorts of events are significant and will be mentioned frequently in your domain. Consider the set of entities and events that are going to be mentioned in the documents you will be analyzing. The goal is to train a model to extract only the event types that are meaningful to your operation.
The defined schema can support multiple event types. For example, if you're analyzing travel blogs, you may want to identify airline and hotel events.
Each event type has one or more key phrases, a word in the text that evokes the given event type. Event extractor uses key phrases to identify candidate event mentions from the text.
Key phrases are case-insensitive and related words are matched. For example, if the key phrase is fly, it will match fly, flying, and flies. The extractor for a key phrase is defined as a morphological extractor. Words of any case, with the same lemma as the key phrase, are considered a match.
Event mentions also include roles, that is, the people, places, times, and other mentions which add detail to the event mention. For a flying event, with a key phrase of flew, you may want to know who flew. Where did they go? The flyer and destination are roles for the event type. For each role, the role type must be defined.
Select Add Event Type.
Add an event type name. This is the label displayed when annotating data.
Add key phrases.
Add the roles with the corresponding role type.
Enter a name for the role. This is the label displayed when annotating data.
Select a role type from the drop-down menu or add a new role type.
Check the Required box if the role type must exist in an event mention for that event type.
Determining events and key phrases
It can be difficult to define when you need to separate the events you are trying to extract into different event types. Some events might be very similar, but the roles in the event have different perspectives to the key phrase. In this case, you will want to create separate event types. Otherwise, the model may have difficulty determining the correct roles.
For example, let's consider a Commerce event for buying and selling show tickets. One way to model this would be to create a purchase event that includes both buying and selling.
Event: commerce event
Key Phrases: buy, obtain, sell, distribute
Roles: buyer, seller, show
Let's consider a couple of events:
James[buyer] bought a ticket from Ticketmaster[seller] to see Les Mis[show].
James[seller] sold his ticket to Les Mis[show] to Jane[buyer].
In these examples, the model will have difficulty identifying correctly the buyer and the seller if they are the same event type. The event model cannot distinguish the different perspectives the roles may have based on the key phrase; all key phrases in a single event type are expected to have the same relationship to the roles.
Therefore, we strongly recommend that when key phrases have different relationships to the roles, they should be separated into separate event types.
Event: buying event
Key Phrases: buy, obtain
Roles: buyer, seller, show
Event: selling event
Key Phrases: sell, distribute
Roles: buyer, seller, show
A similar example would be the events entering and exiting. While they may have the same roles (person, from location, to location, time), the perspective of the person to the locations is different for each key phrase.
Required roles
A role can be required or optional. If required, an event mention will not be extracted without the role. You should only mark a role as required if it must always be in the event mention. Let's look at some examples for a flight scenario.
Bob flew from Boston to Los Angeles on Wednesday.
The key phrase and roles are:
Key phrase: flew
Roles: origin, destination, when
Let's assume the destination is marked as required in the schema definition. In this case, only one of the following event mentions will be extracted.
Bob flew to Los Angeles.
Bob's flew from Boston on Wednesday.
The second event mention will not be extracted, since it does not contain the required role, even if it is annotated.
Role types
Role types are generic categories, while role mentions are specific instances of those categories. Extractors define the specific rules to extract the role candidates. Extractors are combined into role types.
Role types define the rules that are used to identify a piece of text as a candidate for a specific role or key phrase. A role type is made up of one or more extractors and is reusable.
Multiple extractors can be included in a role type definition. They are combined as a union - all possible candidates extracted are included.
To define a role type and assign extractors:
Select Configure.
Each role type must have a unique name.
Select one or more extractors for this role type.
The green check mark indicates all extractors are configured.
Extractors
Model Training Suite has multiple techniques to identify candidate key phrases and roles in text. For example, it can match a list of words, or it can match all the lemmas for a given word. Using Entity Extractor, it can identify entity mentions of specific entity types. Extractors define the rules and techniques used to identify role and key phrase candidates in the text. While any extractor type can be used to define roles, only morphological extractors can be used to identify key phrase candidates.
Once defined, extractors are reusable in multiple schemas. An extractor named location may be defined as the standard entity type Location. It could be used in troop_movement events as well as travel events, as each of them have roles involving locations.
The currently supported extractor types are:
Entity: A list of entity types. You can use the standard, pre-defined entity types or train a custom model to extract other entity types. The custom model must be loaded in Server to define an entity extractor with custom entity types.
Semantic: A list of words or phrases. Any word whose meaning is similar to one of these words will match. For example, an extractor of meeting will match assembly, gathering, conclave. Word vector similarity is used to identify similar words. While a semantic extractor can be defined by a phrase, it will only identify single words as candidate roles.
Morphological: A list of words. When a word is added to this list, it is immediately converted to and stored as its lemma. Words with the same lemmatization will match. For example, a morphological extractor for go will match going, went, goes, gone.This is the only extractor type valid for key phrases.
Exact: a list of words or phrases. Exact will match any words on the list, whether they are identified as entity types or not. For example, you could have a list of common modes of transportation, including armored personnel carrier and specific types of tanks.
Save the schema
Once complete, Save the schema definition. Each section must have a green checkmark indicating that it is complete.
Event Schema Template: if you've imported an existing schema and have not changed the name, you will see a message that the schema will be overwritten.
If you are modifying an existing schema template, select Continue to save the template.
If you are creating a new schema, you must change the name before saving. Select Cancel, modify the name, then Save.
Project Schema: You can keep the original (template) name or modify it. The project schema is not linked back to the original template. Each project has one and only one schema associated with it.
Important
Changes made to a project schema do not modify the template the schema was created from. Changes are made to the project only.
New project
Note
You must be registered as a manager.
The options to create a project are on the Manage menu on the top navigation bar. There are two options to create a new project:
Create: Start from a template.
Import: Import an existing project from an export file. This will import all settings, samples, and annotations. You can choose to import only annotated samples.
Create an events project
Note
You must be registered as a manager.
Select Manage then Create in the top navigation bar.
Enter a name for the project. Choose a name that will be meaningful to you and your annotation team.
Select the Events-Rosette template type from the drop-down menu. The templates are predefined and customized for each type of project.
Add annotators and adjudicators to the project. Select Add/edit roles and permissions to select from the users in the system. Users must be added to the system before you can add them to a project.
Configure the project. Each template type has its own set of configuration options.
Select Create. Your new project appears in the project list.
Before starting annotation, modify the project schema.
Events-Rosette options
Note
At least one template schema must exist before you can create a new event project.
The Events-Rosette template is for annotating documents to train models for entity extraction with Analytics Server.
Model language: The language of the samples.
Initial schema template: Select a schema template from the drop-down list box. Once the project has been created, you modify the schema by selecting Project Schema from the project dashboard menu.
Use Indoc Coref Server: Select if the indocument coreference server is installed and should be used to identify potential entity mentions.
Minimum number to trigger training: By default, each annotated and adjudicated sample triggers model training. You can set how many samples must be completed before triggering training. Default: 1.
Minimum number of seconds to trigger training: Training will be triggered after this time threshold, even if the sample threshold has not been met. Default: 60.
Semantic extractor match threshold: The higher the value, the fewer candidates will be identified by a semantic extractor. You may want to experiment with different values to find the right value for your data. Default (0.65)
Show token boundaries: When enabled, each unannotated span is underlined to make it easier to see the token spans. This option only affects the presentation of the text samples. This option is disabled by default.
Mouse full token selection: When enabled, selecting part of a token causes the entire token to be selected. This option is enabled by default.
Sample type on Ingest: Determines how documents will be divided into samples for annotation after being uploaded.
Sentence: Each sentence in a document becomes a sample. This is a good choice for event models if the entire event is contained within a single sentence.
Paragraph: When a section of text in a document is separated from surrounding text by empty rows, that section becomes its own sample. This can be a good choice for events projects, since events can span multiple sentences. It also ensures annotators have a reasonable number of natural stopping points.
Document: Each document is its own sample. This is sometimes a good choice for events projects, since events can span multiple sentences and it ensures annotators have the complete context for each document. However, very large documents can be difficult to manage. We recommend using Paragraph or Sentence if possible with your input data.
Tip
If events training document size exceeds 2000 characters, select Sentence or Paragraph sample type. Large documents will impact performance.
Sample ingest ratio: When you add documents, you can select the ratio used by auto-split to automatically assign documents to either the training or the validation set. The training documents are used to train the model. The validation set is used to evaluate the performance of the model and calculate the precision, recall, and F1 measure for the model. For event models, you may want to use fewer training documents relative to the validation set. You can change the ratio by selecting a different value from the drop-down list.
Hide eval predictions: When enabled, Adaptation Studio suppresses annotation suggestions on the samples in the evaluation set to avoid biasing the human annotators. This option only affects suggestions for samples in the evaluation set; Adaptation Studio still displays suggestions for samples in the training set if this option is enabled. This option is disabled by default.
Prioritize partially annotated docs: When enabled, Adaptation Studio prioritizes the samples presented for annotation such that full documents are completely annotated. This option is disabled by default.
In-line annotation tags: The annotation labels are displayed next to the selected span. If not checked, the labels are displayed above or below the span.
Auto project backup limit: Each version saved for a project requires resources. This option is set to 5 by default.
Import a project
Note
You must be registered as a manager.
To import a project, you must have an exported project file.
Select Import Project in the side navigation bar.
Drop the desired project file into the field that appears, or select Browse to select it manually and select Open.
It may take a few minutes for an imported project to appear in the Project list, especially if it is a large project. The imported project will only be visible in the Project list to superusers and users assigned to the project.
Note
If a user on an exported project does not exist on the destination server, that user is created on the new server when the project is imported.
The project owner is created on the new server as a manager.
Any adjudicators are created on the new server as adjudicators.
Any other users are created on the new server as annotators.
Users added in this fashion are unable to log into the new server until an admin manually sets their password via the User Management option on the top navigation bar.
Add documents
Note
You must be registered as a manager.
Tip
Uploading a large set of documents can be very time-intensive. Packaging the documents into a zip file will greatly improve upload speed.
Event Models
Most event models perform well with fewer samples (~100). 800 document samples is the recommended maximum of training samples for an event model. Adding additional samples will result in decreased performance.
Select Projects from the top navigation bar to display the projects you have access to.
Select the desired project.
Select Add Document from the project navigation bar.
Add one or more documents.
Upload files into the project. These files should be text or .adm files. You can also upload zip archives containing a collection of files.
Type or cut/paste text into the Document text box.
(Optional) Assign annotators. By default, each added document will be assigned to all annotators currently assigned to the project. If you add annotators to the project later, they will not automatically be given documents that were added earlier.
Add the documents into the project and select whether the document(s) will be used for training or validation.
Add for training: Documents used to train the model.
Add for validation: Gold data used to test the model's accuracy.
Add (auto-split): Automatically assign documents to the training and validation sets.
Note
You can change the project auto-split training/validation ratio by selecting a new ratio from the drop-down. Once you add the documents, the default ratio for the project will be changed.
To view the documents added to the project:
Select Manage from the action bar.
Scroll down to the Documents panel. If any documents appear to be missing, verify that they were unique. Identical documents are merged during the upload.
Annotate events
Event mentions in text have multiple components with nuanced relationships to each other, making annotating events much more complex than annotating for named entity recognition and extraction. The schema must be defined before starting annotation.
Event annotation is a two-step process:
Identify and label the key phrase. This identifies the event type.
Identify and label the roles. The set of potential roles depends on the event type.
Annotators will annotate one sample at a time. The size of each sample is determined by the Sample type on Ingest configuration setting during project creation.
Note
Once the project has been created, the sample type on ingest setting cannot be changed.
Note
These instructions are for the Annotate option on the project navigation bar. You can also annotate directly from the View Annotations page.
Select Annotate in the project navigation bar to start annotating. From the start, candidate annotations are displayed based on the extractors defined in the system. Each time you annotate a sample, the model is trained if there are no conflicting annotations. If the model can identify an event, candidate annotations will be shown. At the minimum, the key phrase will be labeled. Roles may also be identified.
To annotate a sample where a candidate event type is identified:
The key and any candidate role mentions will be identified. Mouse over a key phrase or candidate role to see the labels.
Note
If you are using a custom entity model to extract roles and Adaptation Studio is not identifying any candidate role mentions, make sure the model is loaded in Analytics Server.
Select Annotate to accept the candidates as presented. Otherwise, proceed to step 3.
To clear an incorrect tag, click on the token and use the x to clear the tag.
To mark a new role, select the mention and then select the role type from the list.
Select Annotate once you are satisfied that the event mention is correctly annotated.
If no event mention was identified, you can create one:
Select the key phrase. Select the event type from the displayed list.
Potential role mentions may be identified with the entity type under the word. Select the role mention and select the role type from the list. You can select role mentions that don't have a listed entity type.
Select Annotate.
Note
To remove a role, select it and then select the x icon to the right of the role name. You can then add a new role.
Note
If the sample does not contain anything that should be annotated, you must still select Annotate so that the sample status is changed to annotated. This is a negative annotation; an example of when the key phrase does not identify an event.
Note
When a key phrase or role is not identified as a candidate, but is used as part of the annotation, the extractor is tentatively updated. A manager will review the tentative modifications and choose whether to make these changes a permanent part of the schema.
Other options are:
Unfocus event: Removes focus from all events. A sample may contain multiple events, but only one can be in focus at a time. This allows you to annotate another event.
Undo: Undo changes made in the sample.
Clear: Erase all tags and start afresh.
Note
If you clear annotations using this button, the sample status will remain as annotated. You must still select Annotate to save the sample with no annotations.
Discard sample: Remove the sample from annotation and training. Sometimes samples provide no value to the model; they are not good positive or negative examples. In that case, it can be helpful to discard the sample. The discard button is not available if the sample has been annotated by another user.
Skip: Skip this sample and annotate a different sample. The sample remains in the queue to be annotated.
Previous: Go back to a previously annotated sample from this session.
To move a sample between the validation and training sets, select the appropriate radio button.
Once you've created your data corpus and loaded the documents, at any point in the annotation process, you can review the corpus and the annotations. Select View Annotations to see a detailed view of your work.
Multiple event mentions in a single sample
A sample may contain multiple event mentions, but each mention must be annotated individually. Let's look at an example:
My flight to San Diego took 6 hours, but my flight back to Boston only took 5.
In this example, we're extracting flight events. The simplified schema includes:
Event types: flight, fly
Roles: origin, destination, when
There are 2 event mentions in the above sample:
flight from Boston to San Diego
flight from San Diego to Boston
Each event mention gets its own annotation.
Select the first
flight. It gets labeled askey. San Diego and Boston have location listed under them.
Select
San Diegoand label it asdestination.Unfocus event.
Select the 2nd
flightand flight_booking event.Select
Bostonand label it asdestination.Select
San Diegoand label it asorigin.Annotate.
Both event mention annotations will be saved.
Add comments to annotations
Comments allow you to pose questions or provide clarifications about the sample being edited to adjudicators and managers. Adjudicators and managers can view the comments for each sample via View Annotations. Comments do not affect model training in any way. To add a comment while annotating, follow these steps:
Select any annotation.
Select Add Comment.
Type desired text in the Comment field.
Select the green checkmark icon.
You can edit comments you have made by selecting the commented annotation and selecting Edit Comment. From here you can also delete the comment by selecting the trash can icon.
Adjudicate
Note
You must be registered as an adjudicator for the project.
Adjudication is the process of reviewing annotations that have disagreements and determining which is correct. If there are no disagreements between the annotators, the sample is marked as auto-adjudicated, accelerating the annotation process.
Adjudication comprises 2 distinct tasks:
Resolving differences in annotations between annotators.
Resolving tentative role types.
Adjudication can be initiated via View Annotations or directly from the project navigation bar. From the View Annotations page, select Adjudicate under a sample to navigate to the adjudication page.
When adjudicating, the annotations are displayed by user in the annotations table. The events are identified by key phrase.
After you adjudicate a sample, Adaptation Studio displays the next sample to adjudicate until there are no more samples requiring adjudication.
Samples are not sent to training until they are adjudicated, either by an adjudicator or auto-adjudicated.
The following actions are available:
Unfocus event: Removes focus from all events. A sample may contain multiple events, but only one can be in focus at a time. This allows you to annotate or adjudicate another event.
Undo: Undo your most recent annotation.
Skip: Proceed to another sample without adjudicating the current sample.
Previous: Return to the previous sample.
Adjudicate: Save all event annotations in the sample as adjudications.
Adjudicating annotator differences
The adjudication panel displays the sample with the selected event on the left side of the window and with the annotations by annotator on the right side of the window. The full paragraph is displayed below for context.
The annotations frame has the following columns:
Text: A keyphrase or role. The roles for a given event are listed under the key phrase.
Adjudicated: The selected correct value for the key phrase or role. If it is blank, none of the values were selected and the correct value is blank.
Done: Checked when differences between key phrases or roles have been adjudicated. When all annotators agree, the value is auto-adjudicated (checked by the system).
The remaining columns contain the annotations by annotator.
Event adjudication has multiple steps:
Compare the key phrase. Did all annotators agree? If one annotator did not annotate the key phrase, the cell in that user column will be blank. This indicates the user annotated the sample, but did not annotate that event.
Click on the arrow next to the keyword in the Events column to display the roles.
Annotate the sample to have the correct key phrase and roles.
If there are multiple events, select Unfocus event, and annotate the next sample.
Repeat for all events in the sample.
Select Adjudicate.
Review tentative role types
During annotation, an annotator may identify key phrases or role mentions that the event model has not identified as candidates. The annotator can label a key phrase or a role that was not suggested. The Studio then creates a tentative role type enabling the annotator to continue annotating documents.
At some point, the tentative role types must be reviewed and approved as part of the adjudication process. If the adjudicator Accepts the new role type, it is added to the schema and the extractor is modified. If it shouldn't have been defined, the adjudicator can Reject the tentative role type.
Tentatives are resolved as part of the adjudication process.
To review tentative role types:
Select Adjudicate from the project menu.
Click on the button labeled Resolve. Only tentative roles or key phrases will have a Resolve button next to them.
The resolution dialog will be displayed.
For roles, you can then choose what extractor should be modified, or choose not to modify any extractor.
Update the semantic-phrase extractor: The model will extract phrases with similar meaning. This is useful for cases in which the model did not recognize a phrase, such as "$2 million," and you want it to extract that and similar phrases from now on, such as "3 million" or "400 million."
Update the morphological extractor: The model will extract all forms of this phrase. For example, it would extract both singular and plural versions of the same noun.
Update the exact extractor: The model will extract other instances of this phrase exactly as it appears. This is useful for cases in which the model did not recognize a specific phrase, and you want it to extract that phrase from now on.
Do not modify extractors: Choose this if you do not want any extractor to be changed based on this instance of the role.
For key phrases, you can add the key phrase to the schema or reject the event.
Add the key phrase: Choose this if the key phrase is a valid mention of the event. A new key phrase will be added to the event type in the project schema.
Reject this event: Choose this if the key phrase is not a valid mention of the event.
Tentative extractors are useful for supplementing what is being extracted by the model. They can be used to fill in the "blind spots" of a model that is identifying some, but not all, of the desired phrases as candidate roles. However, if you find yourself making new exact entity extractors for almost every role, you likely need to train a new entity model.
Warning
Samples with tentative transactors are not used for training. If you try to export a model that contains tentative extractors, a message will appear warning you that the model contains tentative extractors.
Auto-adjudication
The annotations in Adaptation Studio are sent to the Event Training Server and provide the data for training a new model. Only adjudicated annotations are included in training. The system will auto-adjudicate samples.
The rules for auto adjudication are:
If only one annotator has annotated a sample, the work is assumed to be correct and adjudicated.
If multiple annotators have supplied identical annotations for a sample, the work is assumed to be correct and adjudicated.
If multiple annotators have supplied contradictory annotations for a sample, then it is marked as "needs adjudication". It is not supplied for training until it has been manually adjudicated.
If a sample contains tentative extractors, it is marked as "needs adjudication".
The system only considers work that has been completed by annotators. If additional annotators have been assigned to work on a document, but they have not completed their work yet, the samples may still be marked as adjudicated.
The system is an interactive environment. At any time, additional work can be done on a sample (a new annotator annotates the sample, an existing annotator revises their work). The modified sample replaces any earlier versions of the sample. Once adjudicated (manually or auto-adjudicated), it will be sent to training with the new annotations.
View annotations
Once you've created your data corpus and loaded the documents, at any point in the annotation process, you can review the corpus and the annotations. Select View Annotations to see a detailed view of your work.
View annotations provides a detailed view of annotations and adjudication. It consists of the Filters panel and the Sample list.
Filters panel
Select Filters on the View Annotations page to expand the Filters panel. To view the filter criteria, click on the down arrow to expand the section. The Filters panel allows you to select which samples to display in the sample list using the following criteria:
Annotated by
Allows adjudicators and managers to select which annotated samples to display based on who annotated them. If you select All selected annotators or Any selected annotators, select annotators with the drop-down menu above.
Samples annotated within a specific date range.
Assigned to
Allows adjudicators and managers to select which unannotated samples to display based on their assigned annotator(s). If you select All selected annotators or Any selected annotators, select annotators with the drop-down menu above.
Adjudication status
Select an adjudication status from the drop-down menu.
Additional filters
Only samples with comments.
Samples removed (discarded) from training and validation.
Samples containing specific terms within the sample text. The text field supports regular expression searches.
Samples with a specified doc id.
Samples from the training dataset.
Samples from the validation dataset.
Adjudicated samples based on the event(s) they are annotated with. The labels are selected from the drop-down box. Select one of:
All selected event.
One or more selected events.
No events.
Select Update results to filter the sample list so that it only displays samples with all chosen criteria.
Sample list
All samples in the project that match the applied filters are listed below the filters panel.
Each sample is displayed next to a table showing the events and roles selected by each annotator. If you are a project manager, this view is useful for identifying and inspecting multiple annotations at a time. Managers can also see any comments added by annotators on the rightmost column of the table.
The following are displayed below each sample:
The sample’s dataset (training or evaluation)
A link to view annotation predictions. Predictions are the tags suggested by the currently trained model.
Links to perform any available actions
Annotate: Review the annotation and, if desired, clear and modify the annotations.
Adjudicate: View and resolve annotation differences. This option is only available to adjudicators and managers.
Copy doc ID: Copy the Document ID to your clipboard.
Predicted text: The annotations suggested by the system.
Each event is identified down arrow (v) with the roles listed underneath. There may be multiple events listed in a single sample. You can expand or hide the roles for each event.
Test Document
Use this option to see how the current version of the model performs on text entered into the Test document box.
Type in the text.
Click on Test.
Click on the key phrase in the displayed annotation to see the roles.

Use the Add Document button to add the sample to the training set.
Event Negation
Note
The negation option is only available for English models.
The base event algorithm extracts events when a key phrase and any required role mentions are detected in the document. It does not recognize whether the event happened or didn't happen, also known as the polarity of the event. For example, in a travel event, the following two sentences will both be extracted by the key phrase "travel":
John[TRAVELER] traveled[KEYPHRASE] to London[DESTINATION].
Charles[TRAVELER] didn't travel[KEYPHRASE] to Paris[DESTINATION].
In the example above, "didn't" is an example of a negation cue. The existence of the cue signifies the event is negated.
You can choose to include or ignore negation in Test Document. The Negation option has 4 values:
Ignore: (default) Returns all events and the negation cue (didn't in the above example) isn't included in the response.
Both: Returns all events, positive and negative, with the negation cue included in the response.
Only positive: Returns only positive events. An empty negation cue may be included in the response.
Only negative: Returns only negative events; a negation cue will be returned.
This example shows the negation cue:

Manage
Note
You must be registered as a manager.
Manager options can be accessed from the Manage option on the project navigation bar.
Management tasks
The following management tasks and information are accessed by selecting Manage from the navigation bar.
Model Training Status: Displays project statuses and allows you to export the model being trained.
Model: The status of the model being trained.
Project: The reconciliation status. When reconciled, the latest model is current with all adjudicated samples that do not include tentative extractors.
Deploy model: Navigates to Deploy model page where you can deploy the trained model directly to your production version of Analytics Server. The model must be trained and ready for export.
Export model: This button downloads the model trained from the annotations in the project. This file can then be loaded into Analytics Server in your production environment to deploy the model. The option is disabled while the model is actively training and being written to disk. It will become enabled once the model is ready for export, which is approximately 10 minutes after the last annotations.
Tentative extractors should be resolved before deploying or exporting an event model.
Note
Samples with tentative transactors are not used for training. If you try to export a model that contains tentative extractors, a message will appear warning you that the model contains tentative extractors.
Exported Versions: A list of projects exported. You can download or delete the export files from here. This section is only visible when there is at least one exported project.
Users: This section allows you to add and remove annotators and adjudicators from the project. You can also see how many samples have been assigned to each annotator, as well as how many they have completed.
Documents: A list of all uploaded documents along with assigned annotators and annotation statistics. For each document you can copy the Doc ID, view the original document, rename the document, reassign annotators and adjudicators, or delete the document from the project. You can also edit annotator and adjudicator assignments on a project level.
Clear Annotations: Remove all annotations from one or more annotators for a selected event.
Note
Clearing annotations via the Manage page changes the status of all affected samples to unannotated.
Guidelines File: Add the URL of your written annotation or other project guidelines. The guidelines can be in any format, such as google doc, pdf, or html page. The guidelines should be available to all users of the Studio. The url should include the full web address, including
http/https.
Add users to existing project
Before you can add a user to a project, they must be created in the system and added to the project. If the user already exists in the system, skip step 1.
Before assigning the user to documents, add them to the system.
In the Manage page, add users in the Users panel by selecting Add/edit roles and permissions.
Assign documents to the new users in the Documents panel.
Assign users by project
Note
Before you can assign tasks to a user, they must be in the system and added to the project.
For projects containing a large volume of annotators and documents, it is easiest to edit user assignments on a project level. For example, if you want to add a new annotator to a project after many documents have already been added, you can use this feature to quickly assign all documents to that annotator.
Select Annotator assignment or Adjudicator assignment at the top of the Documents panel.
Select/deselect a checkbox to assign the corresponding document to that user.
Select Assign all or Unassign all in the rightmost column of a document's row to cycle between assigning and unassigning all users for that document.
Select the checkbox by a user's name to cycle between assigning and unassigning all documents for that user, including documents on other pages of the table.
Save your changes.
Note
If you want to discard your changes, you can select Back to return to the Manage screen without making your changes effective.
Assign users by document
Note
A user must be added to the project as an annotator before they can be added to a document as an annotator.
You can add or delete user assignments by editing a document. This impacts just the selected document.
Select the pencil icon in the Action column for the desired document in the Documents panel.
Select annotators.
Save.
Export project and extract ADMs
From the project menu, you can export a project or extract ADMs. The annotated data model (ADM) is a format used to represent the objects in a model.
Export: Exports a project to the server as a zip file. This file can then be used to reload the project to the same or a new instance of the studio. The directories in the zip file are:
model: The trained model.
adjudicated: The sample files with associated adjudications and adjudication data.
annotations: The sample files with associated annotations and annotation data.
project: ADM files for each sample in the project.
documents: The sample documents.
project-info.json: a json text file containing information about the project.
Select Export from the project menu. The .zip file can be downloaded from the Exported Versions table in the Manage page.
Extract ADMs: Exports to the server a zip file containing all annotated and adjudicated samples in json ADM format. Each annotator's work is in a separate directory.
Select Extract ADMs from the project menu. The .zip file can be downloaded from the Exported Versions table in the Manage page.
Export models
Note
If using Chrome, you must disable popup blocking to allow multiple files to download.
Once a model has been trained, you can move it from the training server to your production instance of Analytics Server. The trained models are used by Analytics Server endpoints.
Tip
The models trained to perform event extraction are consumed by the events endpoint.
To export a model:
Open the project that trained the model you are interested in.
Select Manage from the project navigation bar.
From the Model Training Status block, select Export Model.
Tip
If Export Model is not enabled, the model is not ready to be exported.
The trained model will download to your machine.
Note
Samples with tentative transactors are not used for training. If you try to export a model that contains tentative extractors, a message will appear warning you that the model contains tentative extractors.
Two files are downloaded when the model is exported. The model name is part of the file name for both files.
The
ets-modelfile. This is the file that gets uploaded to the production server.An information file with information about the model. This is a json text file.
Files:
ets-model.616d2e0c5718dde327bfc11f-20211122_11_38_46-LE.ets-model
ets-model.616d2e0c5718dde327bfc11f-20211122_11_38_46-LE.ets-model.export-info
Info File:
{
  "export_time": "2021-11-18 08:17:53",
  "language": "eng",
  "labels": [
    {
      "type": "key",
      "label": "flight_booking"
    },
    {
      "type": "origin",
      "label": "origin"
    },
    {
      "type": "when",
      "label": "when"
    },
    {
      "type": "destination",
      "label": "destination"
    }
  ],
  "training_count": 59,
  "eval_count": 56,
  "scores": {
    "precision": 0.4,
    "recall": 0.47058823529411764,
    "f1": 0.4324324324324324
  }
}
Deploy events model
Adaptation Studio is the training platform for training event models. To use the model in production, the trained model must be copied to the production instance of Analytics Server. There are two ways to deploy an events model to productions:
Export model: Export the model. Then, using the command line, copy it to the production server.
Deploy model: Configure and automatically deploy a model to the production server.
Requirements
The training and production servers must be on the same network.
Only a manager or superuser can deploy a model to the production server.
Only one server can be configured for a project at a time.
The deployment server and model are configured for each project.
From the Manage screen, select Deploy model.
Select a server from the Server drop-down menu. Only a single server can be configured for a project.
Define the name for the destination model. Choose a meaningful name that indicates what kind of events the model is extracting.
(Optional) Add an app id and/or customer id the model. These will be appended to the model name:
{cust_id}:{app_id}:{workspace_id}.If you want the model to overwrite any existing model from this project, move the slider to Yes for Overwrite exiting model.
Reports
Reports provide information to project managers pertaining to the quantity and quality of the data being created by annotators and adjudicators. When training a model, it is critical to have the correct volume and distribution of high-quality data. Only managers have access to reports.
For events, there are the following types of reports
Annotation/Adjudication: Reports that measure the progress of the annotation effort.
Evaluation: Reports to provide insight into how the model is performing overall and by event type.
Inter-Annotator Agreement: Reports that show the relative agreement among annotators, a strong indicator of the quality of the annotations.
Annotation/Adjudication reports
Shows the distribution of annotations and adjudications among all event types. Select Download CSV to download the data.
Annotation progress: Displays the number of annotations per event type. The top row displays the total number of annotations for each event type in parentheses next to the name. You can use these numbers to monitor how balanced your data set is.
Adjudication progress: Displays the number of adjudications per label.
Adjudicator progress: Displays the number of adjudicated samples for each adjudicator. This is useful for project managers who want to measure the progress and speed of adjudicators.
Evaluation reports
The Evaluation section includes two options: Event Detection and Event Extraction.
Event Detection refers to the model's ability to identify an event. It does not concern the event roles, only the key phrase. The Detection Scores (Overall) table shows you the model's performance in identifying each event. You can expand the Sample Breakdown section to compare the annotations and model predictions for each sample in the training set.
Tip
Remember, the samples in the evaluation set are the samples used by the model to calculate the evaluation metrics. If you have a very small evaluation set, you may see misleading values.
Event Extraction refers to the model's ability to identify all the roles in an event, including the key phrase. The Extraction Scores (Overall) table shows you the model's general ability to identify roles for each event. The Extraction Scores (Event Breakdown) tables go one step further by showing the model's performance in identifying each individual role. You can expand the Sample Breakdown section to compare the annotations and model predictions for each sample in the training set.
There are two other rows in the detection and extraction tables that merit some additional explanation: Model Macro and Model Weighted. Both of these provide a holistic, rather than event-specific, indication of the model's performance. The key difference is how much each event is weighted when the average is calculated.
Model Macro refers to the unweighted average of each event's precision and recall scores. The macro F1 is the harmonic mean of the macro precision and macro recall scores. All event types contribute equally to the average.
Model Weighted refers to the model's overall precision and recall scores, where the most frequent event types will have the greatest impact on the average. Less frequent event types will impact the score less. Weighted metrics assume that event types with fewer samples are less important.
Inter-annotator agreement
Note
You must be registered as a manager.
Machine-learning models are completely dependent on the quality of the data used for training. Inconsistent annotation or lack of adherence to the project annotation guidelines will lead to less accurate models. Especially when starting a new project or on-boarding new human annotators, check for reliable annotations by having a subset of data annotated in parallel by multiple human annotators.
Krippendorff’s alpha is a statistical inter-rater reliability metric used to measure inter-annotator agreement. Krippendorff’s alpha scores range from -1.0 to 1.0 with 1.0 indicating perfect agreement between annotators. A score of 0.0 indicates agreement no better than random chance (as if your annotators picked their labels randomly out of a hat). A reliability score of 0.80 or greater is generally considered sufficient (though, the higher the better). Lower scores may indicate potential issues with your data, your annotation guidelines, or your annotators’ understanding of the task. A low level of inter-annotator agreement will ultimately lead to a less accurate model, so we recommend repeatedly measuring the reliability of your annotators until they achieve a satisfactory level of agreement. The cases where annotators disagree are usually good examples to include in your annotation guidelines. It can be useful to have a discussion about points of disagreement with your annotators as a group to reach a consensus.
The IAA history report displays the progress of the inter-annotator agreement over time.
Metrics
Metrics, such as precision, recall, and F1 measure, can be viewed directly on the project dashboard.
Precision, recall, and F1 measure
Most NLP tools are evaluated based on their precision and recall. Accuracy is measured as a combination of precision, recall, and F1 measure.
Precision answers the question "of the answers you found, what percentage were correct?" Precision is sensitive to false positives; higher is more precise.
Recall answers the question "of all possible correct answers, what percentage did you find?" Recall is sensitive to false negatives; higher is better recall.
F1 measure is the harmonic mean of precision and recall. The F1 measure is sensitive to both false positives and false negatives; a higher value means better accuracy. It isn't quite an average of the two scores, as it penalizes the case where the precision or recall scores are far apart. For example, if the system finds 10 answers that are correct (high precision), but misses 1,000 correct answers (low recall), you wouldn't want the F1 measure to be misleadingly high.
The correct measure depends on your application. In applications where you can only handle a few responses, such as voice applications (e.g. Amazon's Alexa), high precision with low recall is ideal, because the system can only present the user with a few options in a reasonable time frame. However, other applications, such as redacting text to remove personally identifiable information, redacting too much (low precision) is much better than missing even one item that should have been redacted. In that case, high recall is preferred.
Notice
The precision, recall, and F1 measures are based only on the samples in the validation set. The values are not calculated for the training set samples.
The values displayed on the project dashboard are calculated using the annotated validation data as the gold data. As the model is trained, it generates new predictions and the scores are recalculated. The predictions generated by the model for the validation samples are compared with the annotated values in the samples.
Calculating precision, recall, and f-scores
Let's look at how precision, recall, and f-score are calculated. Let's assume an event model, where a number of events were extracted.
TP: True positive. A correctly extracted event.
FP: False positive. An incorrectly extracted event.
FN: False negative. Number of events that should have been extracted, but weren't.
Retrieved: All events retrieved = TP + FP
Relevant: All events that should have been retrieved = TP + FN
Precision is the fraction of correct retrievals among all retrieved instances.
Recall is the fraction of relevant events that are successfully retrieved.
F-score is the harmonic mean of precision and recall
Averages
The project dashboard displays precision, recall, and F1 measures for the event model. There are several ways of calculating these scores across multiple event types.
An important concept here is support: the frequency of an event type in the dataset.
Macro Average: The macro average for precision and recall is an unweighted average of the per-event type precision and recall scores. The macro F1 is the harmonic mean of the macro precision and macro recall scores. All event types contribute equally to the average.
Weighted Average: The average of the metric for all classes, weighted by their support. The most frequent event types will have the greatest impact on the average, while less frequent event types will impact the score less. Weighted metrics assume that event types with fewer samples are less important.
Event extraction models are trained to recognize and extract multiple components. Each event mention contains a key phrase and one or more roles. A single annotated sample may contain multiple event mentions, and therefore, multiple key phrases and multiple roles.
The statistics displayed on the project dashboard are the macro averages of precision, recall, and f1 for event detection.
More detail is available on the reports page, where you can see both macro and weighted averages for detection (just the key phrase) and extraction (key phrase and role mentions).
Custom knowledge base
Entity linking provides a mechanism for disambiguating the identity of similarly named entities mentioned in a document. For example, “Rebecca Cole” is the second African-American woman to become a doctor in the United States and also the name of an Australian professional basketball player. Linking helps establish the identity of the entity by disambiguating common names and matching a variety of names, such as nicknames and formal titles, with an entity ID.
To link entities to a knowledge base, Entity Extractor uses a statistical disambiguation model trained on a knowledge base. Entity Extractor is delivered with a model based on a default Wikidata knowledge base. If the entity exists in Wikidata, then Entity Extractor returns the Wikidata QID, such as Q1 for the Universe, in the entityId field.
You can train a custom knowledge base that to replace or run in parallel with the default Wikidata knowledge base.
To train a custom knowledge base:
Define the custom knowledge base.
Train the disambiguation model with Adaptation Studio.
The trained model is then uploaded to the Entity Extractor directories under Analytics Server to be used for entity extraction.
Existing models
This page lists the models known to the Entity Training Server.
Select an action in the workspace to perform one of the following actions:
Download a linking model. The workspace is downloaded to your machine.
Delete
 a linking model. The workspace is deleted from the server.
Query/test
an existing model. The query window prompts you for text. Select Query and all matching entities in the custom knowledge base are listed.
Train a new model
To train a new custom knowledge base for linking, you must have either:
A
.jsonfile defining the entities and context information ORA url to a remote datasource.
Select Train a New Model.
Enter a model name. If you don't enter a name, the system will generate one for you. We recommend entering a meaningful name.
Select the language. Each model supports only a single language.
Choose the data source.
Select file: Drag or select the .json file.
Remote upload: Enter the url for the data.
Once the files have been added or the url specified, the model will automatically start training.
Knowledge base file format
A custom knowledge base is a collection of entities as defined by a .json file.
Parameter | Description | Example | Required? |
|---|---|---|---|
entityId | Unique identifier for the entity. | L1 | Y |
entityName | The name of the entity. | Boston | Y |
entityType | A valid type. Can be one of the standard entity types or another string. | LOCATION | Y |
lang | 3-letter language code. Use | eng | Y |
prevalence | Weight to prefer a candidate. Must be a positive integer. | 3 | N |
aliases | A list of aliases for the entity. | "Boston, MA", "New England" | N |
contextTokens | Tokenized context words. | [["city"], ["massachusetts"], ["new", "england"], ["capital"]] | N |
contextWords | A list of words per language that are used to provide context to identify when this entity is the correct link. | ["city", "massachussetts", "new england", "capital"] | N |
{
    "lang": "eng",
    "entityId": "L1",
    "entityName": "Boston",
    "entityType": "LOCATION",
    "contextTokens": [["city"], ["massachusetts"], ["new", "england"], ["capital"]],
    "contextWords": ["city", "massachussetts", "new england", "capital"]
}
[
{
"entityId": "R1",
"entityName": "Rex",
"entityType": "SOFTWARE",
"contextWords":[
"Babel Street"
]
},
{
"entityId": "R2",
"entityName": "Rex",
"entityType": "TOY",
"contextWords": [
"Toy Story"
]
}
]Using a custom knowledge base in production
The custom knowledge base is used by Entity Extractor to disambiguate when extracting entities. To use the new model for linking, Entity Extractor must see the trained model. These instructions are run on the production machine where Analytics Server is installed.
Create a subdirectory under
<rex-home>/data/flinx/data/kb/. The name of the subdirectory will be the name of your custom knowledge base.Copy the .zip file that was downloaded into the subdirectory and unzip it.
Create a folder within the new knowledge base folder using the 3 letter language code of the model as its name. For example, in the case of English,
eng. Open this newly created folder and copy the corresponding disambiguation model from the default knowledge base into it. For example, in the case of English,cp -r /basis/rs/roots/rex/{version}/data/flinx/data/kb/basis/eng/*.Restart Analytics Server to use the new model.
Customize (optional) the set and priority of linking knowledge bases.
You can customize the set and priority of linking knowledge bases.
By default, all knowledge bases under the data/flinx/data/kb directory inside the Entity Extractor installation will automatically be used for linking. Any custom knowledge bases placed in this directory will be loaded each time Entity Extractor launches.
kbs:
    - /customKBs/kb1
    - /customKBs/kb2
    - /rosette/server/roots/rex/7.44.1.c62.2/data/flinx/data/kb/basis
The list is in priority order; the match from the highest knowledge base on the list will be returned.
Important
Setting the list of knowledge bases completely overwrites the list of knowledge bases the linker uses. If you want the default Wikidata knowledge base to be included, it must be on the list of knowledge bases.
Gazetteers
A gazetteer is a list of exact matches in a predefined closed class. For example, you can use a gazetteer to match all the countries in the world, as there is a precise and unambiguous list of countries. An entry would count as ambiguous if it has multiple possible meanings, such as "Apple", which could be either an ORGANIZATION or a fruit. The gazetteers are very fast at extracting entities. If you are searching for specific words or phrases in your data, a custom gazetteer is a good way to find them quickly.
To improve performance, text gazetteers can be compiled to a binary gazetteer using Adaptation Studio. The binary gazetteer file name must end with -LE.bin.
Entity Extractor is shipped with default gazetteer files which you can modify. Gazetteer files are located in a subdirectory of the data directory, defined by language using the three-letter ISO-639-3 language code. A directory which applies to all languages, uses xxx for the language code. You can also create your own custom gazetteers.
To create a custom gazetteer, put the new file in the appropriate location in the data/gazetteer tree.
language-specific:
data/gazetteer/<lang>/acceptall languages:
data/gazetteer/xxx/accept
Compile gazetteer
You can compile a single file at a time.
Select Compile Gazetteer.
Upload a formatted text file.
The file is compiled and downloaded to your machine.
Copy the compiled file into the appropriate Entity Extractor data directory.
Gazetteer file format
A gazetteer file:
Is a .txt file encoded in UTF-8.
The file should not contain comments (prefixed with #), as they will make the compiled bin file invalid.
The first non-comment line is
TYPE[:SUBTYPE], where TYPE is required and SUBTYPE is optional. The type is applied to the entire gazetteer and defines the entity type name for output. TYPE and SUBTYPE may be predefined or user-defined.
Gazetteer entries and potential matches are space normalized to treat any whitespace between words as a single space. This enables the gazetteer to match entities with differences in whitespace.
To track common infectious diseases, create a gazetteer like this:
DISEASE:INFECTIOUS
tuberculosis
e. coli
malaria
influenza
A single gazetteer may not be enough; you can create as many gazetteers as you need. To search for the scientific names of the infectious disease, you can create a file like this:
DISEASE:INFECTIOUS
Mycobacterium tuberculosis
Escherichia coli
Plasmodium malariae
Orthomyxoviridae
To track certain diseases by their causes:
DISEASE:BACTERIAL
Escherichia coli
E. coli
Staphylococcus aureus
Streptococcus pneuminiae
Salmonella
Or to track the drugs used to treat them:
DRUG:ANTIMICROBIAL
methicillin
vancomycin
macrolide
fluoroquinolone