Model Training Suite System Administrator Guide
System Administrator Guide
This guide provides instructions for installing and maintaining the training and production environments for Babel Street Model Training Suite.
The training section contains installation instructions for the complete Model Training Suite. Included components are Analytics Server, Adaptation Studio, Entity Training Server, and Event Training Server. Your installation may include one or both training servers.
The production section contains installation instructions for a production environment, as well as how to perform event and entity extraction. Included are instructions for moving trained models from the training environment into the production environment.
Install the training environment
The full training installation consists of the following components:
Analytics Server, including Entity Extractor
Adaptation Studio (RAS)
Entity Training Server (EnTS)
Event Training Server (EvTS)
An installation of Model Training Suite may include one or both of the training servers.
The components can be installed on separate machines or all together on a single machine. One machine is adequate for light loads and configuration testing. For production work, large projects, or multiple projects, we recommend installing on multiple machines.
For either install, you will need to know the fully qualified host name where a component is installed. The training servers can be installed on the same server. For the three machine install, you will need the three host names. For a single machine install, you only need the one name.
Important
For all Docker installations, localhost is not an acceptable name; the hostname must be addressable from within the Docker containers.
To find the host name for a machine, run the command hostname -f on the machine.
Docker compose configuration
When you extract the zip files, each server directory will contain the following 2 files for Docker:
docker-compose.yml.envTip
The
.envfile is a hidden file. All file names that start with a . are hidden. Typels -ato list the hidden files along with the other files in the directory.
The directories used to connect the components, as shown in the figure below, are defined in the .env for each product. To view or change a value, edit the .env file, not the docker-compose.yml file.
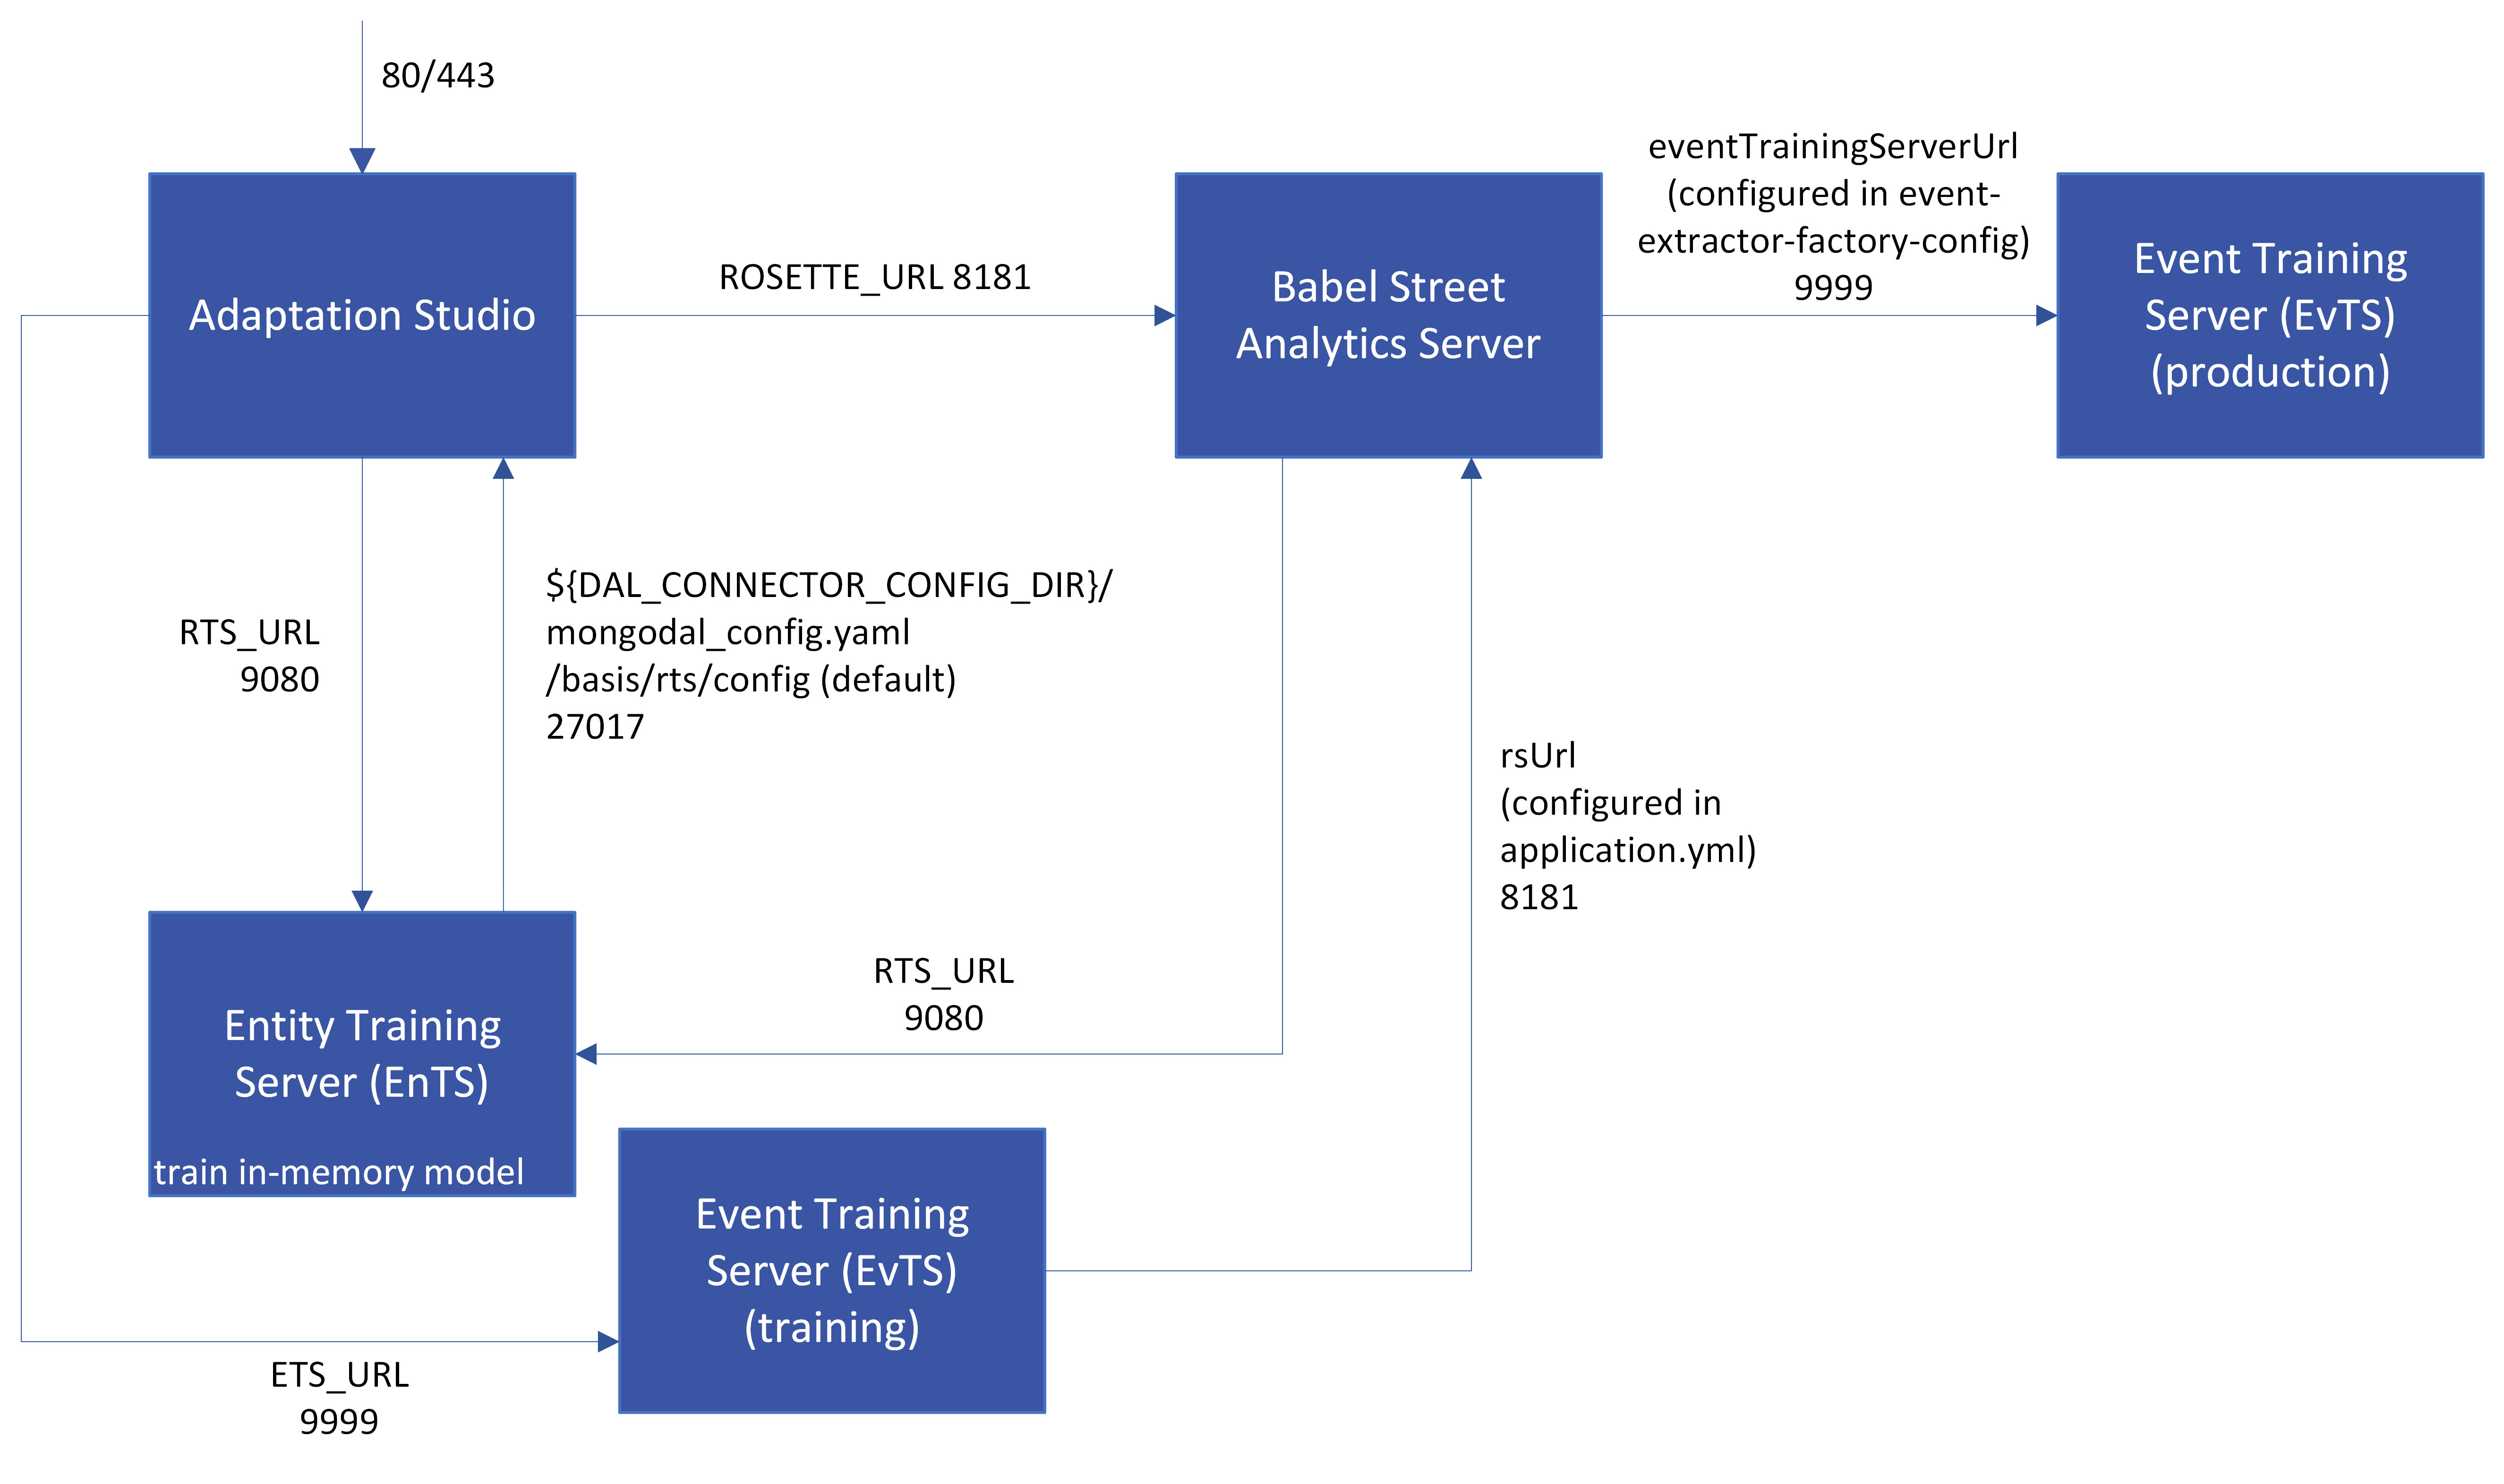
In this diagram, the same instance of Analytics Server is shared by the training and production environments. All ports are configurable; the defaults are displayed.
Example .env file for RTS
RTS_PORT=9080

# Default /basis/rts/workspaces
WORKSPACE_ROOT=/basis/rts/workspaces

# Default /basis/rts
# Wordclasses need to go into this directory
ASSETS_ROOT=/basis/rts

# Default /basis/rts/config
# File is mongodal_config.yaml
DAL_CONNECTOR_CONFIG_DIR=/basis/rts/config

# The release script will update this variable.
REX_TRAINING_SERVER_IMAGE=rex-training-server:0.4.2

# See https://www.ibm.com/support/knowledgecenter/SSD28V_liberty/com.ibm.websphere.wlp.core.doc/ae/twlp_admin_customvars.html
# for details on the contents of this file.
JVM_OPTIONS=/basis/rts/config/jvm.options

# See https://www.ibm.com/support/knowledgecenter/SSEQTP_liberty/com.ibm.websphere.wlp.doc/ae/cwlp_config.html# for details on the contents of this file.
SERVER_XML=/basis/rts/config/server.xml

# Where to store RTS logs
RTS_LOGS=/basis/rts/logs

# The maximum number of training threads at any one time
RTS_CONCURRENT_TRAIN_THREADS=2
# The maximum number of threads serializing models at any one time
RTS_CONCURRENT_SERIALIZE_THREADS=1
# The maximum number of threads creating wordclasses at any one time
RTS_CONCURRENT_WORDCLASS_THREADS=2
The variable values set in the .env file are used in the docker-compose.yml file:
version: '3'
services:
  rex-training-server:
    # https://docs.docker.com/compose/compose-file/#restart
    # no, default, does not restart a container under any circumstance
    # always, the container always restarts
    # on-failure, restarts a container if the exit code indicates an on-failure error
    # unless-stopped, always restarts a container, except when the container is stopped
    # https://github.com/docker/compose/issues/3672 no must be in quotes
    restart: "no"
    image: ${REX_TRAINING_SERVER_IMAGE}
    volumes:
      - ${WORKSPACE_ROOT}:/basis/rts/workspaces
      - ${ASSETS_ROOT}:/basis/rts
      - ${REXJE_ROOT}:/basis/rts/root
      # The file mongodal_config.yaml must exist in this directory
      - ${DAL_CONNECTOR_CONFIG_DIR}:/basis/rts/config
      - ${RTS_LOGS}:/logs# Optionally override JVM settings here, default -Xms8G -Xmx16G#
      - ${JVM_OPTIONS}:/config/jvm.options
# Optionally override JVM settings here,default -Xms8G -Xmx16G
#      - ${JVM_OPTIONS}:/config/jvm.options
# Optionally override Server settings here
#      - ${SERVER_XML}:/config/server.xml
    environment:
      - AS_MONGO_DAL_CONNECTOR_CONFIG_DIR=/basis/rts/config
      - rexje_root=/basis/rts/root
      - RTS_CONCURRENT_TRAIN_THREADS=${RTS_CONCURRENT_TRAIN_THREADS}
      - RTS_CONCURRENT_SERIALIZE_THREADS=${RTS_CONCURRENT_SERIALIZE_THREADS}
      - RTS_CONCURRENT_WORDCLASS_THREADS=${RTS_CONCURRENT_WORDCLASS_THREADS}
    ports:
      - ${RTS_PORT}:9080
Specifying Service Restart Policy
The service restart policy for each service can be specified in the docker-compose.yml files by specifying the restart parameter. This allows containers to be restarted on server reboot, Docker service restart, etc. Restart can be one of "no", always, on-failure, unless-stopped. The default is no if not specified.
Example for the Entity Training Server docker-compose.yml:
version: '3 '
services:
  rex-training-server:
    restart: "no"
...
Prerequisites
These prerequisites are for the training environment.
Important
Recommended Operating System: 64 bit Linux or macOS.
Windows deployment (including Docker Desktop for Windows) is not tested or supported at this time. Windows users using Windows 10 pro or Windows Server 2016 or 2019 should run MTS in a Linux virtual machine under Hyper-V or VMWare Workstation.
Note
Chrome and Firefox are the supported browsers for Adaptation Studio.
Note
To import models into Adaptation Studio from the command line, the utility jq must be installed on your system.
You must install the files for Analytics Server, Entity Training Server, Event Training Server, and Adaptation Studio in different directories or on different computers. We recommend installing the Entity and Event training servers on the same machine.
The machines for Adaptation Studio, Entity Training Server, and Event Training Server must have Docker and docker compose installed.
Before installing any components, create the top-level directory for all components with proper permissions on each machine.
In this example, the install directory (<installDir>) is
/basis.sudo mkdir /basis sudo chmod 2777 /basis
Resource | Requirement |
|---|---|
CPU | 4 virtual CPU cores |
Memory | 32 GB |
Disk Space | 100 GB recommended for multiple small/medium projects. The actual amount required is determined by size and number of active projects. |
Resource | Requirement |
|---|---|
CPU | 4 virtual CPU cores |
Memory | 32 GB |
Disk Space | 500 GB recommended for multiple small/medium projects. The actual amount required is determined by the size and number of active projects. |
Resource | Requirement |
|---|---|
CPU | 4 virtual CPU cores |
Memory | 16 GB |
Disk Space | 500 GB recommended for multiple small/medium projects. The actual amount required is determined by the size and number of active projects. |
Resource | Requirement |
|---|---|
CPU | GPU recommended (Nvidia G4dn or equivalent, 16 GB memory) 4 virtual CPU cores |
Memory | 16 GB |
Disk Space | 125 GB SSD |
Single System Installation Prerequisites
On a single system, the following disk space is required for installation only. More space is needed to run the system. These numbers assume all components are installed.
Installers (all uncompressed files): 91 GB
Installed (everything in the default
/basisdirectory): 125 GB
Tip
If you choose auto-partitioning when installing the operating system, you may need to override the default install to ensure that /root gets enough space. For example, some Linux installs default to 70 GB for /root, which is not enough to install the entire system in /basis.
Shipment
The training shipment contains the following files:
rs-installation-<version>.zip: Files for Analytics Server. The size of the file is dependent on the number of languages included. This file may be shipped separately.
ets-installation-<version>.zip: Files for Event Training Server.
rts-installation-<version>.zip: Files for Entity Training Server.
coref-installation-<version>.zip: Files for in-document coreference.
Files for Adaptation Studio. The file in the shipment will be one of the following, depending on the configuration shipment.
ras-ets-<version>.zip: Files for Adaptation Studio for event model training.
ras-rts-<version>.zip: Files for Adaptation Studio for entity model training.
ras-ets-rts-<version>.zip: Files for Adaptation Studio for event and entity model training.
model-training-suite-documentation-<version>.zip: Documentation files.
System_Administrator_Guide-en.pdf: This guide.
Developing_Models-en.pdf: A guide for system architects and model administrators to aid in defining the modeling strategy and understanding the theory of model training.
Adaptation_Studio_User_Guide-en.pdf: A guide for the managers and annotators using Adaptation Studio
MTS-release-notes-<version>.pdf: Release notes.
eventTest.etsmodel: Sample Event Training Server project.
Adaptation_Studio_Events_tutorial_1_0_x.zip: A complete tutorial for events, including sample documents
You will need the license file during installation. The license file may be shipped separately.
rosette-license.xml: License key file. During the installation of Analytics Server you will be prompted for the location of this file.
Installation log files
A log file is created as each server is installed. All install questions, responses, are logged, along with all actions taken to install the server. Actions during enable and disable SSL are also logged. The files are created in the install directory with the name:
install-<scriptname>.sh.<date>_<time>.log
where scriptname is rs, rts, ets, or ras:
rs: Analytics Server
rts: Entity Server
ets: Event Server
ras: Adaptation Studio Server
For example, an installation of Analytics Server (rs) installed on 10/12/21 at 7:59 am would create the file:
install-rs.sh.10-12-21_07-59.log
Install Analytics Server
Tip
It is recommended that Analytics Server is installed stand-alone. However, Model Training Suite can support a containerized version.
Both Entity Training Server (EnTS or RTS) and Event Training Server (EvTS or ETS) require specific Analytics Server configurations and custom profiles.
The headless and interactive installers can update Analytics Server to support Entity and Event Training Servers as required.
In the interactive installer, answer y to the following questions to update Analytics Server:
Should Analytics Server be configured with RTS support (y/n)?
Should Analytics Server be configured with ETS support (y/n)?
In the headless installer, modify the install-rs-headless.properties file to set up the proper support.
If you answer n or if you have an existing installation of Analytics Server, you can manually run the scripts to update Analytics Server after installation.
The following sections include instructions for installing stand-alone or as a docker container.
Analytics Server (RS) Headless Installer
The headless installer installs Analytics Server with Docker and without human interaction. Instead of user prompts, the installer parameters are taken from the properties file.
The installer prompts are defined in the file install-rs-headless.properties:
Start the installation:
./install-rs-headless.sh
The properties file is in the same directory as the script.
Use the --dry-run flag to validate the properties file, print the settings, and exit without changing anything.
Installing with Docker
Tip
Analytics Server can be configured and run with the roots hosted on an NFS server. An example Helm deployment can be found at https://github.com/rosette-api/helm.
Docker requirements
You must have a recent version of Docker Engine installed
Docker disk image size must be increased to 120GB (from the default of 60GB) to install the full Server package.
If installing on Windows, Docker for Windows must be installed (not Docker Toolbox or Docker Machine) with Hyper-V enabled.
Memory requirements
The Docker memory must be set to at least 16 GB if all endpoints are licensed and activated, and may require more depending on your application.
At a minimum, the Docker maximum memory should be the same or more than the Server JVM heap size. Otherwise, when running in a Docker container Analytics Server may get SIGKILL when the JVM asks for more memory the Docker allocates.
Update Analytics Server
Both the headless and interactive installers will update Analytics Server as required. If you have an existing installation of Analytics Server, or you didn't choose to update it on install, you can manually run the scripts to update Analytics Server.
If you are training named entity models, Update Analytics Server for Entity Training Server.
If you are training event models, Update Analytics Server for Event Training Server.
Update Analytics Server for Entity Training Server
If you are using a standalone (non-Docker) version of Analytics Server, copy the file
./scripts/update-rs-for-rts.shto the Analytics Server machine or directory.Run the script from the Analytics Server directory.
./basis/rts/update-rs-for-rts.sh
The script modifies the Analytics Server installation to install custom profiles and update environment variables.
Custom profiles are enabled if they are not already enabled. You will be prompted for where the custom profiles should be stored. The default location is
/basis/rosette/server/launcher/config/custom-profiles.If custom profiles are already enabled, the
ad-suggestionsandad-base-linguisticsprofiles are copied out to the custom profile subdirectory.If the
ad-suggestionsandad-base-linguisticsprofiles are already installed, they are overwritten.The
wrapper.conffile of Analytics Server is updated to include the following environment variables. If the file already has the variables defined, they are overwritten.set.RTS_URL=http://localhost:9080 set.RTSSOURCE=statistical
Each time the update script is run, a log file with a time stamp is created. Example:
update-rs-for-rts.sh.01-04-22_13-22.All modified files are backed up to the directory where they were changed, with a timestamp.
The script will prompt you for the following information:
Prompt | Purpose | Options | Notes |
|---|---|---|---|
Update Analytics Server for REX Training Server? | The Entity Training Server requires special configuration files. | Y to continue N to cancel | |
Fully qualified host name where REX Training Server is installed | The suggested value will be the host name of your current machine |
| |
Enter the port REX Training Server is listening on | Default: 9080 | ||
Enter the location of Analytics Server installation | Default:
| ||
Enter the directory to store custom profiles | Custom profiles can be in any directory | Default:
|
If the custom profiles are not installed correctly, you will receive a RosetteException from Adaptation Studio. Example:
ras_server_1 | raise RosetteException(code, message, url)
ras_server_1 | rosette.api.RosetteException: unauthorizedProfile: Access to profile
'ad-suggestions' not granted:
ras_server_1 | http://ras_proxy:42/rs/rest/v1/entities
Verify the updates
Once you have run the update script for Analytics Server, verify the install.
Start Analytics Server, if it's not already running.
Verify the custom profiles were deployed through the
custom-profilesendpoint:curl http://<analytics-host>:<port>/rest/v1/custom-profiles
or, in a browser open:
http://<analytics-host>:<port>/rest/v1/custom-profiles
At a minimum, the following two profiles should be returned by the endpoint:
[ad-base-linguistics,ad-suggestions]
If your installation has other custom profiles installed, they will also be returned.
Verify the Entity Training Server configuration.
Start Entity Training Server.
Call the
entitiesendpoint using the profileIdad-suggestionsand an existing Entity Training Server workspace.curl --location --request POST 'http://<analytics-host>:<port>/rest/v1/entities'/ --header 'Content-Type: application/json' --data-raw / '{ "content": "The Securities and Exchange Commission today announced the leadership of the / agency'\''s trial unit.",/ "profileId":"ad-suggestions", "options": {"rtsDecoder": "6224dd36897e684a81935558"}}'If the value for
rtsDecoderis a valid Entity Training Server workspace, a HTTP 200 should be returned.If this is a new install, and there are no Entity Training Server workspaces with the provided string, a HTTP 404 response should be returned. Any other value indicates a misconfiguration.
Update Analytics Server for Event Training Server
The update can be run interactively or with a headless installer.
Copy the file
/basis/ets/scripts/update-rs-for-ets.shto the Analytics Server machine or directory.Run the script from the Analytics Server directory.
./update-rs-for-ets.sh
Update for legacy schemas
The update script updates Analytics Server to support legacy events schemas that used the TIME and MONEY entity types, instead of the current entity types of TEMPORAL:TIME and IDENTIFIER:MONEY. To apply these updates, copy the file EntityTypePatcher.jar along with the update-rs-for-ets.sh script to the Analytics Server machine or directory.
Note
If the legacy schema patch is to be applied, the machine running the patch must have Java installed (minimum Java 8).
The update script will back up all changed files to the directory <current working directory>/regex-backup-<timestamp>. To roll back the changes, copy the files back to the Entity Extractor root directory.
The script will prompt you for the following information:
Prompt | Purpose | Options | Notes |
|---|---|---|---|
Should Analytics Server be updated to communicate with Events Training Server? | Configure Analytics Server with the events extraction configuration | N for the training server Y for the production server | |
Should the entity types be updated to support legacy schemata (create aliases for TIME and MONEY)? | Support legacy entity types | Y to update N to not update | |
Enter Location of Analytics Server configuration | This directory will be mounted as a volume. | Default:
| The configuration file to customize Analytics Server. |
Analytics Server memory management
There is not a single one size fits all number here. The best value for max heap size depends on a number of factors:
activated endpoints and features
usage pattern
data characteristics such as size (both character and token lengths), language, and genre
java garbage collector and its settings
Please note that it’s not recommended setting the max heap to the amount of physical RAM in the system. More heap doesn’t always translate to better performance, especially depending on your garbage collection settings.
Analytics Server’s data files are loaded into virtual memory. Some endpoints, such as /entities, involve a large amount of data. In order for Analytics Server to operate at its peak performance, we recommend that you reserve enough free memory to allow memory mapping of all our data files so that page misses are minimized at runtime.
To modify the JVM heap for standalone, edit the file server/conf/wrapper.conf and modify the value of wrapper.java.maxmemory.
# Maximum JVM heap in GB
ROSETTE_JVM_MAX_HEAP=32
# Minimum JVM heap in GB
ROSETTE_JVM_MIN_HEAP=32
We also recommend increasing the worker threads to 4, as described in Configuring worker threads for HTTP transport.
Install Entity Training Server (EnTS or RTS)
Note
The Entity Training Server used to be called REX Training Server. It is still referred to as RTS in many of the scripts in MTS.
You must have Docker, dockercompose, and unzip installed.
The product can be installed interactively or with a headless installer.
To install interactively:
Unzip the file
rts-installation-<version>.zip.From the directory
rts-installation-<version>, run the installation script:./install-rts.sh
To run the headless version of the script:
./install-rts-headless.sh
The properties file is in the same directory as the script.
Use the
--dry-runflag to validate the properties file, print the settings, and exit without changing anything.
The Entity Training Server installer will prompt you for the following information.
Whenever prompted for a directory, after you enter it, you will have to confirm either:
If the directory does not exist, you'll be prompted to create it.
If the directory exists, you'll be prompted whether it can be overwritten.
Prompt | Purpose | Options | Notes |
|---|---|---|---|
Enter installation directory for REX Training Server | Installation directory for Entity Training Server files | Default:
| This is now the |
Enter installation directory for REX Training Server docker files | Directory where Entity Training Server docker compose files will be installed. | Default:
| The disk requirements for the docker compose files are minimal (< 1 MB). However, other parts of the install require greater disk space |
Load REX Training Server docker image ? | Load the Docker images so they are available on the local machine | Otherwise, load them to a Docker registry shared by all machines. | We recommend |
Enter REX Training Server port to listen on | Default: 9080 You will be prompted to use that port. | This port and hostname will be required when installing the other servers. | |
Enter REX Training Server assets root directory | Directory to Install wordclasses and corpora to ${RTSASSETS} | Default: | This directory holds files needed for training including static wordclass files. The wordclass files can be manually installed later but must exist prior to starting RTS. |
Install worldclasses and corpora to ${RTSASSETS} | Y/N | ||
Enter REX Training Server REX root directory | This directory will be ${RTSROOT} | Default:
| |
Install REX flinx root to ${RTSROOT} | |||
Enter DAL configuration directory | The DAL connects to the mongo database on the Adaptation Studio component to access samples. If the port 27017 is NOT exposed on the RAS server then the | ||
Enter fully qualified host name where Adaptation Studio is installed | ${HOST} for single host install | The suggested value will be the host name of your current machine | Cannot be empty, |
Use ${ACTIVE_MQ_HOST} for ActiveMQ push notifications(y/n)?"; then "Enter fully qualified host name where ActiveMQ is installed (${HOST} for single host install)" "${HOST}") | |||
Use ${ACTIVE_MQ_HOST} (y/n)?"; then "Enter ActiveMQ port " 61616) | |||
Enter fully qualified host name where Adaptation Studio (RAS) is installed (${HOST} for single host install)" "${HOST}")" | |||
Enter location of REX Training Server Logs | Default: | ||
Enter REX Training Server workspaces root directory | This directory will be mounted as a volume. | Default: |
Entity Training Server memory management
The number of models that can be simultaneously trained depends on the size of the models and the memory available.
Once the model is written to disk, it consumes relatively little memory (~2 GB) for runtime requirements. The training and writing phases are much more memory intensive, each consuming approximately three times more memory. Typically, a model actively training will require approximately 10 GB of RAM.
Total memory consumption depends on the number of models being trained simultaneously, as well as the size of the models. The training server is a Java application and all operations use the JVM heap. To allow more simultaneous annotations on more projects, increase the RAM allocated to the JVM in Entity Training Server.
To modify the JVM heap:
Create a file
jvm.optionsin the/basis/rts/configdirectory. In this file, set the initial and maximum heap sizes. They should be set to the same value. The values must be less than the physical RAM installed on the machine.# Set the initial and minimum heap size to 16GB -Xms16G # Set the maximum heap size to 16GB -Xmx16G
Edit the file
/basis/rts/rts-docker/docker-compose.ymland uncomment the line${JVM_OPTIONS}:/config/jvm.options.# Optionally override JVM settings here, default -Xms8G -Xmx16G - ${JVM_OPTIONS}:/config/jvm.optionsEdit the file
/basis/rts/rts-docker/.envand setJVM_OPTIONSto point to thejvm.optionsfile.JVM_OPTIONS=/basis/rts/config/jvm.options
Install Event Training Server (EvTS or ETS)
The Event Training Server must be installed on both the training and the Analytics Server production instance (extraction). The same Event Training Server file is installed, either in training or extraction mode.
You must have Docker, dockercompose, and unzip installed.
The product can be installed interactively or with a headless installer.
To install interactively:
Unzip the file
ets-installation-<version>.zip.Start the installation:
./install-ets.sh
To run the headless install, use the
--headlessflag. The.propertiesfile is in the same directories as the installation script.Use the
--dry-runflag to validate the properties file, print the settings, and exit without changing anything.
The Event Training Server installer will prompt you for the following information:
Prompt | Purpose | Options | Notes |
|---|---|---|---|
ETS mode | Determine if installation is for training or extraction (production) mode | 1) Training 2) Extraction 3) Exit Installer | Sets the mode. Training mode prompts for location of Analytics Server; extraction mode does not. |
Installation directory | Installation directory for Event Training Server files | Default: If the directory does not exist, you'll be prompted to create it. If the directory exists, you'll be prompted whether it can be overwritten. | This is now the |
Port Event Training Server should listen on | Default: 9999 You will then have to confirm to use that port. | This port and hostname will be required when installing the other servers. | |
Directory for ETS workspaces | This directory will be mounted as a volume. | Default: If the directory does not exist, you'll be prompted to create it. If the directory exists, you'll be prompted whether it can be overwritten. | This directory holds the events models. |
Fully qualified host name where Analytics Server is installed | Not asked when installing in extraction mode (production server) | The suggested value will be the host name of your current machine. | Cannot be empty, |
Port Analytics Server is listening on | Not asked when installing in extraction mode (production server) | Default: 8181 | |
Full qualified name where ActiveMQ is installed | Active_MQ_Host | ||
Active MQ port | Default: 61616 |
Event Training Server configuration
Parameter | Note | Default | |||||||||||||||||||||||||||||||||||||||||||||||
|---|---|---|---|---|---|---|---|---|---|---|---|---|---|---|---|---|---|---|---|---|---|---|---|---|---|---|---|---|---|---|---|---|---|---|---|---|---|---|---|---|---|---|---|---|---|---|---|---|---|
| Only needed in training mode. Users are prompted during install for the value if performing a Training mode installation. | None | |||||||||||||||||||||||||||||||||||||||||||||||
| Event Training Server is either in training or extraction mode | Training | |||||||||||||||||||||||||||||||||||||||||||||||
| The port Event Training Server will listen on. Users are prompted during install for the value | 9999 | |||||||||||||||||||||||||||||||||||||||||||||||
| The container image of the Event Training Server front end. | ||||||||||||||||||||||||||||||||||||||||||||||||
| The location of the |
| |||||||||||||||||||||||||||||||||||||||||||||||
| true if Event Training Server should use SSL when connecting to Analytics Server (and P-ETS workers if they are on remote hosts). False otherwise. Note, | false | |||||||||||||||||||||||||||||||||||||||||||||||
| The password of the JKS keystore file. | None | |||||||||||||||||||||||||||||||||||||||||||||||
| The location of the JKS keystore. | None | |||||||||||||||||||||||||||||||||||||||||||||||
| The password of the JKS truststore file. | None | |||||||||||||||||||||||||||||||||||||||||||||||
| The location of the JKS truststore. | None | |||||||||||||||||||||||||||||||||||||||||||||||
| Controls the granularity (verbosity) of the logging. Options include, ERROR, WARN, INFO, DEBUG, or TRACE. | INFO | |||||||||||||||||||||||||||||||||||||||||||||||
| The container image of the P-ETS worker | Release dependent | |||||||||||||||||||||||||||||||||||||||||||||||
| The location to store the Event Training Server models. |
| |||||||||||||||||||||||||||||||||||||||||||||||
| The container image of the nginx proxy in use. |
| |||||||||||||||||||||||||||||||||||||||||||||||
| The host certificate in PEM file format. Used to enable incoming SSL connections. | None | |||||||||||||||||||||||||||||||||||||||||||||||
| The host key in PEM file format. Used to enable incoming SSL connections. | None | |||||||||||||||||||||||||||||||||||||||||||||||
| The CA certificate in PEM file format. Used to enable incoming SSL connections. | None | |||||||||||||||||||||||||||||||||||||||||||||||
| The location of the nginx configuration file. Either |
| |||||||||||||||||||||||||||||||||||||||||||||||
| Configuration file for nginx when operating with SSL enabled. | ||||||||||||||||||||||||||||||||||||||||||||||||
| Configuration file for nginx when operating with SSL not enabled. | ||||||||||||||||||||||||||||||||||||||||||||||||
[a] Parameter updated by the | |||||||||||||||||||||||||||||||||||||||||||||||||
Event Training Server application.yml configuration file
The application.yml file controls the configuration of the Event Training Server application. The values in this file rarely change and are relative to the container, meaning the values are only used within the container and have no relevance to the machine running the container.
Server
This section contains the basic server setup. context-path is the part of the URL prepended to all Event Training Server URLs for example /ets/info. In the container, Event Training Server is listening on port 9999.
server:
  servlet:
    context-path: /ets
  port: 9999
Logging
This section contains the log setup. The default log level is info and can be changed by setting the ETS_LOGGING_LEVEL value in the .env file. The com.netflix.eureka.cluster is set to ERROR because by default it fills the log with unneeded log messages. The same is true for com.netflix.eureka.registry. If you would like to log everything, the two lines referencing com.netflix.* can be commented out with a #.
logging:
  level:
    ROOT: ${ETS_LOGGING_LEVEL:info}
    com.netflix.eureka.cluster: ERROR
    com.netflix.eureka.registry: WARN
Management
This section controls the management services, including health and metrics. This service can be run on a different port so the management services are not on the same interface as the Event Training Server API. Note: enabling this management port will require changes to the docker-compose.yml file to expose the port.
The health endpoint was customized to disable the display of disk space reporting, ping reporting and refresh information as it cluttered the response. In addition, the health endpoint is configured to always show details of the dependent services (P-ETS and in training mode, Analytics Server). To change the behavior and get a simple UP/DOWN response set show-details to never.
The following management endpoints are enabled: info, health, metrics, and prometheus. There are approximately 20 additional management endpoints that can be enabled.
Metrics is enabled to expose runtime metric information about the Event Training Server process, memory consumption, threads and CPU usage.
Prometheus is enabled so that Event Training Server can be used as a data source for monitoring applications such as Graphana.
Endpoint timing information is enabled and available using the /ets/prometheus endpoint
management:
# Management can be on a separate port
#  server:
#    port: 9888
  health:
    diskspace:
      enabled: false
    ping:
      enabled: false
    refresh:
      enabled: false
  endpoint:
    health:
      show-details: always
  endpoints:
    web:
      base-path: /
      exposure:
        include: "prometheus, metrics, health, info"
  metrics:
    web:
      server:
        auto-time-requests: true
Eureka
ETS_HOST is only used when Event Training Server is running remotely to PETS
eureka:
  dashboard:
    path: /eurekadashboard
    enabled: false
  instance:
    appname: JETS
    hostname: ${ETS_HOST:ets-server}
    leaseRenewalIntervalInSeconds: 30
    leaseExpirationDurationInSeconds: 120
    status-page-url: /ets/info
    health-check-url: /ets/health
server:
    enableSelfPreservation: false
  client:
    healthcheck:
      enabled: false
#  As the server we don't want to register with ourselves
    registerWithEureka: false
    fetchRegistry: false
    serviceUrl:
      defaultZone:
 http://${eureka.instance.hostname}:${server.port}/ets/eureka/
Info
This section determines the Event Training Server operating mode (training or extraction). The ETS_TRUSTSTORE_FILENAME and ETS_KEYSTORE_FILENAME are only defined when running outside a container.
info:
  app:
    name: "events-training-server"
    description: "Rosette Event Extraction and Training Server"
ets:
    operating-mode: "${ETS_MODE:training}"
rs:
  # rsUrl is only required in training configuration
  rsUrl: ${RS_URL:}
  rsConnectTimeoutMS:30000
    ssl:
    enable-outgoing-ssl: ${ENABLE_OUTGOING_SSL:false}
        key-store: ${ETS_KEYSTORE_FILENAME:/certs/keystore.jks}
    key-store-password: ${ETS_KEYSTORE_PW:}
    trust-store: ${ETS_TRUSTSTORE_FILENAME:/certs/truststore.jks}
    trust-store-password: ${ETS_TRUSTSTORE_PW:}
pets:
    minimumVersion: v1.0.0
    connectTimeoutMS: 60000
    readTimeoutMS: 60000
    writeBufferSizeKB: 1000
Springdoc
springdoc:
  show-actuator: true
  # Enable/disable swagger documentation
  api-docs:
    enabled: true
spring:
  banner:
    location: classpath:ets-banner.txt
  resources:
    add-mappings: false
  cloud:
    discovery:
      client:
        composite-indicator:
          enabled: false
        health-indicator:
          enabled: false
Enabling Event Training Server log files
This process describes how to capture the logs for the Event Training Server frontend process, (the J-ETS server). The backend worker (P-ETS) processes logs through the docker subsystem.
Configuring the Log Files
On the host machine, create a directory for the logs and set the permissions.
mkdir /basis/ets/logs
chmod 777 /basis/ets/logs
The container must have sufficient permissions to write to the directory (uid = 1000, user = ets, group = ets).
Edit the file
/basis/ets/ets-docker/.env, adding a variable to set the logs directory.Add:
ETS_LOG_DIR=/basis/ets/logs
Edit the file
/basis/ets/ets-docker/docker-compose.ymlto mount the logs directory.In the
ets-server:section, add a new volume definition, using the new logs directory. The last line in the sample below is the added line.volumes: - ${ETS_CONFIG_FILE}:/application.yml - ${ETS_KEYSTORE_FILE}:/certs/keystore.jks - ${ETS_TRUSTSTORE_FILE}:/certs/truststore.jks - ${ETS_LOG_DIR}:/logsThis will create the
/logsdirectory in the container.Tell Event Training Server to use the
ETS_LOG_DIRby editing the file/basis/ets/config/application.ymland adding thefile: path: /logs statements.file: path: /logs level: ROOT: ${ETS_LOGGING_LEVEL:info} com.netflix.eureka.cluster: ERROR com.netflix.eureka.registry: WARNNote that the values in the
application.ymlfile refer to values in the container, not the host. The path specified inlogging.file.pathshould be/logsor whatever the volume was set to in thedocker-compose.ymlfile.
Log File Naming
The default log file name is spring.log. If you prefer a different name, you can change the log file name.
Edit the file
/basis/ets/config/application.ymland set the log file name by adding the name parameter and removing the path parameter from the logging section. If path and name are both present, path takes precedence and the default log file name will be used.logging: file: name: /logs/ets-server.log level: ROOT: ${ETS_LOGGING_LEVEL:info} com.netflix.eureka.cluster: ERROR com.netflix.eureka.registry: WARN
Log Rotation
By default, once logs reach 10 MB they are archived. That is, they are compressed with a date stamp and sequence number such as ets-server.log.2022-03-04.0.gz.The file size at which this occurs can be changed by setting the max-size in the file /basis/ets/config/application.yml.
logging:
  file:
    name: /logs/ets-server.log
    max-size: 20 MB
Supported values for the max-size include MB and KB.
Install indoc coref server
Within a document, there may be multiple references to a single entity. In-document coreference (indoc coref) chains together all mentions to an entity.
The indoc coref server is an additional server which may be installed alongside Analytics Server.
The response time will be slower when the request includes options such as
{"useIndocserver":true}. For this reason, we recommend using a GPU with indoc coref enabled.Indoc coref is supported for English only.
You must have Docker, dockercompose, and unzip installed.
The product can be installed interactively or with a headless installer.
To install interactively:
Unzip the file
coref-installation-<version>.zip.From the directory
coref-installation-<version>, run the installation script:./install-coref.sh
To run the headless version of the script:
./install-coref-headless.sh
The properties file is in the same directory as the script.
Use the
--dry-runflag to validate the properties file, print the settings, and exit without changing anything.
The Indoc Coref Server installer will prompt you for the following information.
Prompt | Purpose |
|---|---|
Install Coreference Server | Choose whether to install the indoc coref server. |
${Install Dir} does not exist, create (y/n)? | Create a new directory to install |
${Install Dir} exists, use anyway (files will be overwritten) (y/n)? | Overwrite the existing version. |
Load Coreference Server docker image (recommend Y) (y/n)? | |
Enter port Coreference Server should listen on (default 5000) | Default: 5000 |
Indoc Coref headless installer
The headless installer installs the indoc coref server without human interaction. Instead of user prompts, the installer parameters are taken from the properties file.
The installer prompts are defined in the file install-coref-headless.properties:
# The directory the Coreference server should be installed in
# Default is /basis/coref
install_dir=/basis/coref

# Load the Coreference server docker image into the docker cache
# Default is true
load_image=true

# The port the Coreference server should listen on
# Default is 5000
coref_port=5000
Start the installation:
./install-coref.sh --headless
Install Adaptation Studio (RAS)
You must have Docker, dockercompose, and unzip installed.
Unzip the file
rosette-adaptation-studio-<version>.zip.From the directory
rosette-installation-<version>, run the installation script:Start the installation:
./install-ras.sh
To run the headless version of the script:
./install-ras-headless.sh
The properties file is in the same directory as the script.
Use the
--dry-runflag to validate the properties file, print the settings, and exit without changing anything.
Note
SSL for the front end browser, the connection from the web client to the Adaptation Studio server, can be enabled when RAS is installed. After installation of all three servers is complete, you can enable SSL between the servers.
To enable SSL for the front end browser, answer Yes to the question "Enable SSL for NGINX?". The certificate should already be on the server before beginning the installation.
Enabling front end SSL support is independent of enabling SSL between the servers.
The Adaptation Studio installer will prompt you for the following information:
Prompt | Purpose | Options | Notes |
|---|---|---|---|
Installation directory | Directory for docker compose files and helper scripts. | Default:
| The disk requirements for the docker compose files are minimal (< 1 MB). However, other parts of the install require greater disk space |
Enter location of Adaptation Studio logs | Directory for log files | Default: | |
Load the Adaptation Studio Docker image? | Load the Docker images so they are available on the local machine | Otherwise, load them to a Docker registry shared by all machines. | |
Enable SSL for NGINX? | To enable SSL for the connection from the web client to the RAS server | In a closed network this may not be required however, passwords from the client to server are initially sent using clear-text so it is recommended to enable SSL. | |
Target directory for SSL certificate files | Directory that will contain the SSL certificate files | Default: | For information on SSL certificate files:http://nginx.org/en/docs/http/ngx_http_ssl_module.html#ssl_certificate |
Location of the certificate key file | Where to find the certificate key file | The certificate must be in PEM format | |
Location of the certificate file | Where to find the certificate file | The certificate must be in PEM format | |
HTTPS Port to expose | Required if enabling SSL | Default: 443 | |
HTTP port to expose | Required if not enabling SSL | Default: 80 | |
Fully qualified host name where REX Training Server is installed | Used by Adaptation Studio to perform training for entity extraction | The Entity Training Server does not need to be installed before Adaptation Studio, but you must know where it will be installed. Cannot be empty, | |
Port REX Training Server is listening on |
| Default: 9080 |
|
Fully qualified host name where Events Training Server is installed | Used by Adaptation Studio to perform training for events extraction | The Event Server does not need to be installed before Adaptation Studio, but you must know where it will be installed. Cannot be empty, | |
Port Event Training Server is listed on | Default: 9999 | ||
Fully qualified host name where Analytics Server is installed | Used internally by Adaptation Studio |
| Analytics Server does not need to be installed before Adaptation Studio but Server should be installed and started before starting the studio. Liveliness checks will be performed on startup. Cannot be empty, |
Port Analytics Server is listening on | Default: 8181 | ||
Data directory for Adaptation Studio database | Directory where the Adaptation Studio data will be stored. | Default: | This can be an NFS mount. |
Directory for database backups | Directory where data should be stored when backed up from the RAS client. | Default: | This can be an NFS mount. |
Port to expose for the database | This port will be used by the Entity Training Server to connect to the Adaptation Studio database instance to retrieve samples. | Default: 27017 |
Verify system status
Model Training Suite has scripts on each server to monitor the health and status of the system. Run them at startup to verify the system is ready to go.
The scripts are:
/basis/rs/scripts/rs-healthcheck.sh/basis/rts/scripts/rts-healthcheck.sh/basis/ras/scripts/ras-healthcheck.sh
where /basis is the default installation directory. If you've installed in a different directory, replace /basis with your install directory.
Each script verifies that the Docker containers have loaded and all components are running.
To check the status of Event Training Server, open a browser and proceed to http:/{host}:{port}/ets/health. The default port is 9999.
The workers indicate that Event Training Server is available and Analytics Server can communicate with it:
{"status": "UP",
"components": {
    "PETS-Workers": {
       "status": "UP",
       "details": {
           "P-ETS Workers": "1 Worker(s) Available"
       }
     },
    "RosetteServer": {
       "status": "UP",
       "details": {
           "Analytics Server": "Available at http://memento:8181/rest/v1"
       }
     }
   }
}
Use the following links to verify the status of each of the servers:
Event Training Server health check: http://localhost:9999/ets/health
Entity Training Server Training Server endpoints health check: http://localhost:9080/health
Analytics Server: http://localhost:8181/rest/v1/info
Adaptation Studio: http://localhost/
Model Training Suite is shipped with a sample events model that can be used to verify the installation for events. Use the import_project.sh script to import the project.
Manage the training servers
Start the servers
Once installed, start the servers in the following order:
Run the Event Training Server (EvTS)
Navigate to the installation directory containing the Docker compose files. The default is:
/basis/ets/ets-docker
Run the service in detached mode.
docker compose up -d
To check that the service has started, check the logs.
docker compose logs -f
To check the status of Event Training Server, open a browser and proceed to
http:/{host}:{port}/ets/health. The default port is 9999.The workers indicate that Event Training Server is available and Analytics Server can communicate with it:
{"status": "UP",
"components": {
    "PETS-Workers": {
       "status": "UP",
       "details": {
           "P-ETS Workers": "1 Worker(s) Available"
       }
     },
    "RosetteServer": {
       "status": "UP",
       "details": {
           "Rosette Server": "Available at http://memento:8181/rest/v1"
       }
     }
   }
}
Run the Entity Training Server (EnTS or RTS)
Navigate to the installation directory containing the Docker compose files. The default is:
/basis/rts/rts-docker
Run the service in detached mode.
docker compose up -d
To check that the service has started, check the logs. This will display the last few lines of the logs from the service.
tail /basis/rts/logs/messages.log
The service can be tested by using a browser and navigating to
http://<host>:<port>/health. The default port is 9080.Example:
http://localhost:9080/health
Run Analytics Server (RS)
To run on the console:
cd /basis/rosette/server/bin
./launch.sh console
To stop in the console:
CTRL-C
To run as a daemon:
./launch.sh start
To stop the daemon:
./launch.sh stop
To run the dockerized version of Analytics Server:
cd /basis/rs/rs-docker
If running on the console: CTRL-CIf running as a daemon: ./launch.sh stop
To stop the dockerized version:
docker compose down
Note
Check the logs in /basis/rosette/server/logs/ to see any errors from startup or during the server run.
Note
If your installation includes the entity extraction component (rex-root), you may see failed to open ... warning messages for data files in languages not installed in your system. These can safely be ignored.
Tip
Now you can Try it out.
Run Adaptation Studio
Analytics Server and Entity Training Server must be running.
Navigate to the installation directory (default
/basis/ras).Execute the script
./scripts/start-standalone.sh. This script starts the services in detached mode and prints the logs. The message "Rosette Active Learning Studio Server <version> now up" will be displayed when the server is ready. You can then press CTRL-C to disconnect from the logs.Using a browser, navigate to
http(s)://<host>:<port>/to display the Adaptation Studio landing page.http://localhost:80
Verify system status
Model Training Suite has scripts on each server to monitor the health and status of the system. Run them at startup to verify the system is ready to go.
The scripts are:
/basis/rs/scripts/rs-healthcheck.sh/basis/rts/scripts/rts-healthcheck.sh/basis/ras/scripts/ras-healthcheck.sh
where /basis is the default installation directory. If you've installed in a different directory, replace /basis with your install directory.
Each script verifies that the Docker containers have loaded and all components are running.
To check the status of Event Training Server, open a browser and proceed to http:/{host}:{port}/ets/health. The default port is 9999.
The workers indicate that Event Training Server is available and Analytics Server can communicate with it:
{"status": "UP",
"components": {
    "PETS-Workers": {
       "status": "UP",
       "details": {
           "P-ETS Workers": "1 Worker(s) Available"
       }
     },
    "RosetteServer": {
       "status": "UP",
       "details": {
           "Analytics Server": "Available at http://memento:8181/rest/v1"
       }
     }
   }
}
Use the following links to verify the status of each of the servers:
Event Training Server health check: http://localhost:9999/ets/health
Entity Training Server Training Server endpoints health check: http://localhost:9080/health
Analytics Server: http://localhost:8181/rest/v1/info
Adaptation Studio: http://localhost/
Model Training Suite is shipped with a sample events model that can be used to verify the installation for events. Use the import_project.sh script to import the project.
Superuser password
Important
The initial superuser password for Adaptation Studio is set on install and must be changed on first login.
The superuser can create users and perform all tasks. At install, the superuser is set to admin.
The first time you log in as admin, you will be forced to change the password. The initial login information is:
Name: admin
Password: admin
The superuser password can be reset by running the reset_admin.sh in /basis/ras/scripts. After reset, you will be prompted to change the password when you log in the first time.
Note
If the superuser password contains the special characters $ or \, the password must be in quotes when sent to the reset_admin.sh script. Example:
./reset_admin.sh '2^$4bu\Qm$4C'
Headless installer
When using the headless installer, you can set the initial superuser password in the properties file.
To override the admin password, set the admin_password property to the plain text password to use in the install-ras-headless.properties file. On install, this password will be hashed and inserted into the authentication database of Adaptation Studio. Once installed the value can be deleted from the properties file.
You will not be prompted to change the password on the first login.
Shut down the servers
Once you've entered annotations and selected annotate, the data is saved in the system. If you bring down the servers while models are being trained, the models will be recreated and retrained upon restart.
Shut down the servers in the following order:
Adaptation Studio
Navigate to the scripts directory (default
/basis/ras/scripts/)stop-standalone.sh
Analytics Server
If running on the console:
CTRL-CIf running as a daemon:
./launch.sh stop
Entity Training Server
Navigate to the docker directory (default
/basis/rts/rts-docker/)docker compose down
Event Training Server
Navigate to the docker directory (default
/basis/ets/ets-docker/)docker compose down
Troubleshooting
These commands are executed in the directory with the docker compose files, e.g. /basis/rts/rts-docker.
Command | Purpose |
|---|---|
| Applies the variables from the |
| If you omit the |
| The |
| Attaches to the logs |
| Allows you to see the ENV variables the container is using. |
docker compose config
services:
  rex-training-server:
    environment:
      AS_MONGO_DAL_CONNECTOR_CONFIG_DIR: /basis/rts/config
    image: rex-training-server-tom-0.4.1:latest
    ports:
    - 9080:9080/tcp
    volumes:
    - /basis/0.8.final/rts/workspaces:/basis/rts/workspaces:rw
    - /basis/0.8.final/rts/assets:/basis/rts:rw
    - /basis/0.8.final/rts/config:/basis/rts/config:rw
    - /basis/0.8.final/rts/logs:/logs:rw
    - /basis/0.8.final/rts/rts-docker/jvm.options:/config/jvm.options:rw
version: '3.0'
System log files
Each component generates logs which may be useful if a problem occurs.
The location of the logs is determined during installation. The files in the default locations are:
/basis/rs/logs/wrapper.logs/basis/rts/logs/messages.logs/basis/ras/logs/error.log(Nginx error log)/basis/ras/logs/access.log(Nginx access log)/basis/ras/logs/server.log
The Event Training Server (EvTS) leverages Docker log files, allowing you to customize log file location, rotation, log format (e.g. JSON), and if the logs are stored off the device. To display log information, from the Event Training Server install directory:
docker compose logs
or to follow the logs:
docker compose logs -f
See the Docker documentation for configuration and usage information.
Log files are also created during installation. Refer to these files for details on how each component was installed, as well as SSL configuration.
Analytics Server
/rest/metrics
The metrics endpoint provides info about the JVM. These values can be used with tools like ELK to graph the overall health of the container. For example, you can graph the percentage of memory used over time to see if you are running out of memory.
curl localhost:8181/rest/metrics
# HELP jvm_buffer_pool_used_bytes Used bytes of a given JVM buffer pool.
 TYPE jvm_buffer_pool_used_bytes gauge
jvm_buffer_pool_used_bytes{pool="mapped",} 1.9689509698E10
jvm_buffer_pool_used_bytes{pool="direct",} 219885.0
jvm_buffer_pool_used_bytes{pool="mapped - 'non-volatile memory'",} 0.0
# HELP jvm_buffer_pool_capacity_bytes Bytes capacity of a given JVM buffer pool.
# TYPE jvm_buffer_pool_capacity_bytes gauge
jvm_buffer_pool_capacity_bytes{pool="mapped",} 1.968950405E10
jvm_buffer_pool_capacity_bytes{pool="direct",} 219885.0
jvm_buffer_pool_capacity_bytes{pool="mapped - 'non-volatile memory'",} 0.0
# HELP jvm_buffer_pool_used_buffers Used buffers of a given JVM buffer pool.
# TYPE jvm_buffer_pool_used_buffers gauge
jvm_buffer_pool_used_buffers{pool="mapped",} 58.0
jvm_buffer_pool_used_buffers{pool="direct",} 17.0```
Ping
Ping the server to test that Server is running and you can connect to it.
bash:
curl http://localhost:8181/rest/v1/ping
Windows Powershell:
Invoke-WebRequest -Uri http://localhost:8181/rest/v1/ping
Windows Command Prompt:
start "" http://localhost:8181/rest/v1/ping
This should return:
{"message":"Rosette at your service","time":1467912784915}
Query the version
bash:
curl http://localhost:8181/rest/v1/info
Windows Powershell:
Invoke-WebRequest -Uri http://localhost:8181/rest/v1/info
This should return:
{
  "name": "Rosette",
  "version": "1.28.0",
  "buildNumber": "a8ea5010",
  "buildTime": "20231218215507",
  "licenseExpiration": "Perpetual"
}
Entity Training Server → Adaptation Studio troubleshooting/monitoring
The /rts/info/server endpoint
$ curl "http://localhost:9080/rts/info/server"
returns the configuration properties along with the version:
{"assetRoot": "/basis/rts",
"concurrentSerializationThreads": 1,
"concurrentTrainThreads": 2,
"concurrentWordclassTrainingThreads": 2,
"memoryCacheTimeout": 180,
"serializationDelay": 300,
"version": "1.0.1",
"workspaceRoot": "/basis/rts/workspaces"}
DAL Connection Test
The DAL connection test verifies the connection between Entity Training Server and the mongo instance on Adaptation Studio by connecting to EnTS directly. If Adaptation Studio is not reachable, this test could hang for 1-2 minutes waiting for the connection.
curl -v -X POST "http://localhost:9080/rts/rex/test-dal-connector" --header 'Content-Type: application/json' -d '{
        "connectorId": "AS_MONGO",
        "corpusType": "ANNOTATED_TRAIN_CORPUS",
        "healthCheck" : "true",
  "config": {
    "projectId": "5f1470b6412ff29b8e4982f3",
    "sampleIds": "5f158b0e412ff29b8e4983b8,5f158b0e412ff29b8e4983b5,5f158b0e412ff29b8e4983b7"
  }
}'
If it is working, it will return:
{"tests":[{"connectorId":"AS_MONGO","message":"Health check passed","success":true}]}This message indicates that the port is open and mongo is responding to requests.
The DAL connector is configured using the file /basis/rts/config/mongodal_config.yaml.
connectionString: 192.168.0.145:27017
maxSamples: 100000
useSsl: false
user: root
password: admin
authenticationDB: admin
The connectionString points to the mongo instance in Adaptation Studio which is needed by the DAL connector in Entity Training Server. If the test is not successful, use cURL or a mongo client to test the connection to the mongo server without going through Entity Training Server.
curl 192.168.0.145:27017
When using cURL, a successful response will be a message from mongo similar to:
"It looks like you are trying to access MongoDB over HTTP on the native driver port."
This indicates the port is open and mongo is responding to requests.
Analytics Server → Entity Training Server troubleshooting/monitoring
Ping the server to test that the Entity Training Server is running and confirm that you can connect to it:
curl localhost:9080/rts/info/server
Verify the settings in the .env file in the rs-docker directory
$ cat .env
returns:
# Connector information
RTS_URL=http://192.168.1.234:9080
RTS_SOURCE_STRING=statistical
Verify that the hostname/port are correct and reachable from the host. In the Analytics Server container, the following command should return 200.
curl $RTS_URL
Analytics Server → Event Training Server troubleshooting/monitoring
Ping the server to test that Event Training Server is running and confirm that you can connect to it:
curl -v http://<host>:<port>/rest/v1/events/info
If Analytics Server can't connect to Event Training Server, check the event-extractor-factory-config.yaml file in the rs/config/rosapi directory. Verify that the value of eventTrainingServerUrl is correct and not commented out.
Adaptation Studio
Model Training Suite uses mongo as the backend database to store projects. The mongo client is required to perform a health check of the backend.
For performance, db.enable.FreeMonitoring() can be enabled and will provide an external API with statistics. This is not recommended for use in production.
The Manage Project page in the Studio will display the status of Analytics Server and Entity Training Server.
SSL support
Note
SSL for the front end browser, the connection from the web client to the Adaptation Studio server, can be enabled when Adaptation Studio is installed. After installation of all servers is complete, you can enable SSL between the servers.
This section describes how to enable and disable SSL support between the servers.
Enabling front end SSL support is independent of enabling SSL between the servers.
SSL prerequisites
To run the provided scripts you need a certificate and a key generated for each host that is running a component. Each of the certificates must be signed by the root certificate authority (CA) that will be shared by all hosts running components. All certificates, keys, and root certificate authority files must be stored in PEM format.
Note
If all components are running on a single host, the same certificate and key PEM files can be shared by Adaptation Studio, Event Training Server, Entity Training Server, and Analytics Server.
Event Training Server, Entity Training Server, and Analytics Server are Java processes, so they require a keystore for the host and truststore for the root CA in a password protected Java Key Store (JKS) format in addition to PEM-format files. There is a script provided, generate-keystores.sh, in the Entity Training Server docker directory that will convert the certificate and key into a password protected JKS file. The JKS file must have a .jks file extension. Additionally, this script will generate a password protected truststore JKS file. For Event Training Server, the generate-keystores.sh script is located in the scripts directory.
As long as the root CA is included, any truststore can be used. The truststore created by the provided script does not have to be used.
Enable and disable SSL support
Note
These instructions assume you have certificates for each of the servers. You will need the location and passwords for the keystore and the truststore for each server.
Adaptation Studio includes scripts to enable and disable SSL support between the servers. The scripts are found in the following directories:
/basis/rs/rs-docker/basis/rts/rts-docker/basis/ras/scripts/basis/ets/ets-docker/basis/coref/scripts
Enable SSL
Install and test the complete Adaptation Studio installation before enabling SSL. This will verify that everything is properly installed.
For each component:
Warning
You must shut down all the services before enabling SSL between them.
If you receive an error when restarting the services: "Cannot start service servicename: error while creating mount source path", the services were not shut down before enabling SSL.
To continue, restart Docker:
sudo systemctl restart docker
then restart the services.
Once the installation has been verified, shut down the services.
Execute the script from the directory containing scripts. For each product, you will be prompted for the location and passwords for the keystore and truststore.
To run the headless version of the scripts, use the
--headlessflag. The.propertiesfiles are in the same directories as the scripts.Use the
--dry-runflag to validate the properties file, print the settings, and exit without changing anything./basis/rs/scripts/enable-rs-ssl.sh/basis/rts/rts-docker/enable-rts-ssl.sh/basis/ras/scripts/enable-ras-ssl.sh/basis/ets/ets-docker/enable-ets-ssl.sh/basis/coref/scripts/enable-coref-ssl.sh
Start the services.
Disable SSL
Shut down the services.
Execute the script from the directory containing the docker-compose files.
To run the headless version of the scripts, use the
--headlessflag. The.propertiesfiles are in the same directories as the scripts.Use the
--dry-runflag to validate the properties file, print the settings, and exit without changing anything./basis/rs/rs-docker/disable-rs-ssl.sh/basis/rts/rts-docker/disable-rts-ssl.sh/basis/ras/scripts/disable-ras-ssl.sh/basis/ets/ets-docker/disable-ets-ssl.sh/basis/coref/scripts/disable-coref-ssl.sh
Start the services.
Analytics Server SSL scripts
Analytics Server is based on the Java-based OSGI with Jetty web server. To enable incoming SSL connections the server configuration must be updated to include the path to the truststore, keystore, and their respective passwords. Additionally, to enable outgoing SSL connections, e.g. Entity Training Server Decoder, custom code etc., the Java virtual machine settings must be updated to include the path to the truststore, keystore, and their respective passwords as well.
The enable-rs-ssl.sh script performs the following actions:
Prompts for the location and passwords of the truststore and keystore files.
Copies the truststore and keystore to the configuration directory so that the container has access to them.
Note
if you are re-enabling SSL and using truststores and keystores already present in the configuration directory you will see a warning message about the files being identical and not being copied. This message can safely be ignored.
Copies
ssl-conf-template.confto the configuration directory and renames it tossl-conf.conf.ssl-conf.confwill contain parameters to the JVM settings for Analytics Server and will hold the names and passwords of the truststore and keystore.On startup, if the Analytics Server container detects the presence of the
ssl-conf.conffile in the config directory and the environment variable ENABLE_SSL is set to 1 (set in the .envfile), then the configuration file will be included in thewrapper.conffile for RS. Thewrapper.conffile is responsible for setting up the runtime environment for Analytics Server.Sets ENABLE_SSL to 1 in
.env.Adds/uncomments the keystore and truststore file names and passwords in the file
org.apache.cxf.http.jetty-main.cfgin the config directory.Sets the URL scheme to https in the file
com.basistech.ws.cxf.cfgin the config directory.Sets the scheme of the RTS_URL to https in the
.envfile.
The disable-rs-ssl.sh script reverses the actions above:
Note
This script does not delete the truststore or keystore from the configuration directory.
Sets ENABLE_SSL to 0 in
.env.Comments out the keystore and trustore file names and passwords in the file
org.apache.cxf.http.jetty-main.cfgin the config directory.Sets the URL scheme to http in the file
com.basistech.ws.cxf.cfgin the config directory.Sets the scheme of the RTS_URL to http in the
.envfile.
Enabling SSL in Analytics Server
A script to create a trust and/or keystore for Analytics Server can be found in both the Entity Training Server and Event Training Server directories. The scripts are identical.
<RTS_INSTALL>/scripts/generate-keystores.sh<ETS_INSTALL>/scripts/generate-keystores.sh.
Generating a keystore will require a certificate and key in PEM format.
Generating a truststore will require a Root Certificate Authority (Root CA) certificate in PEM format.
Note
The Root Certificate Authority can also be added to the truststore used system-wide by Java. If this option is used, then the trust store does not need to be explicitly set in the steps below. Typically, the global certificate authority certificate truststore is in <JAVA_INSTALL>/lib/security/cacerts with the default password of changeit.
SSL over inbound Analytics Server connections
Edit the keystore and truststore file properties and passwords in launcher/config/jetty-ssl-config.xml.
<beans xmlns="http://www.springframework.org/schema/beans"
       xmlns:xsi="http://www.w3.org/2001/XMLSchema-instance"
       xmlns:http="http://cxf.apache.org/transports/http/configuration"
       xmlns:httpj="http://cxf.apache.org/transports/http-jetty/configuration"
       xmlns:sec="http://cxf.apache.org/configuration/security"
       xsi:schemaLocation="
        http://www.springframework.org/schema/beans                 http://www.springframework.org/schema/beans/spring-beans.xsd
        http://cxf.apache.org/transports/http/configuration         http://cxf.apache.org/schemas/configuration/http-conf.xsd
        http://cxf.apache.org/transports/http-jetty/configuration   http://cxf.apache.org/schemas/configuration/http-jetty.xsd
        http://cxf.apache.org/configuration/security                http://cxf.apache.org/schemas/configuration/security.xsd">


    <httpj:engine-factory id="rosette-server-engine-config">
        <httpj:engine port="#{ systemProperties['rosapi.port'] }">
            <httpj:tlsServerParameters>
                <sec:clientAuthentication required="false" />
                <sec:keyManagers keyPassword="[key-pass]">
                    <sec:keyStore type="JKS" password="[keystore-pass]"
                                  file="path/to/keystore.jks"/>
                </sec:keyManagers>
                <sec:trustManagers>
                    <sec:keyStore type="JKS" password="[truststore-pass]"
                                  file="path/to/truststore.jks"/>
                </sec:trustManagers>
            </httpj:tlsServerParameters>
        </httpj:engine>
    </httpj:engine-factory>

</beans>
Change http to https in /launcher/config/com.basistech.ws.cxf.cfg.
urlBase=https://0.0.0.0:${rosapi.port}/restSSL over outbound Analytics Server connections
Create a file named
ssl-conf.conf. Edit the file, adding the following contents:#encoding=UTF-8 #Uncomment the line below to enable SSL debugging #-Djavax.net.debug=ssl -Djavax.net.ssl.keyStore=<full path to the Java keystore file (jks|pkcs12)> -Djavax.net.ssl.keyStorePassword=<KEY_STORE_PASSWORD> -Djavax.net.ssl.trustStore=<full path to the Java truststore file (jks|pkcs12)> -Djavax.net.ssl.trustStorePassword=<TRUST_STORE_PASSWORD>
Edit
<ROSETTE_SERVER_INSTALL>/server/conf/wrapper.conf. Add the following to the end of the file:wrapper.java.additional_file=<path to the ssl-conf.conf file>
for example:
wrapper.java.additional_file=/rosette/server/launcher/config/ssl-conf.conf
Entity Training Server SSL scripts
Entity Training Server is based on the Java-based Open Liberty web container. To enable incoming and outgoing SSL the server configuration must be updated to include the path to the truststore, keystore, and their respective passwords. Additionally the mongodal_config.yaml file (in the config directory) must be updated to set the useSsl flag to true, enabling SSL between Entity Training Server and the mongo instance running on Adaptation Studio.
The enable-rts-ssl.sh script performs the following actions:
Prompts for the location and passwords of the truststore and keystore files.
Copies the truststore and keystore to the configuration directory so that the container has access to them.
Note
if you are re-enabling SSL and using truststores and keystores already present in the configuration directory you will see a warning message about the files being identical and not being copied. This message can safely be ignored.
Copies a
server.template.xmlfile to the configuration directory and renames it toserver.ssl.xml.Replaces the values for the truststore and keystore file names and passwords in the
server.ssl.xmlfile.Updates the
docker-compose.ymlfile and enables mounting theserver.ssl.xmlfile asserver.xml.This updates the server’s configuration.Updates the
.envfile with the name of the SERVER_XML file (server.ssl.xml).Enables ssl in the
mongodal_config.yamlfile.
The disable-rts-ssl.sh script reverses the actions above:
Note
This script does not delete the truststore or keystore from the configuration directory.
Updates the
docker-compose.ymlfile and comments out the mounting of the SERVER_XML file.Updates the
.envfile and comments out the SERVER_XML filename.Deletes the
server.ssl.xmlfile from the configuration directory.
Adaptation Studio SSL scripts
Adaptation Studio is based on multiple technologies: python server, nginx reverse proxy, mongoDB server and React. As such, the configuration for Adaptation Studio will be different from a Java process. All components internal to Adaptation Studio use nginx for outgoing communication. Mongo is exposed to the host machine and can be protected by SSL. One of the primary differences between the Adaptation Studio scripts and Entity/Event Training Server scripts is that the Adaptation Studio scripts use PEM files rather than JKS files. Also, since Adaptation Studio is made of one incoming connection (mongo) and three outgoing connections (Entity Training Server, Event Training Server, Analytics Server) it is possible to selectively enable SSL for mongodb, Entity Training Server and Analytics Server.
The enable-ras-ssl.sh script performs the following actions:
Prompts for the locations of the certificate, key, and root CA PEM files.
Copies the PEM files to WEBSITE_HTTPS_CERT_DIR defined in the
.envfile.If incoming mongodb traffic is to use SSL:
The certificate and key are concatenated into a single file for use by mongo and stored in the WEBSITE_HTTPS_CERT_DIR. This file is named
<certificate name without file extension>-ras-cert-key.pem.The file
proxy-ssl-template.confis copied and renamedproxy-mongo-ssl.conf. This file will contain nginx SSL settings for the certificate and ca certificate to use when internal components communicate with mongodb.The file
mongo-ssl-template-docker-compose.override.ymlis copied and renameddocker-compose.override.yml. This file contains the alternative startup command for mongodb that includes parameters to only accept SSL traffic. Additionally it mounts theproxy-mongo-ssl.conffile so that the ras-proxy service can gain access to the SSL configuration file.
If the outgoing traffic to RS is to use SSL:
The file
proxy-ssl-template.confis copied and renamedproxy-rs-ssl.conf. This file will contain nginx SSL settings for the certificate and ca certificate to use when internal components communicate with Analytics Server.The
nginx-template.conffile is updated to uncomment the inclusion of theproxy-rs-ssl.conffile.The
docker-compose.ymlfile is updated to mount theproxy-rs-ssl.conffile so that nginx can load it.The scheme for ROSETTE_URL is changed to https in
.env
If the outgoing traffic to Entity Training Server is to use SSL:
The file
proxy-ssl-template.confis copied and renamedproxy-rts-ssl.conf. This file will contain nginx SSL settings for the certificate and ca certificate to use when internal components communicate with Analytics Server.The
nginx-template.conffile is updated to uncomment the inclusion of theproxy-rts-ssl.conffile.The
docker-compose.ymlfile is updated to mount theproxy-rts-ssl.conffile so that nginx can load it.Changes the scheme of RTS_URL to https in the
.envfile.
The disable-ras-ssl.sh script reverses the actions above:
Note
This script does not delete the PEM files from the WEBSITE_HTTPS_CERT_DIR directory.
If SSL is to be disabled for incoming mongodb traffic:
Comments out the inclusion of the
proxy-mongo-ssl.conffrom thenginx-template.conffile.Deletes the
proxy-mongo-ssl.conffile.Backs up then deletes the
proxy-mongo-ssl.conffile.
If SSL is to be disabled for outgoing Analytics Server traffic:
Deletes the
proxy-rs-ssl.conffile.Comments out the inclusion of the
proxy-rs-ssl.conffrom thenginx-template.conffile.Comments out the mount of the
proxy-rs-ssl.conffrom thedocker-compose.ymlfile.
If SSL is to be disabled for outgoing Entity Training Server traffic:
Deletes the
proxy-rts-ssl.conffile.Comments out the inclusion of the
proxy-rts-ssl.conffrom thenginx-template.conffile.Comments out the mount of the
proxy-rts-ssl.conffrom thedocker-compose.ymlfile.Changes the scheme of RTS_URL to http in the
.envfile.
You can enable and disable the SSL connection between the browser and Adaptation Studio.
To disable SSL for incoming browser connections to the Studio, use the
disable-browser-ras-ssl.shscript.To enable SSL for incoming browser connections to the Studio, use the
enable-browser-ras-ssl.shscript. You will need a certificate and a key in PEM format.
Event Training Server SSL scripts
Event Training Server requires a certificate and key in PEM file format, in addition to a root certificate in PEM format.
Training mode also requires a keystore and truststore in JKS format.
./scripts/generate-keystores.shwill create the JKS files from the PEM files.
The enable-ets-ssl.sh script performs the following actions:
Prompts for the location and passwords of the truststore and keystore files and attempts to validate them.
Prompts whether the files should be copied to the
./certsdirectory (recommended but not required).Updates
./ets-docker/.env, setting the following:Sets
NGINX_CONF_FILEtonginx-ssl.conf.Sets
NGINX_CERT_PEM_FILE,NGINX_KEY_PEM_FILEandNGINX_TRUSTED_PEM_FILEto the respective PEM files.Sets
ETS_KEYSTORE_PW,ETS_TRUSTSTORE_PW,ETS_KEYSTORE_FILEandETS_TRUSTSTORE_FILE(if in training mode).Sets
ENABLE_OUTGOING_SSLto true (if in training mode).
The disable-ets-ssl.sh script performs the following actions:
Updates
./ets-docker/.envsetting the following:Sets
NGINX_CONF_FILEtonginx-not-ssl.conf.Sets
NGINX_CERT_PEM_FILE,NGINX_KEY_PEM_FILEandNGINX_TRUSTED_PEM_FILEto placeholder files in the./certsdirectory.Deletes
ETS_KEYSTORE_PWandETS_TRUSTSTORE_PW.Sets
ETS_KEYSTORE_FILEandETS_TRUSTSTORE_FILEto placeholder files in the./certsdirectory.Sets
ENABLE_OUTGOING_SSLto false.
Indoc Coref Server SSL scripts
Indoc coref requires a certificate and key in PEM file format, in addition to a root certificate in PEM format.
The enable-coref-ssl.sh script will prompt you:
Would you like to enable SSL for Coreference Server in $(dirname ${ENV_FILE})? (You will need a server certificate and private key file, and if you also wish to enable client authentication, a trusted root certificates file in PEM format)(y/n)
Should the certificates and key be copied to /basis/coref/certs, and granted read access to all (y/n)?
Enter server certificate file location
Enter server private key file location
Should authentication of incoming requests be enabled (y/n)?
Enter the trusted certificates file location
Disable mutual authentication
Mutual authentication, where both the client and the server verify each other's identities, is the most secure type of authentication. This section describes how to disable Model Training Suite client validation, thus disabling mutual authentication.
Disable Event Training Server client authentication
Edit the NGINX configuration file
/basis/ets/ets-docker/nginx-ssl-include.confand change the settingssl_verify_clienttooff.ssl_verify_client: off;
Stop Event Training Server
Navigate to
/basis/ets/ets-docker/docker compose down
Restart Event Training Server
docker compose up -d
Disable Analytics Server client authorization
Edit the file
/basis/rs/config/org.apache.cxf.http.jetty-main.cfgsetting theclientAuthenticationtofalse. ChangetlsServerParameters.clientAuthentication.required=true
to
tlsServerParameters.clientAuthentication.required=false
Edit the file
/basis/rs/config/jetty-ssl-config.xml. Change<sec:clientAuthentication required="true" />
to
<sec:clientAuthenticationrequired="false" />
Stop Analytics Server
Navigate to /basis/rs/rs-docker
docker compose down
Restart Analytics Server
docker compose up -d
Note
If you run ./enable-rs-ssl.sh again you will need to change this parameter back to false as the script will overwrite the setting.
Disable Entity Training Server client authorization
Edit the file
/basis/rts/config/server.ssl.xmlsetting theclientAuthenticationtofalse. Change<ssl id="defaultSSLConfig" keyStoreRef="defaultKeyStore" trustStoreRef="defaultTrustStore" clientAuthentication="true" />
to
<ssl id="defaultSSLConfig" keyStoreRef="defaultKeyStore"
 trustStoreRef="defaultTrustStore" clientAuthentication="false" />
Stop Entity Training Server
Navigate to the docker directory (default
/basis/rts/rts-docker/)docker compose down
Restart Entity Training Server
docker compose up -d
Note
The clientAuthentication parameter is set to false. If you run ./enable-rts-ssl.sh again you will need to change this parameter back to false as the script will overwrite the setting.
Disable Adaptation Studio client authorization
Edit the file
/basis/ras/docker-compose.override.yml. Changecommand:--tlsMode requireTLS--tlsCertificateKeyFile /etc/ssl/instance1-ras-cert-key.pem--tlsCAFile /etc/ssl/basiscacert.pemto
command:--tlsMode requireTLS--tlsCertificateKeyFile
    /etc/ssl/instance1-ras-cert-key.pem
Stop Adaptation Studio
Navigate to
/basis/ras/scripts/stop-standalone.sh
Restart Adaptation Studio
start-standalone.sh
Note
Be cautious not to change the indentation of the file as YAML files are sensitive to indentation. Indentation is done using spaces, not tabs.
The tlsCAFile is used by mongo to verify client certificates. Removing this parameter will disable this checking. If you run ./enable-ras-ssl.sh again, you will need to remove this parameter again as the script will overwrite the setting.
Training system maintenance
Hostname changes
This section describes what files and fields must be updated when one of the hostnames are changed.
Event Training Server Hostname Change
When the Event Training Server hostname changes, the following updates must be made:
If SSL is enabled, new PEM files and JKS files must be generated for the new hostname.
Use the
generate-keystores.shscript to create keystores from the PEM files, if you don't already have them.Disable SSL:
./disable-ets-ssl.shEnable SSL:
./enable-ets-ssl.sh
If Event Training Server is used for extraction, update the Event Training Server url in the Analytics Server configuration file
./rs/config/rosapi/event-extractor-factory-config.yaml.If Event Training Server is used for training, update
ETS_URLin the .env file of RAS:./ras/.env.
Entity Training Server Hostname Change
When the Entity Training Server hostname changes, the following updates must be made:
If SSL is enabled, new PEM files and JKS files must be generated for the new hostname.
Use the
generate-keystores.shscript to create keystores from the PEM files.Disable SSL:
./disable-rts-ssl.shEnable SSL:
./enable-rts-ssl.sh
Update
RTS_URLin the Analytics Server .env file (./rs/rs-docker/.env) with the new hostname.Update
RTS_URLin the Adaptation Studio .env file (./ras/.env) with the new hostname.
Analytics Server Hostname Change
When the Analytics Server hostname changes, the following updates must be made:
If SSL is enabled, new PEM files and JKS files must be generated for the new hostname.
Use the
generate-keystores.shscript to create keystores from the PEM files.Disable SSL:
./disable-rs-ssl.shEnable SSL:
./enable-rs-ssl.sh
If Event Training Server is being used for training, then update the RS_URL in the ETS .env file (
./ets/ets-docker/.env).Update
ROSETTE_URLin the Adaptation Studio .env file (./ras/.env) with the new hostname.
Adaptation Studio Hostname Change
When the Adaptation Studio hostname changes, the following updates must be made:
If SSL is enabled, new PEM files and JKS files must be generated for the new hostname.
Use the
generate-keystores.shscript to create keystores from the PEM files.Disable SSL:
./disable-ras-ssl.shEnable SSL:
./enable-ras-ssl.sh
Update the mongo configuration of the Entity Training Server (
/rts/config/mongodal_config.yaml) with the new hostname.
Export or backup a project
Note
You must be registered as a manager.
You can backup an individual project to save a snapshot whenever necessary, for example at project milestones or before making major changes to the project.
In the project menu, select Export Project.
Add a descriptive name to the export. The studio will generate an ID for the download; the name you provide will be listed as the version.
Confirm when prompted.
To view the exported versions:
Select Manage from the navigation menu.
Scroll down to the Exported Versions table.
From here, you can download or delete the file. The downloaded file name will concatenate the project id and backup timestamp.
Import a project
Note
You must be registered as a manager.
Note
To import models into Adaptation Studio from the command line, the utility jq must be installed on your system.
To import a project, you must have an exported project file.
Open a command window on the Adaptation Studio server.
Run the
import_project.shcommand.
Usage: ./import_project.sh [options] --username <username> --password <password> export_file
Available options:
  --server <server>       Server to use (default: localhost)
  --https                 Contact server with https (default is http)
  --name <name>           Set the name of the project being imported
  --template <template>   Set the template of the project being imported, e.g. --template rex
                          (must be compatible with existing template)
  --async                 Upload asynchronously (may be required for large projects) [EXPERIMENTAL]
  --max-wait <secs>       Maximum amount of time to wait for project to be ready
                          (only effective when --async is set)
  --skip-sanity           Don't run sanity checks on imported project
You can also import a project from within Adaptation Studio from the New Project menu.
Upgrade to a new release
At this time, all components must be upgraded when installing a new release.
Note
These instructions assume all components of Model Training Suite are installed with the default installation.
You may want to backup all projects you want to move to the new release from Adaptation Studio.
Install the new releases on a different server or virtual machine.
Shut down the servers in the following order:
Adaptation Studio
stop-standalone.sh
Analytics Server
docker compose down
CTRL-C
Entity Training Server
docker compose down
Event Training Server
docker compose down
Migrate the Entity Training Server workspace:
sudo cp -rp /basis/<old>/rts/workspaces/* /basis/<new>/rts/workspaces
Migrate the Event Training Server workspace:
sudo cp -rp /basis/<old>/ets/workspaces/* /basis/<new>/ets/workspaces
Migrate the Analytics Server custom profiles:
cd /basis/<old>/rs/config/custom-profiles
sudo cp -rp $(ls -A | grep -v 'ad-') /basis/<new>/rs/config/custom-profiles
Migrate the Adaptation Studio mongo database:
sudo cp -rp /basis/<old>/ras/mongo_data_db/* /basis/<new>/ras/mongo_data_db
sudo cp -rp /basis/<old>/ras/mongo_data_dump/* /basis/<new>/ras/mongo_data_dump
Install a new license file
To upgrade the license in an existing Model Training Suite installation, replace the license for Analytics Server. This is the only component in the system that requires a license.
This process ensures that a new license is installed for Analytics Server and the existing file is backed up if it needs to be reverted and restarting the Docker services. This approach helps maintain the integrity of your system while ensuring all Analytics Server machines have the latest licensing information.
On each machine running Analytics Server, perform the following steps:
Determine the location of the existing license file:
Navigate to
/basis/rs/rs-docker/Open or cat the
.envfilecat .envLook for a line with
ROSAPI_LICENSE_PATH. It will point to the path of the existing license file. Example:ROSAPI_LICENSE_PATH=/basis/rs/config/rosapi/rosette-license.xml
Backup the existing license file:
Use the value from
ROSAPI_LICENSE_PATHto copy the file to a new backup location.For example, if
ROSAPI_LICENSE_PATH=/basis/rs/config/rosapi/rosette-license.xml, use the following command:If prompted to overwrite the existing file, respond with "yes".
cp /basis/rs/config/rosapi/rosette-license.xml /basis/rs/config/rosapi/rosette-license.xml.bak
Copy the new License File:
Obtain the new license file from Babel Street and copy it to the same location as the existing license file.
For example, if
ROSAPI_LICENSE_PATH=/basis/rs/config/rosapi/rosette-license.xml, use the following command:cp rosette-license.xml /basis/rs/config/rosapi/rosette-license.xml
Restart Analytics Server:
Change your directory to
/basis/rs/rs-dockerExecute the following commands to stop and start the Docker services:
docker-compose down
docker-compose up -d
Verify the new license and the license expiration date:
Once Rosette Server is started then a browser can be used to verify the license date by going to the following URL
http://<host>:8181/rest/v1/infoorhttps://<host>:8181/rest/v1/infoif SSL is enabled.The response will contain the license expiration date:
{"name":"xxxxxx","version":"x.x.x","buildNumber":"","buildTime":"","licenseExpiration":"XXXXX"}
Migrate to a new template
Note
You must be registered as a manager.
There may be times when you want to migrate a project from one template to another. New templates may be added, or you may realize a different template will work better for your project.
Tip
The templates must be compatible.
These procedures can be used to move projects created with the NER template to the NER-Rosette template.
On the Same Server
This option copies a project created with the NER template to the NER-Rosette Template. The new copy is on the same server.
Open the project.
From the project menu in the upper right-hand corner of the project dashboard, select Clone.
Enter the name of the new project.
Check the box: Switch to NER-Rosette Template?.
OK.
To a Different Server
This option creates a copy of the project on a new server. A different template can be specified.
Backup the Adaptation Studio Server
Note
Adaptation Studio does not automatically backup the database. You must create a cron job or other process to create regular server backups.
The server uses a mongo database to store the projects.
The Studio ships with a script file, backup_mongo.sh. This script creates a timestamped snapshot of the entire mongo database in the mongo_data_dump subdirectory.
The script can be run manually at any time.
We recommend setting up a cron job to backup the server automatically. For example, do crontab -e and add the following line to run the script weekly (replacing MYDIR with your installation directory):
0 0 * * 0 <MYDIR>/backup_mongo.sh > <MYDIR>/backup.log 2> <MYDIR>/backup.err
Restore
To restore the entire database from a backup use the restore_mongo.sh script. This restores all projects in the database.
To save and restore an individual project, export and then import the project.
Get the container id of the mongo docker server by querying the docker containers on the Adaptation Studio Server.
docker ps
Get a list of all the backups available. From the machine where the backup is run, the Adaptation Studio Server directory will have a subdirectory named
mongo_data_dump. The backups will be in the format DD-Mon-YYYY, e.g. 18-Oct-2020.ls
Select the backup to restore and issue the following command:
docker exec -i <container-id> mongorestore /data/dump/<backup_version>
where <backup_version> is the backup name, 18-Oct-2020.
If using SSL, use the following command:
docker exec -i <container-id>  mongorestore host="${MONGO_HOST}:27017"/
 --ssl --sslCAFile=<certificate-file> --sslPEMKeyFile=<key-file> /data/dump/<backup_version>
Install the production environment
The full production installation consists of the following components installed on the same machine:
Analytics Server, including Entity Extractor
Event Training Server
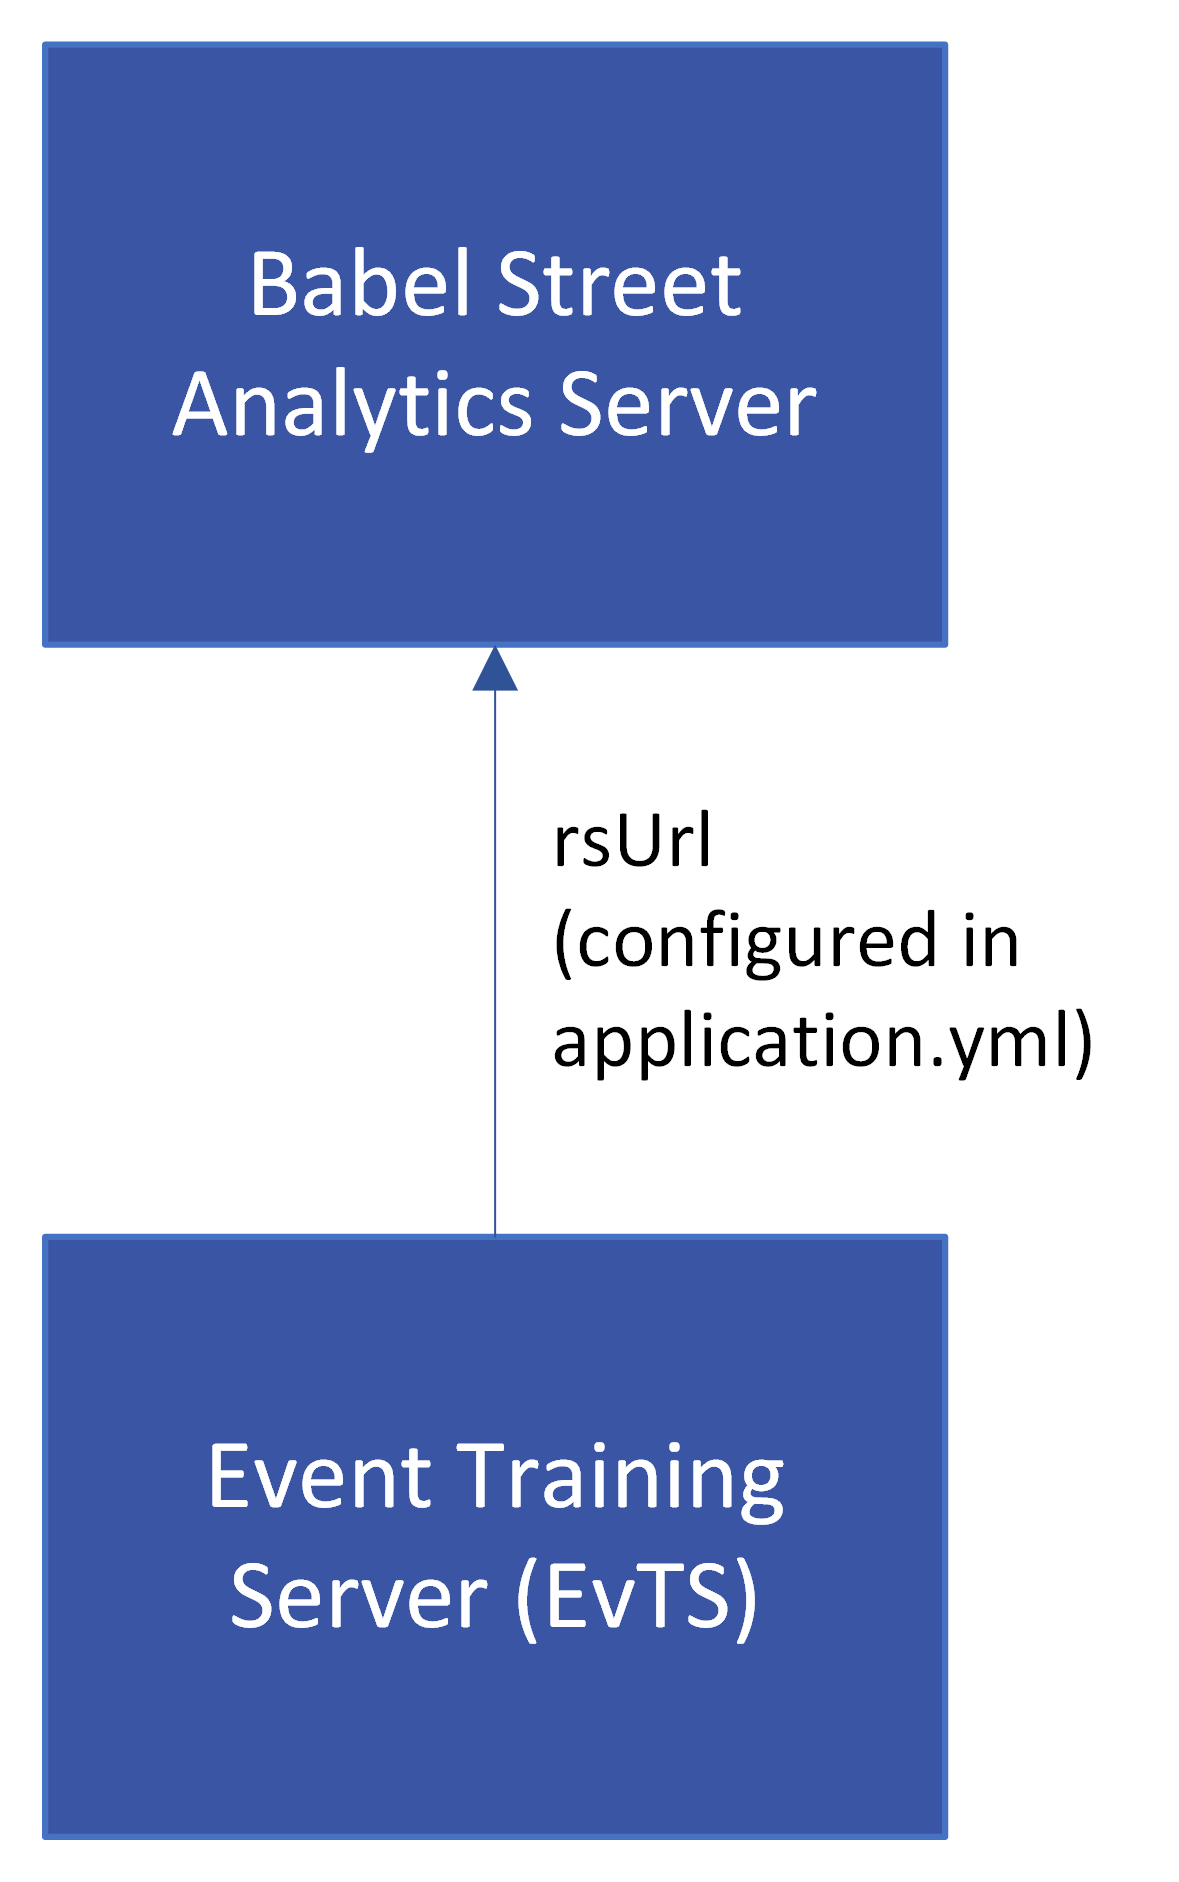 |
Model deployment architecture
Trained models from Model Training Studio must be copied to the Analytics Server production instance to perform entity and event extraction.
Entity extraction models: Custom-trained models are copied into a directory. This directory may be part of an optional custom profile.
Event extraction models: Trained models are copied into the production server instance of Event Training Server.
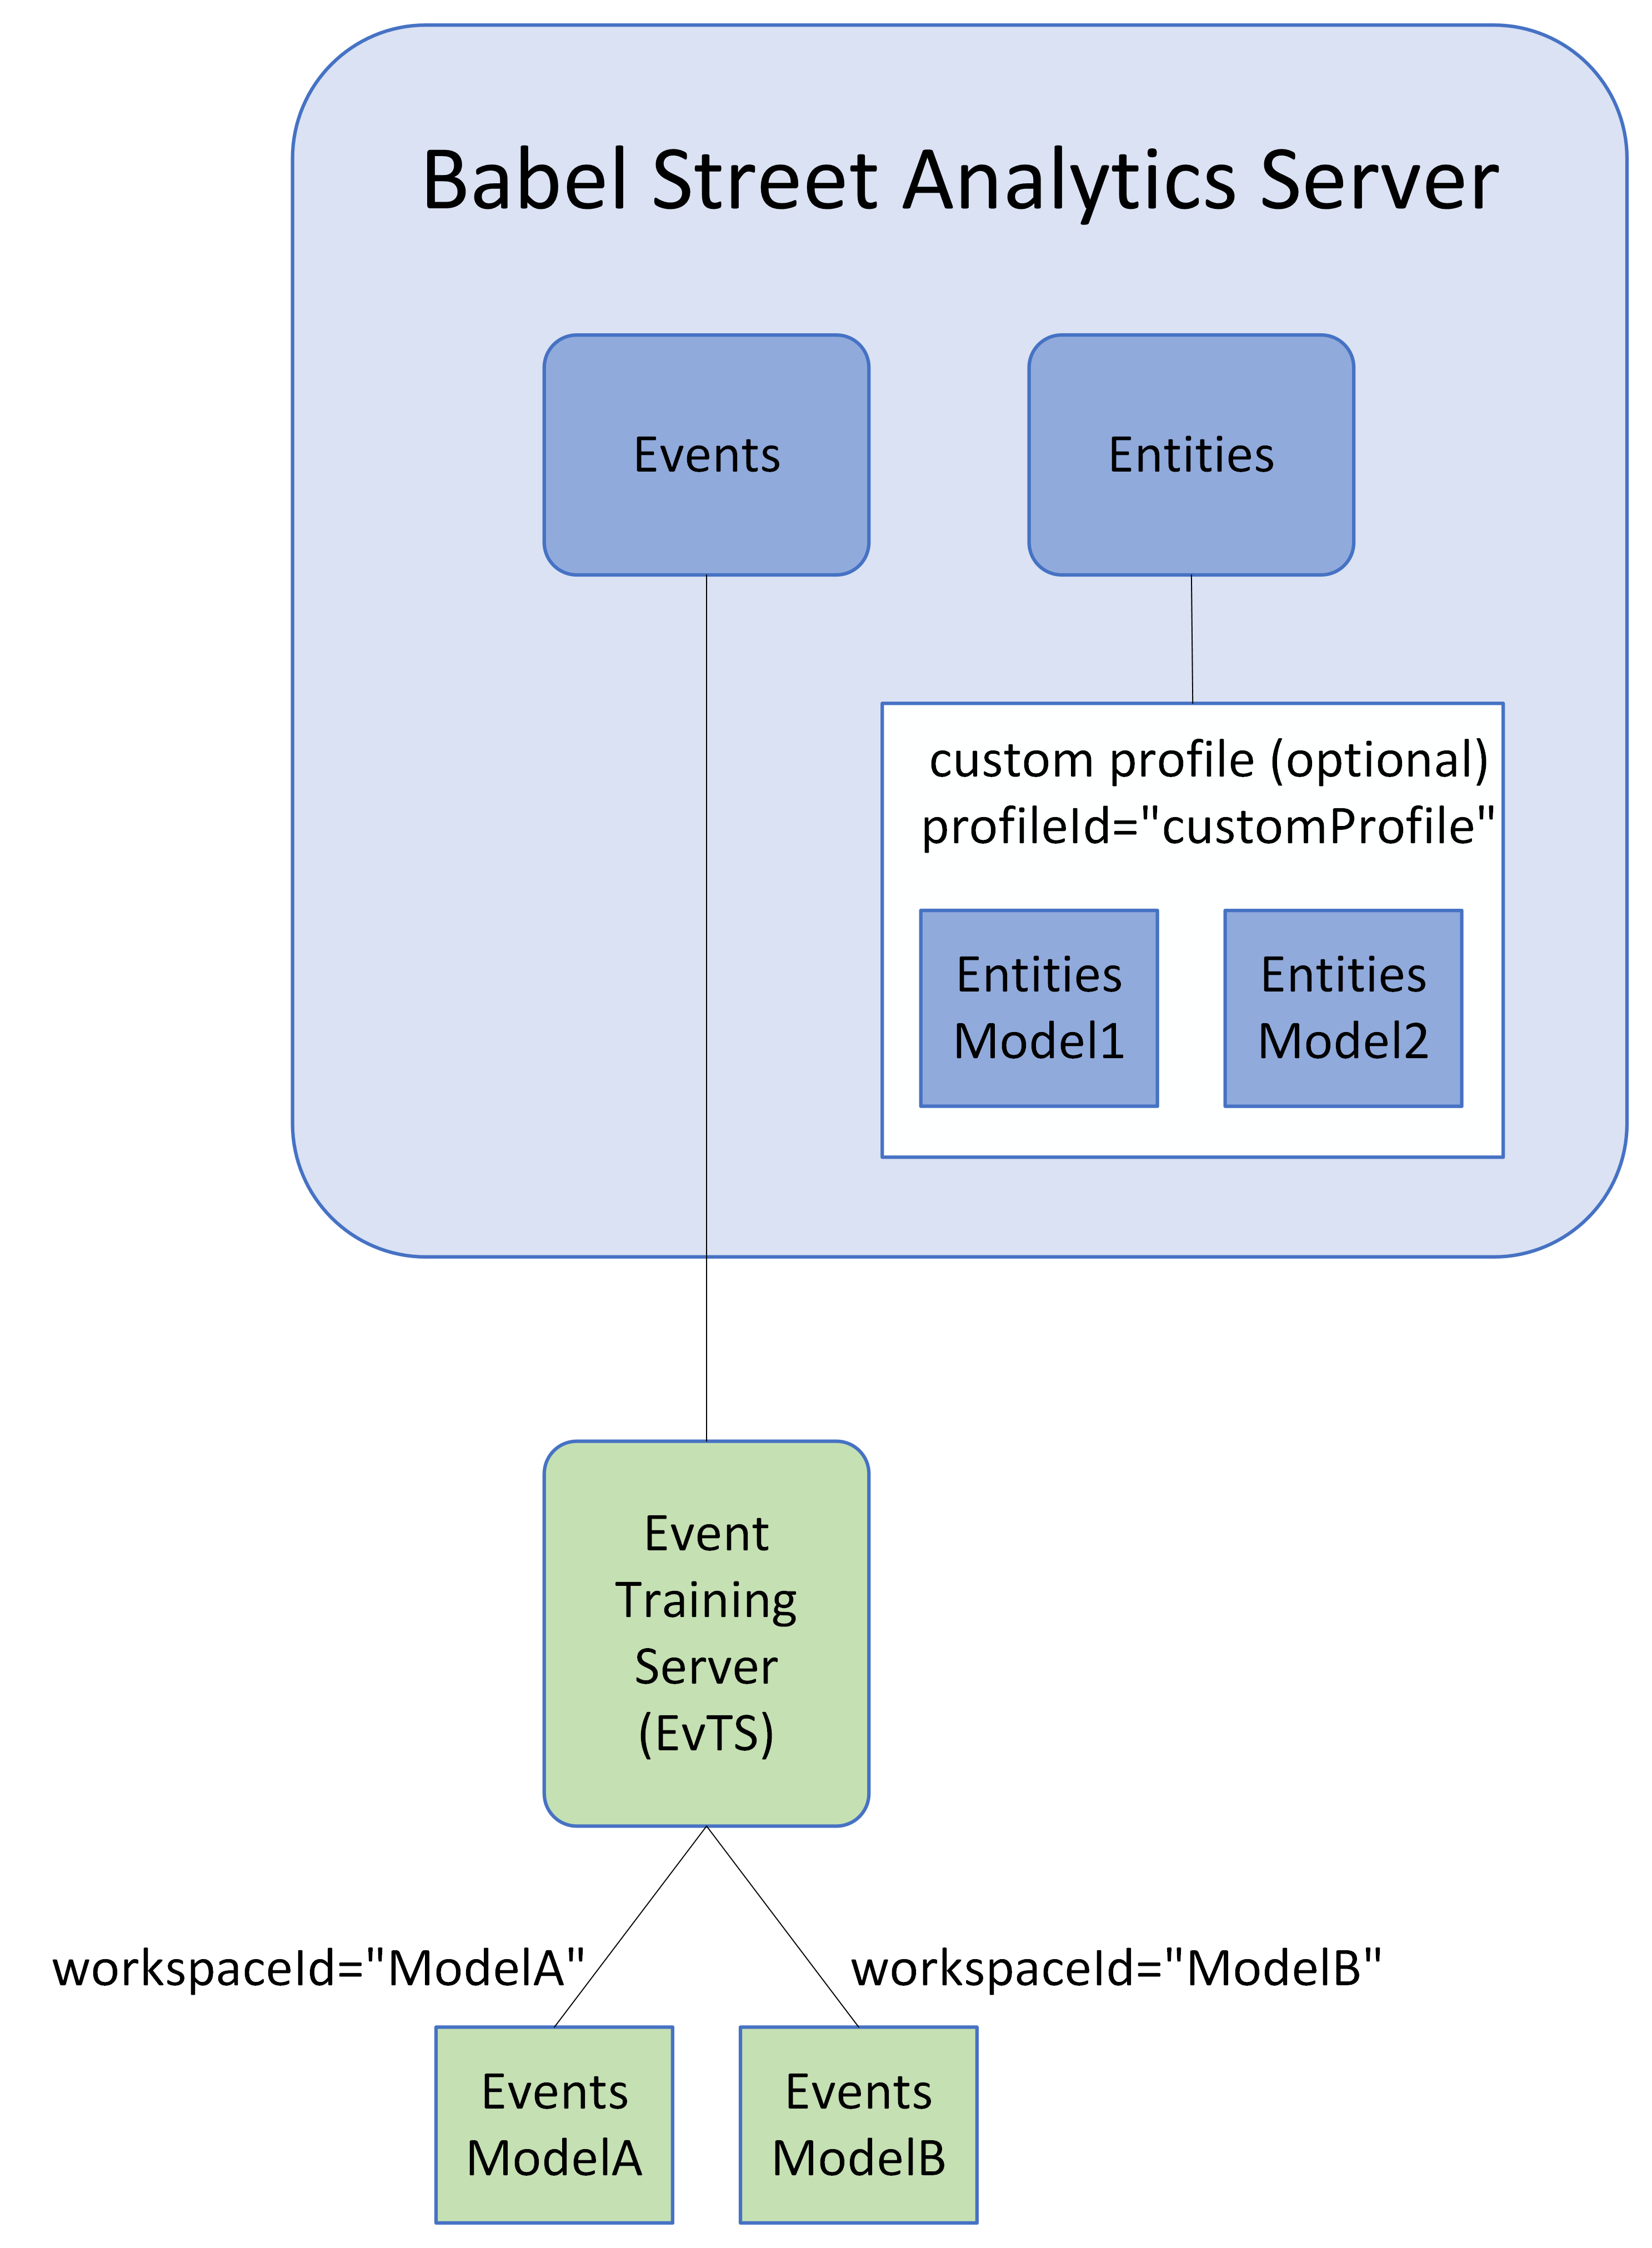 |
The production instance of Analytics Server must include the Event Training Server. The Entity Training Server is not required in the production instance.
Event Extraction Server requirements
The optimal system configuration for the production server depends on the size of the input provided for event extraction. Benchmarks for different server configurations are provided to help you select the proper hardware for the production environment.
System Size | CPU Cores | CPU Threads | Total RAM | RAM allocated to Java Heap |
|---|---|---|---|---|
Small | 4 | 8 | 32Gb | 20Gb |
Medium | 8 | 26 | 64Gb | 24Gb |
Large | 16 | 32 | 64Gb | 32Gb |
Overall combined throughput across 20 concurrent users (requests/second)
System Size | SMS (50 characters) | Tweet (200 characters) | Email (1000 characters) | Book Chapter (16000 characters) |
|---|---|---|---|---|
Small | 49.3 | 26.3 | 8.43 | 0.6 |
Medium | 107.9 | 58.7 | 18.2 | 1.2 |
Large | 154.3 | 91.6 | 28.8 | 2.1 |
Install Event Training Server (EvTS or ETS)
The Event Training Server must be installed on both the training and the Analytics Server production instance (extraction). The same Event Training Server file is installed, either in training or extraction mode.
You must have Docker, dockercompose, and unzip installed.
The product can be installed interactively or with a headless installer.
To install interactively:
Unzip the file
ets-installation-<version>.zip.Start the installation:
./install-ets.sh
To run the headless install, use the
--headlessflag. The.propertiesfile is in the same directories as the installation script.Use the
--dry-runflag to validate the properties file, print the settings, and exit without changing anything.
The Event Training Server installer will prompt you for the following information:
Prompt | Purpose | Options | Notes |
|---|---|---|---|
ETS mode | Determine if installation is for training or extraction (production) mode | 1) Training 2) Extraction 3) Exit Installer | Sets the mode. Training mode prompts for location of Analytics Server; extraction mode does not. |
Installation directory | Installation directory for Event Training Server files | Default: If the directory does not exist, you'll be prompted to create it. If the directory exists, you'll be prompted whether it can be overwritten. | This is now the |
Port Event Training Server should listen on | Default: 9999 You will then have to confirm to use that port. | This port and hostname will be required when installing the other servers. | |
Directory for ETS workspaces | This directory will be mounted as a volume. | Default: If the directory does not exist, you'll be prompted to create it. If the directory exists, you'll be prompted whether it can be overwritten. | This directory holds the events models. |
Fully qualified host name where Analytics Server is installed | Not asked when installing in extraction mode (production server) | The suggested value will be the host name of your current machine. | Cannot be empty, |
Port Analytics Server is listening on | Not asked when installing in extraction mode (production server) | Default: 8181 | |
Full qualified name where ActiveMQ is installed | Active_MQ_Host | ||
Active MQ port | Default: 61616 |
Configure Analytics Server for event extraction
Important
The Analytics Server configuration must be updated to support events. The rex-factory-config.yaml installed by the install scripts contains the correct values. You only need to run this update script if you are using a different copy of the yaml file.
Copy the file
./scripts/update-rs-configuration.shfrom the Event Training Server directory to the Analytics Server machine or directory.Run the script from the Analytics Server directory.
./update-rs-configuration.sh
The script will prompt you for the following information:
Prompt | Purpose | Options | Notes |
|---|---|---|---|
Should Analytics Server be updated to communicate with Events Training Server? | Analytics Server only communicates with Event Training Server in production. | Y for the production server N for the training server | |
Fully qualified host name where Events Training Server is installed | The suggested value will be the host name of your current machine | Cannot be empty, | |
Port Events Training Server is listening on | Default: 9999 | ||
Enter Location of Analytics Server configuration | This directory will be mounted as a volume. | Default:
| The configuration file to customize Analytics Server. |
Location of Analytics Server roots | This directory will be mounted as a volume. | Default:
|
Event extraction requires specific Entity Extractor configuration parameters. The install scripts install a version of the rex-factory-config.yaml file containing the correct values for the parameters. The parameters added or modified by the install scripts are in the table below.
Parameter | Value for Events | Default Value | Notes |
|---|---|---|---|
|
|
| Entire document processed as unstructured text. |
|
|
| Entity confidence values are returned. |
|
|
| Entity Extractor will resolve pronounces to person entities. |
|
|
| Entities are disambiguated to a known knowledge base, Wikidata. |
|
|
| Entity Extractor determines case sensitivity. |
|
| ||
| "${rex-root}/data/regex/<lang>/accept/supplemental/date-regexes.xml" "${rex-root}/data/regex/<lang>/accept/supplemental/time-regexes.xml" ${rex-root}/data/regex/<lang>/accept/supplemental/geo-regexes.xml" "${rex-root}/data/regex/<lang>/accept/supplemental/distance-regexes.xml" | Activate the supplemental regexes for date, time, geo, and distance. These are shipped with Entity Extractor but need to be activated for each installed language, along with unspecified (xxx) language. |
Custom entity extractors
Event extraction takes advantage of the advanced entity extraction capabilities provided by Entity Extractor. Entity Extractor uses pre-trained statistical models to extract the following entity types:
Location
Organization
Person
Title
Product
You can also use custom-trained entity extraction models, trained by the Model Training Suite, to extract additional entity types. These models are loaded into Analytics Server. They can be called in the default configuration or through a custom profile.
Entity Extractor also includes rule-based extractors, including statistical regex extractors that can extract additional entity types such as:
Date
Time
Credit Card numbers
Phone Numbers
The rule-based extractors are not returned by default, To use rule-based extractors, modify the supplementalRegularExpressionPaths in the configuration (rex-factory-config.yaml) file. You can also add custom regex files to create new exact extractors.
Note
Any models, gazetteers, and regular expressions used when training a model must also be used when performing event extraction. Use the same custom profile to configure Entity Extractor for model training and event extraction. The custom profile is set in the schema definition for event model training.
Custom profiles
Custom profiles allow Analytics Server to be customized without altering the server-wide (global) settings. A custom profile can consist of any combination of regexes, gazetteers, configuration settings, or models. Analytics Server can support multiple profiles, each with different data domains (such as user dictionaries, regular expressions files, and custom models) as well as different parameter and configuration settings. Each profile is defined by its own root directory. Any data or configuration files that live in the root directory of an endpoint can be part of a custom profile.
Using custom profiles, a single endpoint can simultaneously support users with different processing requirements within a single instance of Analytics Server. For example, one user may work with product reviews and have a custom sentiment analysis model they want to use, while another user works with news articles and wants to use the default sentiment analysis model.
You can also create a custom profile for testing purposes. Once the test team is satisfied with the results of the component under test, the profile can be deployed to the global configuration so that everyone can use them by default.
Only the settings specified in the custom profile overide the server-wide configuration. If a profile does not override a setting then the server-wide setting is used.
Each unique profile in Analytics Server is identified by a string, profileId. The profile is specified when calling the API, by adding the profileId parameter, indicating the set of configuration and data files to be used for that call.
Custom profiles and their associated data are contained in a <profile-data-root> directory. This directory can be anywhere in your environment; it does not have to be in the Analytics Server install directory.
Endpoint | Applicable data files for custom profile |
|---|---|
/categories | Custom models |
/entities | Gazetteers, regular expression files, custom models, linking knowledge base |
/morphology | User dictionaries |
/sentiment | Custom models |
/tokens | Custom tokenization dictionaries |
Note
Custom profiles are not currently supported for the address-similarity, name-deduplication, name-similarity, record-similarity, and name-translation endpoints.
Setting up custom profiles
Create a directory to contain the configuration and data files for the custom profile.
The directory name must be 1 or more characters consisting of
0-9,A-Z,a-z, underscore or hyphen and no more than 80 characters long. It cannot contain spaces. It can be anywhere on your server; it does not have to be in the Analytics Server directory structure. This is theprofile-data-root.Create a subdirectory for each profile, identified by a profileId.
For each profile, create a subdirectory named profileID in the profile-data-root. The profile-path for a project is
profile-data-root/profileId.For example, let's assume our
profile-data-rootis rosette-users, and we have two profiles: group1 and group2. We would have the followingprofile-paths:rosette-users/group1 rosette-users/group2
Edit the Analytics Server configuration files to look for the profile directories.
The configuration files are in the
launcher/config/directory. Set theprofile-data-rootvalue in this file:com.basistech.ws.worker.cfg
# profile data root folder that may contain profile-id/{rex,tcat} etc
profile-data-root=file:///Users/rosette-users
Add the customization files for each profile. They may be configuration and/or data files.
When you call the API, add "profileId" = "myProfileId" to the body of the call.
{"content": "The black bear fought the white tiger at London Zoo.",
 "profileId": "group1"
}
Updating custom profiles
New profiles are automatically loaded in Analytics Server. You do not have to bring down or restart the instance to add new models or data to Analytics Server.
When editing an existing profile, you may need to restart Analytics Server. If the profile has been called since Analytics Server was started, the Server must be restarted for the changes to take effect. If the profile has not been called since Analytics Server was started, there is no need to restart.
To add or update models or data, assuming the custom profile root rosette-users and profiles group1 and group2.
Add a new profile with the new models or new data, for example
group3.Delete the profile and re-add it. Delete
group1and then recreate thegroup1directory with the new models and/or data.
Custom configuration
The configurations for each endpoint are contained in the factory configuration files. The worker-config.yaml file describes which factory configuration files are used by each endpoint as well as the pipelines for each endpoint. To modify parameter values or any other configuration values, copy the factory configuration file into the profile path and modify the values.
Let's go back to our example with profile-ids of group1 and group2. Group1 wants to modify the default entities parameters, setting entity linking to true and case sensitivity to false. These parameters are set in the rex-factory-config.yaml file.
Copy the file
/launcher/config/rosapi/rex-factory-config.yamltorosette-users/group1/config/rosapi/rex-factory-config.yaml.Edit the new
rex-factory-config.yamlfile as needed. This is an excerpt from a sample file.# rootDirectory is the location of the rex root rootDirectory: ${rex-root} # startingWithDefaultConfigurations sets whether to fill in the defaults with CreateDefaultExtrator startingWithDefaultConfiguration: true # calculateConfidence turns on confidence calculation # values: true | false calculateConfidence: true # resolvePronouns turns on pronoun resolution # values: true | false resolvePronouns: true # rblRootDirectory is the location of the rbl root rblRootDirectory: ${rex-root}/rbl-je # case sensitivity model defaults to auto caseSensitivity: false # linkEntities is default true for the Cloud linkEntities: true
Custom data sets
Each profile can include custom data sets. For example, the entities endpoint includes multiple types of data files, including regex and gazetteers. These files can be put into their own directory for entities, known as an overlay directory. This is an additional data directory which takes priority over the default entities data directory.
Note
If the data overlay directory is named rex, the contents of the overlay directory will completely replace all supplied data files, including models, regex, and gazetteer files.
If your custom data sets are intended to supplement the shipped files, the directory name must not be
rex.If your custom data sets are intended to completely replace the shipped files, use the directory name
rex.
We will create a custom gazetteer file called custom_gaz.txt specifying "John Doe" as an ENGINEER entity type. Full details on how to create custom gazetteer files are in the section Gazetteers in the Adaptation Studio User Guide. You can also use Adaptation Studio to compile a gazetteer for improved performance.
Create the custom gazetteer file in
/Users/rosette-users/group1/custom-rex/data/gazetteer/eng/accept/custom_gaz.txt.It should consist of just two lines:ENGINEER John Doe
Copy the file
/launcher/config/rosapi/rex-factory-config.yamlto/Users/rosette-users/group1/config/rosapi/rex-factory-config.yaml.Edit the new
rex-factory-config.yamlfile, setting thedataOverlayDirectory.# rootDirectory is the location of the rex root rootDirectory: ${rex-root} dataOverlayDirectory: "/Users/rosette-users/group1/custom-rex/data"Call the entities endpoint with the
profileIdset togroup1:curl -s -X POST \ -H "Content-Type: application/json" \ -H "Accept: application/json" \ -H "Cache-Control: no-cache" \ -d '{"content": "John Doe is employed by Basis Technology", "profileId": "group1"}' \ "http://localhost:8181/rest/v1/entities"
You will see "John Doe" extracted as type ENGINEER from the custom gazetteer.
Custom models
You can train and deploy a custom model to the entities endpoint for entity extraction. You can either:
Copy the model file to the default data directory in the Entity Extractor root folder.
<RosetteServerInstallDir>/roots/rex/<version>/data/statistical/<lang>/<modelfile>where <lang> is the 3 letter language code for the model.Copy the model to the data directory of a custom profile.
<profile-data-root>/<profileId>/data/statistical/<lang>/<modelfile>where <lang> is the 3 letter language code for the model.The custom profile must be set up as described in Setting up custom profiles
Tip
Model naming convention
The prefix must be model. and the suffix must be -LE.bin. Any alphanumeric ASCII characters are allowed in between.
Example valid model names:
model.fruit-LE.bin
model.customer4-LE.bin
Example
In this example, we're going to add the entity types COLORS and ANIMALS to the entities endpoint, using a regex file.
Create a
profile-data-root, called rosette-users in theUsersdirectory.Create a user with the
profileIdof group1. The newprofile-pathis:/Users/rosette-users/group1
Edit the Analytics Server configuration files:
/launcher/config/com.basistech.ws.worker.cfg/launcher/config/com.basistech.ws.frontend.cfg
adding the profile-data-root.
# profile data root folder that may contain app-id/profile-id/{rex,tcat} etc
profile-data-root=file:///Users/rosette-users
Copy the
rex-factory-config.yamlfile from/launcher/config/rosapiinto the new directory:/Users/rosette-users/group1/config/rosapi/rex-factory-config.yaml
Edit the copied file, setting the
dataOverlayDirectoryparameter and adding the path for the new regex file. The overlay directory is a directory shaped like thedatadirectory. The entities endpoint will look for files in both locations, preferring the version in the overlap directory.dataOverlayDirectory: "/Users/rosette-users/group1/custom-rex/data" supplementalRegularExpressionPaths: - "/Users/rosette-users/group1/custom-rex/data/regex/eng/accept/supplemental/custom-regexes.xml"
Create the file
custom-regexes.xmlin the/Users/rosette-users/group1/custom-rex/data/regex/eng/accept/supplementaldirectory.<regexps> <regexp type="COLOR">(?i)red|white|blue|black</regexp> <regexp type="ANIMAL">(?i)bear|tiger|whale</regexp> </regexps>
Call the entities endpoint without using the custom profile:
 curl -s -X POST \
    -H "Content-Type: application/json" \
    -H "Accept: application/json" \
    -H "Cache-Control: no-cache" \
    -d '{"content": "The black bear fought the white tiger at London Zoo." }' \
    "http://localhost:8181/rest/v1/entities"
The only entity returned is London Zoo:
{
  "entities": [
    {
      "type": "LOCATION",
      "mention": "London Zoo",
      "normalized": "London Zoo",
      "count": 1,
      "mentionOffsets": [
        {
          "startOffset": 41,
          "endOffset": 51
        }
      ],
      "entityId": "T0"
    }
  ]
}
Call the entities endpoint, adding the profileId to the call:
curl -s -X POST \ -H "Content-Type: application/json" \
-H "Accept: application/json" \
-H "Cache-Control: no-cache" \
-d '{"content": "The black bear fought the white tiger at London Zoo.",
     "profileId": "group1"}' \
"http://localhost:8181/rest/v1/entities"
The new colors and animals are also returned:
    "entities": [
        {
            "type": "COLOR",
            "mention": "black",
            "normalized": "black",
            "count": 1,
            "mentionOffsets": [
                {
                    "startOffset": 4,
                    "endOffset": 9
                }
            ],
            "entityId": "T0"
        },
        {
            "type": "ANIMAL",
            "mention": "bear",
            "normalized": "bear",
            "count": 1,
            "mentionOffsets": [
                {
                    "startOffset": 10,
                    "endOffset": 14
                }
            ],
            "entityId": "T1"
        },
        {
            "type": "COLOR",
            "mention": "white",
            "normalized": "white",
            "count": 1,
            "mentionOffsets": [
                {
                    "startOffset": 26,
                    "endOffset": 31
                }
            ],
            "entityId": "T2"
        },
        {
            "type": "ANIMAL",
            "mention": "tiger",
            "normalized": "tiger",
            "count": 1,
            "mentionOffsets": [
                {
                    "startOffset": 32,
                    "endOffset": 37
                }
            ],
            "entityId": "T3"
        },
        {
            "type": "LOCATION",
            "mention": "London Zoo",
            "normalized": "London Zoo",
            "count": 1,
            "mentionOffsets": [
                {
                    "startOffset": 41,
                    "endOffset": 51
                }
            ],
            "entityId": "T4"
        }
Configuring Analytics Server
For a full description of installing Analytics Server and all configuration parameters, refer to the Analytivcs Server User Guide. This section describes a few of the more common configuration parameters.
Enable passing files to endpoints
Most endpoints can take either a text block, a file, or a link to a webpage as the input text. The webpage link is in the form of a URI. To enable passing a URI to an endpoint, the enableDTE flag must be set in the file com.basistech.ws.worker.cfg.
By default, the flag is set to True; URI passing is enabled.
#download and text
extractorenableDte=true
Modify the input constraints
The limits for the input parameters are in the file /rosapi/constraints.yaml. Modify the values in this file to increase the limits on the maximum input character count and maximum input payload per call. You can also increase the number of names per list for each call to the name deduplication endpoint.
The default values were determined as optimal during early rounds of performance tests targeting < 2 second response times. Larger values may cause degradation of system performance.
Parameter | Minimum | Maximum | Default Value | Description |
|---|---|---|---|---|
maxInputRawByteSize | 1 | 10,000,000 | 614400 | The maximum number of input bytes per raw doc |
maxInputRawTextSize | 1 | 1,000,000 | 50000 | The maximum number of input characters per submission |
maxNameDedupeListSize | 1 | 100,000 | 1000 | The maximum number of names to be deduplicated. |
To modify the input constraints:
Edit the file
/rosapi/constraints.yamlModify the value for one or more parameters
Setting Analytics Server to pre-warm
To speed up first call response time, Analytics Server can be pre-warmed by loading data files at startup at the cost of a larger memory footprint.
Most components load their data lazily, meaning that the data required for processing will only be loaded into memory when an actual call hits. This is particularly true for language-specific data. The consequence is that when the very first call with text in a given language arrives at a worker, the worker can take a quite a bit of time loading data before it can process the request.
Pre-warming is Analytics Server's attempt to address the 1st-call penalty by hitting the worker with text in every licensed language it supports at boot time. Then, when an actual customer request comes in, all data will have already been memory mapped and you won't experience a first call delay as the data is loaded. Only languages licensed for your installation will be pre-warmed.
The default is set to false, pre-warm is not enabled.
To set Analytics Server to warm up the worker upon activation
On macOS/Linux or Windows:
Edit the file
/com.basistech.ws.worker.cfgset
warmUpWorker=true
Tip
When installing on macOS or Linux, Analytics can be set to pre-warm in the installation. Select Y when asked Pre-warm Rosette at startup? You can always change the option by editing the com.basistech.ws.worker.cfg file.
With Docker:
Edit the file
docker-compose.ymlSet
ROSETTE_PRE_WARM=true
Configuring worker threads for HTTP transport
Multiple worker threads allow you to implement parallel request processing. Generally, we recommend that the number of threads should be less than the number of physical cores or less than the total number of hyperthreads, if enabled.
You can experiment with 2-4 worker threads per core. More worker threads may improve throughput a bit, but typically won't improve latency. The default value of worker threads is 2.
If the URL for all licensed endpoints are set to local: (not distributed):
Edit the file
/config/com.basistech.ws.transport.embedded.cfg.Modify the value of
workerThreadCount
If using transport rules in a distributed deployment on macOS/Linux or Windows:
Edit the file
/config/com.basistech.ws.transport.embedded.cfg.Modify the value of
workerThreadCount.Edit the file
/config/com.basistech.ws.worker.cfgModify the value of
workerThreadCount
Using entity extraction models in production
The trained entity extraction models are moved from the Entity Training Server to the production instance of Analytics Server through the following steps:
The Entity Training Server is not used for entity extraction once the model is trained.
Export the entity extraction model
Export the trained model from the Model Training Suite.
From Adaptation Studio:
Open the project that trained the model you are interested in.
Select Manage from the project navigation bar.
From the Model Training Status block, select Export Model.
If Export Model is not enabled, the model is not ready to be exported.
The trained model will download to your machine.
Rename the model
The model downloaded from Adaptation Studio does not follow the Entity Extractor naming conventions to avoid unintentionally overwriting the model in the production server. The model must be renamed before uploading the model to the production instance of Analytics Server.
Tip
Model naming convention
The prefix must be model. and the suffix must be -LE.bin. Any alphanumeric ASCII characters are allowed in between.
Example valid model names:
model.fruit-LE.bin
model.customer4-LE.bin
Upload the model to the production server
Copy the model file to the production server. You can either:
Copy the model file to the default data directory in the Entity Extractor root folder.
<RosetteServerInstallDir>/roots/rex/<version>/data/statistical/<lang>/<modelfile>where <lang> is the 3 letter language code for the model.Copy the model to the data directory of a custom profile.
<profile-data-root>/<profileId>/data/statistical/<lang>/<modelfile>where <lang> is the 3 letter language code for the model.The custom profile must be set up as described in Setting up custom profiles.
A custom profile allows multiple configurations, each with its own data files, models, gazetteers, and settings, to exist on the same instance of Analytics Server.
Calling the /entities endpoint
https://<PRODSERVER>/rest/v1/entities
Entity Extraction uses statistical or deep neural network based models, patterns, and exact matching to identify entities in documents. An entity refers to an object of interest such as a person, organization, location, date, or email address. Identifying entities can help you classify documents and the kinds of data they contain.
The statistical models are based on computational linguistics and human-annotated training documents. The patterns are regular expressions that identify entities such as dates, times, and geographical coordinates. The exact matcher uses lists of entities to match words exactly in one or more entities.
Through the Model Training Suite you can customize, retrain, or train new statistical models to improve the extraction results in your domain. The two primary types of customization are:
improving accuracy on data in your specific domain
extracting additional entity types
The custom models can be deployed alongside the provided statistical model.
Call the /info method to list all entity types known by the /entities endpoint:
https://<PRODSERVER>/rest/v1/entities/info
Request
Option | Type | Description | Default |
|---|---|---|---|
| string | model type to use; valid values |
|
| boolean | Return the confidence values.
| false (unless |
| boolean | Return salience score. Salience indicates whether a given entity is important to the overall scope of the document. Salience values are binary, either 0 (not salient) or 1 (salient). Salience is determined by a classifier trained to predict which entities would be included in a summary or abstract of an article. | false |
| boolean | Link mentions to knowledge base entities with disambiguation model. Enabling this option also enables | true (Cloud) false (Server) |
| boolean | Return the full ontological path of the type within the DBpedia hierarchy | false |
| boolean | Return the id to PermID knowledge base | false |
| string | When set to | string |
| boolean | When set to true, money entities are extracted as | false |
| string | Configures how structured regions will be processed. It has three values: |
|
| boolean | Enables the indoc co-ref server to return extended entity references. The query parameter | false |
Tip
Entity linking must be enabled to return DBpediaTypes and PermIDs.
{
  "content": "string",
  "language": "string",
  "options": {
    "modelType": "string",
    "calculateConfidence": "false",
    "calculateSalience": "false",
    "linkEntities": "false",
    "includeDBpediaTypes": "false",
    "includePermID": "false",
    "linkMentionMode": "entities",
    "regexCurrencySplit": "true",
    "structuredRegionProcessingType": "none",
    "useIndocServer": "false"
}
Response
{
  "entitiesResponse": [
    {
      "type": "string",
      "mention": "string",
      "normalized": "string",
      "count": 0,
      "mentionOffsets": [
        {
        "startOffset": number,
        "endOffset": number
        }
      ],
      "entityId": "string",
      "confidence": 0,
      "linkingConfidence": 0,
      "DPediaTypes": [],
      "permId": "string",
      "salience": 0
    }
  ]
}
Using custom models
The models trained by the Entity Training Server are statistically-trained models. Multiple statistical models can be deployed and used in each call to the entities endpoint.
If you are not using custom profiles, the custom models are automatically used with each call to the entities endpoint.
curl -s -X POST \
 -H "Content-Type: application/json" \
 -H "Accept: application/json" \
 -H "Cache-Control: no-cache" \
 -d '{"content": "Sample text for extraction"}' \"
http://<PRODSERVER>/rest/v1/entities"If your installation is using custom profiles, you must specify the profileId where the model is installed.
curl -s -X POST \
 -H "Content-Type: application/json" \
 -H "Accept: application/json" \
 -H "Cache-Control: no-cache" \
 -d '{"content": "Sample text for extraction",
 "profileId": "<profileId>"}' \"
http://<PRODSERVER>/rest/v1/entities"
Redactor
The redactor determines which entity to choose when multiple mentions for the same entity are extracted. The redactor first chooses longer entity mentions over shorter ones. If the length of the mentions are the same, the redactor uses weightings to select an entity mention.
Different processors can extract overlapping entities. For example, a gazetteer extracts "Newton", Massachusetts as a LOCATION, and the statistical processor extracts "Isaac Newton" as a PERSON. When two processors return the same or overlapping entities, the redactor chooses an entity based on the length of the competing entity strings. By default, a conflict between overlapping entities is resolved in favor of the longer candidate, "Isaac Newton".
Tip
The correct entity mention is almost always the longer mention. There can be examples, such as the example of "Newton" above, where the shorter mention is the correct mention. While it might seem that turning off the option to prefer length is the easiest fix, it usually just fixes a specific instance while reducing overall accuracy. We strongly recommend keeping the default redactorPreferLength as true.
The redactor can be configured to set weights by:
entity type
processor
Using event extraction models in production
Note
If the model was trained with an instance of Analytics Server using a custom profile, the same profile must be used for event extraction.
The Event Training Server (EvTS) supports both training and extraction. Analytics Server communicates with Event Training Server to perform event extraction tasks. If the production instance is separate from the training instance, the trained event model must be moved to the production server by completing the following steps:
Export the event extraction model
Export the trained model from Model Training Suite.
From Adaptation Studio:
Open the project that trained the model you are interested in.
Select Manage from the project navigation bar.
From the System Status block, select Export Model.
The trained model will download to your machine.
The model can also be downloaded through the Event Training Server API. This requires the workspace Id (wid) for the model you want to download.
The GET /workspaces method returns a list of all workspaces in the server:
curl -X 'GET' \
  'http://<ETSSERVER>/ets/workspaces' \
  -H 'accept: application/json'
The GET /workspace/{wid}/download-model method downloads the model specified by wid (workspace Id).
curl -X 'GET' \
  'http://<ETSSERVER>/ets/workspace/<wid>/download-model' \
  -H 'accept: application/octet-stream' | ets-model.<wid>.ets-model
where <ETSSERVER> is the name of Event Training Server in the training environment. Your call must redirect the output to a file.
Upload the model to the production server
Note
The Event Training Server must be installed on the production server.
Use the Event Training Server API to upload the model to the production server. The workspaceID is the first token after ets-model. in the downloaded file name. For example:
filename:
ets-model.613f53723a13b6a52938f9f8-20210917_10_09_61-LE.ets-modelworkspaceID: 613f53723a13b6a52938f9f8
Use the ets-upload-model.sh script to upload the model to the production server. Execute this script from the /ets/scripts directory on the production server.
./ets-upload-model.sh -w <workspaceID> -m <filename>
If the model already exists in the workspace, the script will ask you whether to overwrite the existing model. When asked if the model should be overwritten, respond:
Y (default) to replace the model in the workspace with the newer version
N to make no change.
In this example, a version of the model already exists on the server and the user replaces it with a newer version.
$ ./ets-upload-model.sh -w testMe -m ~/Downloads/ets-model.6193e-LE.ets-model
Info: ETS reachable on http://localhost:9999/ets
Info: Uploading /Users/user/Downloads/ets-model.6193e-LE.ets-model to workspace testMe on http://localhost:9999
Error: Workspace testMe exists!
Should testMe be overwritten (y/n)? y
Info: Uploading /Users/user/Downloads/ets-model.6193e-LE.ets-model to workspace testMe on http://localhost:9999
Info: SUCCESS: Uploaded /Users/user/Downloads/ets-model.6193e-LE.ets-model to http://localhost:9999/ets/workspace/testMe got HTTP 201
Calling the /events endpoint
https://<PRODSERVER>/rest/v1/events
An event is a dynamic situation that unfolds. Event extraction analyzes unstructured text and extracts event mentions. An event model is trained to extract specific types of events. To use the endpoint, you must first train a model to extract the event types you are interested in. Events are dependent on both the structure of your data, as well as the information you are interested in extracting. There is no standard or default model for event extraction.
An event mention consists of a key phrase and one or more role mentions.
A key phrase is a word or phrase in the text that evokes the given event type.
Roles are entity mentions. i.e. people, places, times, and other mentions, which add detail to the key phrase. Roles have a name indicating the type of role.
As an example, let's consider a trip event:
Bob flew from Boston to Los Angeles.
The key phrase is flew. Other lemmas of flew would also be identified as key phrases: flying and flies, for example.
The roles are:
Bob, traveler
Boston, origin
Los Angeles, destination
The key phrases (flew) and roles (traveler, origin, destination) were all defined in advance and a model trained to extract them. The event mention would identify the role mentions: Bob, Boston, Los Angeles.
The event type for flying could have other roles defined, such as when (a date or time). Not all roles must be extracted for all event mentions. The schema, which defines the key phrases and roles, defines which roles are required. If a role is required, the event will not be extracted without a role mention.
Request
Name | Type | Description | Required? |
|---|---|---|---|
| string | Text to process | Required |
| string | Three-letter ISO 693-3 language code | Optional |
Important
Input documents for event extraction should be no larger than 4K characters.
Do you know the language of your input?
If you know the language of your input, include the three-letter language code in your call. This will speed up the response time.
Otherwise, the endpoint will identify the language automatically.
While events will identify the language automatically, if the language is misidentified, the correct events model will not be used. We recommend you include the language code in your call, where possible.
If no language is provided, and events is unable to auto-detect it, an endpoint may provide a “Language xxx is not supported” error, where xxx indicates the language was not determined.
Option | Type | Description | Required? |
|---|---|---|---|
| string | The id of a single events workspace. | Optional |
| string | A list of languages and workspaces. Allows multiple event models to be used in a single call. | Optional |
| string | Determines whether to evaluate the event for negation.
English Only | Optional |
Either workspaceId or plan can be provided as an option. Both cannot be used in the same call. When using plan, the workspaceId is provided within the plan.
Response
{
  "events": [
    {
      "eventType": "string",
      "mentions": [
        {
          "startOffset": 0,
          "endOffset": 0,
          "roles": [
            {
              "startOffset": 0,
              "endOffset": 0,
              "name": "string",
              "id": "string",
              "dataSpan": "string",
              "confidence": "string",
              "extractorName": "string",
              "roleType": "string"
            }
          ],
          "polarity": "string",
          "negationCues": [
            {
              "startOffset": 0,
              "endOffset": 0,
              "dataSpan": "string"
            }
          ]
        }
      ],
      "confidence": 0,
      "workspaceId": "string"
    }
  ]
}
Event negation
Note
The negation option is only available for English models.
The base event algorithm extracts events when a key phrase and any required role mentions are detected in the document. It does not recognize whether the event happened or didn't happen, also known as the polarity of the event. For example, in a travel event, the following two sentences will both be extracted by the key phrase "travel":
John[TRAVELER] traveled[KEYPHRASE] to London[DESTINATION].
Charles[TRAVELER] didn't travel[KEYPHRASE] to Paris[DESTINATION].
In the example above, "didn't" is an example of a negation cue. The existence of the cue signifies the event is negated.
You can choose to include or ignore negation when you call the events endpoint. The negation option has 4 values:
Ignore: (default) Returns all events and the negation cue (didn't in the above example) isn't included in the response.Both: Returns all events, positive and negative, with the negation cue included in the response.Only_positive: Returns only positive events. An empty negation cue may be included in the response.Only_negative: Returns only negative events; a negation cue will be returned.
By default, if you do not pass in a negation parameter, the sentences above return the same event values.
When both, only_positive, or only_negative options are selected, the polarity is included in the response, with the negation cue, if it exists.
The following example had negation set to both in the request.
{
  "events": [
    {
      "eventType": "flight_booking_schema_new_schema.TRAVEL",
      "mentions": [
        {
          "startOffset": 0,
          "endOffset": 23,
          "roles": [
            {
              "startOffset": 0,
              "endOffset": 4,
              "name": "TRAVELER",
              "id": "T0",
              "dataSpan": "John",
              "confidence": 0.90569645,
              "extractorName": "flight_booking_schema_new_schema.per_title",
              "roleType": "flight_booking_schema_new_schema.PER_TITLE"
            },
            {
              "startOffset": 5,
              "endOffset": 13,
              "name": "key",
              "id": "E1",
              "dataSpan": "traveled"
            },
            {
              "startOffset": 17,
              "endOffset": 23,
              "name": "DESTINATION",
              "id": "Q84",
              "dataSpan": "London",
              "confidence": 0.6654963,
              "extractorName": "flight_booking_schema_new_schema.location-entity",
              "roleType": "flight_booking_schema_new_schema.location"
            }
          ],
          "polarity": "Positive",
          "negationCues": []
        }
      ],
      "confidence": 1,
      "workspaceId": "650c4c891c39afa1b071dae3"
    },
    {
      "eventType": "flight_booking_schema_new_schema.TRAVEL",
      "mentions": [
        {
          "startOffset": 25,
          "endOffset": 55,
          "roles": [
            {
              "startOffset": 25,
              "endOffset": 32,
              "name": "TRAVELER",
              "id": "T2",
              "dataSpan": "Charles",
              "confidence": 0.72164702,
              "extractorName": "flight_booking_schema_new_schema.per_title",
              "roleType": "flight_booking_schema_new_schema.PER_TITLE"
            },
            {
              "startOffset": 40,
              "endOffset": 46,
              "name": "key",
              "id": "E2",
              "dataSpan": "travel"
            },
            {
              "startOffset": 50,
              "endOffset": 55,
              "name": "DESTINATION",
              "id": "E3",
              "dataSpan": "Paris",
              "extractorName": "flight_booking_schema_new_schema.location-entity",
              "roleType": "flight_booking_schema_new_schema.location"
            }
          ],
          "polarity": "Negative",
          "negationCues": [
            {
              "startOffset": 33,
              "endOffset": 39,
              "dataSpan": "didn't"
            }
          ]
        }
      ],
      "confidence": 0.89116663,
      "workspaceId": "650c4c891c39afa1b071dae3"
    }
  ]
}
Extracting from multiple event models
The events endpoint can support event extraction from multiple event models in a single call.
Each event extraction model is for a single language.
A model is identified by a
workspaceId.A plan specifies a list of event models (identified by
workspaceId) to be used to extract event mentions. The models are listed by language.
Through the plan options the user can specify a list of event extraction models to be used when extracting event mentions from a document.
If no workspaceId or plan is specified, then all events models in the instance are used for extraction.
Only models matching the language of the content are called. This can be explicitly set by passing the language code in the call or events will identify the language. Each model is called serially. The response time will increase as additional models are added to the search. It is still faster, however, than making multiple individual calls to each event model.
For each event mention extracted, the response will include the workspaceId of the model which extracted the event mention. Each entity extracted will include the customProfileId (if any) which the extracted entity came from.
Only a single event extraction model is called.
{
  "content": "string",
  "language": "string",
  "options": {
    "workspaceId": "string"
}All event extraction models that match the language of the content string are called. Multiple event mentions may be returned, from different event models.
{
  "content": "string",
  "language": "string",
}Multiple event extraction models are called in a single request. Only the models where the languageCode matches the language of the content string are called. Multiple event mentions may be returned, from different event models.
{
  "content": "string",
  "language": "string",
  "options": {
    "plan": {
       "string": [
         "string"
        ]
    }
  }
The following example requests events extracted from the content string using the english (eng) language models mult-1, mult-2, and mult-3.
{content": "I want flights from Boston to New York",
  "language": "eng",
  "options":
 {  "plan": {
      "eng": ["multi-1", "multi-2","multi-3"
      ]
    }
  }
Examples
Example events request when using a single events model:
{"content": "I want flights from Boston to New York",
"language": "eng",
"options": {
   "workspaceId": "multi-1"
 }
Response:
{
    "events": [
        {
            "eventType": "flight_booking_schema.flight_booking",
            "mentions": [
                {
                    "startOffset": 7,
                    "endOffset": 38,
                    "roles": [
                        {
                            "startOffset": 7,
                            "endOffset": 14,
                            "name": "key",
                            "id": "E1",
                            "dataSpan": "flights",
                            "obsolete": false,
                            "roleType": "flight_booking_schema.flight_booking_key",
                            "extractorName": "flight_booking_schema.flight-key-morphological"
                        },
                        {
                            "startOffset": 20,
                            "endOffset": 26,
                            "name": "origin",
                            "id": "T0",
                            "dataSpan": "Boston",
                            "obsolete": false,
                            "roleType": "generic_schema.location",
                            "extractorName": "generic_schema.location-entity"
                        },
                        {
                            "startOffset": 30,
                            "endOffset": 38,
                            "name": "destination",
                            "id": "T1",
                            "dataSpan": "New York",
                            "obsolete": false,
                            "roleType": "generic_schema.location",
                            "extractorName": "generic_schema.location-entity"
                        }
                    ]
                }
            ],
            "confidence": 0.93891401,
            "workspaceId": "multi-1"
        }
    ]
}
Example events request when using multiple events models in a single call:
{content": "I want flights from Boston to New York",
  "language": "eng",
  "options": {
  "plan": {
      "eng": ["multi-1", "multi-2","multi-3"]}
  }
Response:
{
    "events": [
        {
            "eventType": "flight_booking_schema.flight_booking",
            "mentions": [
                {
                    "startOffset": 7,
                    "endOffset": 38,
                    "roles": [
                        {
                            "startOffset": 7,
                            "endOffset": 14,
                            "name": "key",
                            "id": "E1",
                            "dataSpan": "flights",
                            "obsolete": false,
                            "roleType": "flight_booking_schema.flight_booking_key",
                            "extractorName": "flight_booking_schema.flight-key-morphological"
                        },
                        {
                            "startOffset": 20,
                            "endOffset": 26,
                            "name": "origin",
                            "id": "T0",
                            "dataSpan": "Boston",
                            "obsolete": false,
                            "roleType": "generic_schema.location",
                            "extractorName": "generic_schema.location-entity"
                        },
                        {
                            "startOffset": 30,
                            "endOffset": 38,
                            "name": "destination",
                            "id": "T1",
                            "dataSpan": "New York",
                            "obsolete": false,
                            "roleType": "generic_schema.location",
                            "extractorName": "generic_schema.location-entity"
                        }
                    ]
                }
            ],
            "confidence": 0.93891401,
            "workspaceId": "multi-1"
        },
        {
            "eventType": "flight_booking_schema.flight_booking",
            "mentions": [
                {
                    "startOffset": 7,
                    "endOffset": 38,
                    "roles": [
                        {
                            "startOffset": 7,
                            "endOffset": 14,
                            "name": "key",
                            "id": "E2",
                            "dataSpan": "flights",
                            "obsolete": false,
                            "roleType": "flight_booking_schema.flight_booking_key",
                            "extractorName": "flight_booking_schema.flight-key-morphological"
                        },
                        {
                            "startOffset": 20,
                            "endOffset": 26,
                            "name": "origin",
                            "id": "T0",
                            "dataSpan": "Boston",
                            "obsolete": false,
                            "roleType": "generic_schema.location",
                            "extractorName": "generic_schema.location-entity"
                        },
                        {
                            "startOffset": 30,
                            "endOffset": 38,
                            "name": "destination",
                            "id": "T1",
                            "dataSpan": "New York",
                            "obsolete": false,
                            "roleType": "generic_schema.location",
                            "extractorName": "generic_schema.location-entity"
                        }
                    ]
                }
            ],
            "confidence": 0.93891401,
            "workspaceId": "multi-2"
        },
        {
            "eventType": "flight_booking_schema.flight_booking",
            "mentions": [
                {
                    "startOffset": 7,
                    "endOffset": 38,
                    "roles": [
                        {
                            "startOffset": 7,
                            "endOffset": 14,
                            "name": "key",
                            "id": "E3",
                            "dataSpan": "flights",
                            "obsolete": false,
                            "roleType": "flight_booking_schema.flight_booking_key",
                            "extractorName": "flight_booking_schema.flight-key-morphological"
                        },
                        {
                            "startOffset": 20,
                            "endOffset": 26,
                            "name": "origin",
                            "id": "T0",
                            "dataSpan": "Boston",
                            "obsolete": false,
                            "roleType": "generic_schema.location",
                            "extractorName": "generic_schema.location-entity"
                        },
                        {
                            "startOffset": 30,
                            "endOffset": 38,
                            "name": "destination",
                            "id": "T1",
                            "dataSpan": "New York",
                            "obsolete": false,
                            "roleType": "generic_schema.location",
                            "extractorName": "generic_schema.location-entity"
                        }
                    ]
                }
            ],
            "confidence": 0.93891401,
            "workspaceId": "multi-3"
        }
    ]
}This request queries all loaded event models in a single call. This call uses ?output=rosette to return the full ADM output, including entities:
https://<PRODSERVER>rest/v1/events?output=rosette
{content": "I need a flight from Boston to New York today. I don't want to get arrested here.",
  "language": "eng"
}
Response (without tokens section):
{
"version": "1.1.0",
"data": "I need a flight from Boston to New York today. I don't want to get arrested here.",
"attributes": {
"sentence": {
"type": "list",
"itemType": "sentence",
"items": [
{
"startOffset": 0,
"endOffset": 47
},
{
"startOffset": 47,
"endOffset": 81
}
]
},
"languageDetection": {
"type": "languageDetection",
"startOffset": 0,
"endOffset": 81,
"detectionResults": [
{
"language": "eng",
"encoding": "UTF-16BE",
"script": "Latn",
"confidence": 0.86757723
}
]
},
"scriptRegion": {
"type": "list",
"itemType": "scriptRegion",
"items": [
{
"startOffset": 0,
"endOffset": 81,
"script": "Latn"
}
]
},
"layoutRegion": {
"type": "list",
"itemType": "layoutRegion",
"items": [
{
"startOffset": 0,
"endOffset": 81,
"layout": "UNSTRUCTURED"
}
]
},
"events": {
"type": "list",
"itemType": "event",
"items": [
{
"eventType": "flight_booking_schema.flight_booking",
"mentions": [
{
"startOffset": 9,
"endOffset": 39,
"roles": [
{
"startOffset": 9,
"endOffset": 15,
"name": "key",
"id": "E1",
"dataSpan": "flight",
"obsolete": false,
"roleType": "flight_booking_schema.flight_booking_key",
"extractorName": "flight_booking_schema.flight-key-morphological"
},
{
"startOffset": 21,
"endOffset": 27,
"name": "origin",
"id": "Q100",
"dataSpan": "Boston",
"confidence": 0.20862331,
"obsolete": false,
"roleType": "generic_schema.location",
"extractorName": "generic_schema.location-entity"
},
{
"startOffset": 31,
"endOffset": 39,
"name": "destination",
"id": "T1",
"dataSpan": "New York",
"obsolete": false,
"roleType": "generic_schema.location",
"extractorName": "generic_schema.location-entity"
}
]
}
],
"confidence": 1.0,
"workspaceId": "flight_booking"
},
{
"eventType": "flight_booking_schema.flight_booking",
"mentions": [
{
"startOffset": 9,
"endOffset": 39,
"roles": [
{
"startOffset": 9,
"endOffset": 15,
"name": "key",
"id": "E2",
"dataSpan": "flight",
"obsolete": false,
"roleType": "flight_booking_schema.flight_booking_key",
"extractorName": "flight_booking_schema.flight-key-morphological"
},
{
"startOffset": 21,
"endOffset": 27,
"name": "origin",
"id": "T0",
"dataSpan": "Boston",
"obsolete": false,
"roleType": "generic_schema.location",
"extractorName": "generic_schema.location-entity"
},
{
"startOffset": 31,
"endOffset": 39,
"name": "destination",
"id": "T1",
"dataSpan": "New York",
"obsolete": false,
"roleType": "generic_schema.location",
"extractorName": "generic_schema.location-entity"
}
]
}
],
"confidence": 1.0,
"workspaceId": "starwars"
},
{
"eventType": "law_enforcement_schema.arrest",
"mentions": [
{
"startOffset": 67,
"endOffset": 75,
"roles": [
{
"startOffset": 67,
"endOffset": 75,
"name": "key",
"id": "E3",
"dataSpan": "arrested",
"obsolete": false,
"roleType": "law_enforcement_schema.arrest_key",
"extractorName": "law_enforcement_schema.arrest-key"
}
]
}
],
"confidence": 0.91264051,
"workspaceId": "law_enforcement"
},
{
"eventType": "flight_booking_schema.flight_booking",
"mentions": [
{
"startOffset": 9,
"endOffset": 39,
"roles": [
{
"startOffset": 9,
"endOffset": 15,
"name": "key",
"id": "E4",
"dataSpan": "flight",
"obsolete": false,
"roleType": "flight_booking_schema.flight_booking_key",
"extractorName": "flight_booking_schema.flight-key-morphological"
},
{
"startOffset": 21,
"endOffset": 27,
"name": "origin",
"id": "Q100",
"dataSpan": "Boston",
"confidence": 0.20862331,
"obsolete": false,
"roleType": "generic_schema.location",
"extractorName": "generic_schema.location-entity"
},
{
"startOffset": 31,
"endOffset": 39,
"name": "destination",
"id": "T1",
"dataSpan": "New York",
"obsolete": false,
"roleType": "generic_schema.location",
"extractorName": "generic_schema.location-entity"
}
]
}
],
"confidence": 1.0,
"workspaceId": "flight_booking1"
},
{
"eventType": "flight_booking_schema.flight_booking",
"mentions": [
{
"startOffset": 9,
"endOffset": 39,
"roles": [
{
"startOffset": 9,
"endOffset": 15,
"name": "key",
"id": "E5",
"dataSpan": "flight",
"obsolete": false,
"roleType": "flight_booking_schema.flight_booking_key",
"extractorName": "flight_booking_schema.flight-key-morphological"
},
{
"startOffset": 21,
"endOffset": 27,
"name": "origin",
"id": "Q100",
"dataSpan": "Boston",
"confidence": 0.20862331,
"obsolete": false,
"roleType": "generic_schema.location",
"extractorName": "generic_schema.location-entity"
},
{
"startOffset": 31,
"endOffset": 39,
"name": "destination",
"id": "T1",
"dataSpan": "New York",
"obsolete": false,
"roleType": "generic_schema.location",
"extractorName": "generic_schema.location-entity"
}
]
}
],
"confidence": 1.0,
"workspaceId": "kt2"
},
{
"eventType": "flight_booking_schema.flight_booking",
"mentions": [
{
"startOffset": 9,
"endOffset": 39,
"roles": [
{
"startOffset": 9,
"endOffset": 15,
"name": "key",
"id": "E6",
"dataSpan": "flight",
"obsolete": false,
"roleType": "flight_booking_schema.flight_booking_key",
"extractorName": "flight_booking_schema.flight-key-morphological"
},
{
"startOffset": 21,
"endOffset": 27,
"name": "origin",
"id": "Q100",
"dataSpan": "Boston",
"confidence": 0.20862331,
"obsolete": false,
"roleType": "generic_schema.location",
"extractorName": "generic_schema.location-entity"
},
{
"startOffset": 31,
"endOffset": 39,
"name": "destination",
"id": "T1",
"dataSpan": "New York",
"obsolete": false,
"roleType": "generic_schema.location",
"extractorName": "generic_schema.location-entity"
}
]
}
],
"confidence": 1.0,
"workspaceId": "kt1"
}
]
},
"token": {
...
},
"entities": {
"type": "list",
"itemType": "entities",
"items": [
{
"mentions": [
{
"startOffset": 21,
"endOffset": 27,
"source": "gazetteer",
"subsource": "/basis/roots//rex/7.51.1.c65.0/data/gazetteer/eng/accept/gaz-LE.bin",
"normalized": "Boston"
}
],
"headMentionIndex": 0,
"type": "LOCATION",
"entityId": "T0",
"entitiesCustomProfile": "starwars"
},
{
"mentions": [
{
"startOffset": 31,
"endOffset": 39,
"source": "gazetteer",
"subsource": "/basis/roots//rex/7.51.1.c65.0/data/gazetteer/eng/accept/gaz-LE.bin",
"normalized": "New York"
}
],
"headMentionIndex": 0,
"type": "LOCATION",
"entityId": "T1",
"entitiesCustomProfile": "starwars"
},
{
"mentions": [
{
"startOffset": 21,
"endOffset": 27,
"linkingConfidence": 0.20862331,
"source": "gazetteer",
"subsource": "/basis/roots//rex/7.51.1.c65.0/data/gazetteer/eng/accept/gaz-LE.bin",
"normalized": "Boston"
}
],
"headMentionIndex": 0,
"type": "LOCATION",
"entityId": "Q100"
},
{
"mentions": [
{
"startOffset": 31,
"endOffset": 39,
"source": "gazetteer",
"subsource": "/basis/roots//rex/7.51.1.c65.0/data/gazetteer/eng/accept/gaz-LE.bin",
"normalized": "New York"
}
],
"headMentionIndex": 0,
"type": "LOCATION",
"entityId": "T1"
}
]
}
},
"documentMetadata": {
"eventsModelFingerprints": [
"{\"v\": \"3ad91641b2b3cfd5a08f735f0ba3b709d9d533ec8ebae1bbf303564398f6cf9c\", \"t\": 1633468622.8697586}",
"{\"v\": \"d25cf8b3ffa15f06c26e47970b4d1955f4c12619dbf710ff0221d45d8d29f0c7\", \"t\": 1633638752.92538}",
"{\"v\": \"be886861e88855818de2b7e98148cc0f405fcc089da8ef3c997e21a1237ae61d\", \"t\": 1633468557.6076355}",
"{\"v\": \"3ad91641b2b3cfd5a08f735f0ba3b709d9d533ec8ebae1bbf303564398f6cf9c\", \"t\": 1633468622.8697586}",
"{\"v\": \"3ad91641b2b3cfd5a08f735f0ba3b709d9d533ec8ebae1bbf303564398f6cf9c\", \"t\": 1633468622.8697586}",
"{\"v\": \"3ad91641b2b3cfd5a08f735f0ba3b709d9d533ec8ebae1bbf303564398f6cf9c\", \"t\": 1633468622.8697586}"
],
"processedBy": [
"language-identification@127.0.0.1",
"event-extractor@127.0.0.1"
],
"eventsModels": [
"flight_booking",
"starwars",
"law_enforcement",
"flight_booking1",
"kt2",
"kt1"
]
}
}
Event schema
GET /events/info
GET /events/info?workspaceId={wid}
The event schema defines the event types you are extracting. It includes key phrases, roles, role types, and extractors.
For each key phrase and role, there is a role-type. A role type is made up of one or more extractors. Extractors are reusable components which define the rules and techniques to identify roles and key phrases.
The supported extractor types are:
Entity: A list of entity types. You can use the standard, pre-defined entity types or train a custom model to extract other entity types. The custom model must be loaded in Server to define an entity extractor with custom entity types.
Exact: a list of words or phrases. Exact will match any words on the list, whether they are identified as entity types or not. For example, you could have a list of common modes of transportation, including armored personnel carrier and specific types of tanks.
Morphological: A list of words. When a word is added to this list, it is immediately converted to and stored as its lemma. Words with the same lemmatization will match. For example, a morphological extractor for go will match going, went, goes, gone.This is the only extractor type valid for key phrases.
Semantic: A list of words or phrases. Any word whose meaning is similar to one of these words will match. For example, an extractor of meeting will match assembly, gathering, conclave. Word vector similarity is used to identify similar words. While a semantic extractor can be defined by a phrase, it will only identify single words as candidate roles.
You cannot modify the schema for a trained model. You can view it through the /events/info endpoint.
GET /events/infoReturns the list of all models currently installed in the system along with the schemas used to create the models.GET /events/info?workspaceId={wid}Returns the schema used to create the model, wherewidis the workspace identifier for the particular events model.
Error handling/invalid requests
The
languageparameter is optional. If not provided, Analytics Server will automatically identify the language of the content provided. If there is no model listed for the identified language, then a 400 Bad Request will be returned.If no language is provided, and Analytics Server is unable to auto-detect it, the endpoint may provide a “Language
xxxis not supported” error, wherexxxindicates the language was not determined.If the model identified by
workspaceIddoes not exist on the Server, a 400 will be returned.If any of the
workspaceIds listed in the target plan do not exist on the servicing Event Training Server, a 400 will be returned.If any of the workspaces were trained with a custom entity model and any of the custom entity models are not deployed to Analytics Server, a 400 Bad Request will be returned.
If both
workspaceIdandplanoptions are provided in the same request, a 400 Bad Request will be returned.
Using custom profiles in Analytics Server
Custom profiles are a powerful feature of Analytics Server that enable you to tailor its functionality without modifying the global configuration. While they offer great flexibility, they can sometimes be complex to implement.
With custom profiles, you can incorporate specialized Named Entity Recognition (NER) models, regular expressions (regexes), and gazetteers within the Model Training Suite. For example, you might train a custom NER model and use it for event model training. Custom profiles allow you to override the default Analytics Server configuration for specific applications, ensuring more precise entity extraction and data processing.
In the following tutorials, we will guide you through the process of creating and applying custom profiles, including:
Custom configurations
Gazetteers
Regexes
Custom NER Models
Overview
Custom profiles allow Analytics Server to be customized without altering the server-wide (global) settings. A custom profile can consist of any combination of regexes, gazetteers, configuration settings, and NER models. They are typically used in a few different scenarios:
Testing: A custom profile is created for testing purposes. Once the test team is satisfied with the results of the regex/gazetteer/configuration/NER models, the profile can be deployed to the global configuration so that everyone can use them by default.
Specific Problem Domains: In specific domains, it is sometimes better to keep profiles separate because they are not useful in general use cases. For example, there might be models dedicated to weapon systems that include gazetteers for F-16, F-18, F-22, Raptor, and similar items. Typical users of the system might not be interested in those.
Custom profiles work by providing a set of configuration files, models, regular expressions, and gazetteers that override the server's existing configuration. Only the settings specified in the custom profile override the server-wide configuration. If a custom profile does not override a setting, then the server-wide setting is used.
Note
Only one configuration file, the factory configuration file, is required at the heart of it; everything else is optional.
The custom profile is given a name, which is the directory it is stored in. A custom profile is explicitly invoked when calling endpoints in Analytics Server by using the profileId request attribute. For example:
POST /rest/v1/entities
{
  "content": "This sentence will be processed by the my-config custom profile",
  "profileId": "my-config"
}
Note
The configuration setting startingWithDefaultConfiguration: true controls if the custom profile includes the server-wide configuration in addition to the custom profile or not. If startingWithDefaultConfiguration is set to false, then the custom profile must include all NER models, gazetteers, regexes, and all other data files from the REX root that are needed. If set to true, then the custom profile will simply override settings and append to the server-wide configuration.
Setting up custom profiles
Create a directory to contain the configuration and data files for the custom profile.
The directory name must be 1 or more characters consisting of
0-9,A-Z,a-z, underscore or hyphen and no more than 80 characters long. It cannot contain spaces. It can be anywhere on your server; it does not have to be in the Analytics Server directory structure. This is theprofile-data-root.Create a subdirectory for each profile, identified by a profileId.
For each profile, create a subdirectory named profileID in the profile-data-root. The profile-path for a project is
profile-data-root/profileId.For example, let's assume our
profile-data-rootis rosette-users, and we have two profiles: group1 and group2. We would have the followingprofile-paths:rosette-users/group1 rosette-users/group2
Edit the Analytics Server configuration files to look for the profile directories.
The configuration files are in the
launcher/config/directory. Set theprofile-data-rootvalue in this file:com.basistech.ws.worker.cfg
# profile data root folder that may contain profile-id/{rex,tcat} etc
profile-data-root=file:///Users/rosette-users
Add the customization files for each profile. They may be configuration and/or data files.
When you call the API, add "profileId" = "myProfileId" to the body of the call.
{"content": "The black bear fought the white tiger at London Zoo.",
 "profileId": "group1"
}
Prerequisites
To run the examples included in the section, you must have:
Access to the machine where Analytics Server is installed.
Ability to create directories under
${install-dir}/config/custom-profiles.A tool that can send HTTP POST requests, such as
cURL,POSTMAN, or similar. If usingcURL, havingjqinstalled can help visualize JSON output.
Customizing the Entity Extractor configuration
This section walks you through creating a custom profile that contains a customized Entity Extractor configuration.
In this tutorial, we're going to create a new custom profile that customizes the Entity Extractor configuration. The new profile:
excludes the
TITLEtypeexcludes the confidence scores
Show the Default Behavior of TITLES
With Analytics Server running, execute the following:
# Replace HOST with the hostname where RS is installed
HOST=Rosette Server HOST
curl -X POST -H 'Content-Type: application/json' http://${HOST}:8181/rest/v1/entities -d '{"content":"Dr. Jones will not attend the party."}'
Expected response (note the
TITLEof Dr. and the confidence values):{ "entities": [ { "type": "TITLE", "mention": "Dr.", "normalized": "Dr.", "count": 1, "mentionOffsets": [ { "startOffset": 0, "endOffset": 3 } ], "entityId": "T0", "confidence": 0.85472322 }, { "type": "PERSON", "mention": "Jones", "normalized": "Jones", "count": 1, "mentionOffsets": [ { "startOffset": 4, "endOffset": 9 } ], "entityId": "T1", "confidence": 0.71944249 } ] }Create the Custom Profile Directory
INSTALL=the directory where RS was installed, e.g. /basis/rs
cd $INSTALL/config/custom-profiles
mkdir my-config
cd my-config
mkdir -p config/rosapi
The directory structure under
$INSTALL/config/custom-profiles/my-regexfollows the same structure as theREXroot data directory, with the addition of Analytic Server'sconfig/rosapisubdirectory.Create a new
rex-factory-config.yamlFileUsing your editor of choice, create the file at:
$INSTALL/config/custom-profiles/my-config/config/rosapi/rex-factory-config.yaml
Contents of the file:
# rootDirectory is the location of the rex root
rootDirectory: ${rex-root}
# startingWithDefaultConfigurations sets whether to fill in the defaults with createDefaultExtractor
startingWithDefaultConfiguration: true

calculateConfidence: false
excludedEntityTypes:
- TITLE

# This tells RS what directory should be treated as the REX 'data' directory.
# Since RS in MTS is containerized, this path is relative to the container's filesystem,
# not the host's filesystem.
dataOverlayDirectory: file:///rosette/server/launcher/config/custom-profiles/my-config
Once complete, your directory structure should look like this:
 $INSTALL/config/custom-profiles/my-config
└── config
    └── rosapi
        └── rex-factory-config.yaml
Restart Analytics Server
Analytics Server periodically scans the custom profiles directory for changes and reloads a profile if a change is detected. The most assured way to know the profile was loaded is to restart Analytics Server.
cd $INSTALL/rs-docker
docker-compose stop
docker-compose up -d
Check the Custom Profile
When Analytics Server is available:
# Listing custom profiles
HOST={RS HOST}
curl http://${HOST}:8181/rest/v1/custom-profiles

# Response is similar:
["ad-suggestions","ad-base-linguistics","my-config"]
Troubleshooting
If
my-configis not listed, check the Analytics Server logs for issues:cd $INSTALL/rs-docker docker-compose logs -f
Possible problems:
Permissions error reading from the
my-configdirectory:cd $INSTALL/config/custom-profiles chmod -R 777 ./my-config/* # Restart Rosette Server
Typo in a configuration file.
Try Out the Custom Configuration
curl -X POST -H 'Content-Type: application/json' http://${HOST}:8181/rest/v1/entities -d '{"content":"Dr. Jones will not attend the party.", "profileId":"my-config"}'Expected response (note the confidence and
TITLEare omitted):{ "entities": [ { "type": "PERSON", "mention": "Jones", "normalized": "Jones", "count": 1, "mentionOffsets": [ { "startOffset": 4, "endOffset": 9 } ], "entityId": "T0" } ] }Troubleshooting
If the response from Analytics Server includes confidence values or
TITLE, ensure that"profileId": "my-config"is included in the request.
Adding an NER model with a custom profile
This section walks you through creating a custom Entity Extractor profile that contains a custom Named Entity Recognition (NER) model for Analytics Server.
In this tutorial, we will create a custom profile named my-ner and add a custom NER model to it. When the custom profile is used, if the NER model detects an entity, it will be extracted along with its type and model location.
Show Existing Custom Profiles
With Analytics Server running, execute the following:
# Replace HOST with the hostname where RS is installed
HOST=Rosette Server HOST
curl http://${HOST}:8181/rest/v1/custom-profiles

# Response is similar:
["ad-suggestions","ad-base-linguistics"]
Create the Custom Profile Directory
INSTALL=the directory where RS was installed, e.g. /basis/rs
cd $INSTALL/config/custom-profiles
mkdir my-ner
cd my-ner
mkdir -p config/rosapi
mkdir -p statistical/eng
The directory structure under $INSTALL/config/custom-profiles/my-regex follows the same structure as the Entity Extractor root data directory, with the addition of Analytic Server's config/rosapi subdirectory.
Create the
rex-factory-config.yamlFileUsing your editor of choice, create the file at:
$INSTALL/config/custom-profiles/my-ner/config/rosapi/rex-factory-config.yaml
Contents of the file:
# rootDirectory is the location of the rex root
rootDirectory: ${rex-root}
# startingWithDefaultConfigurations sets whether to fill in the defaults with createDefaultExtractor
startingWithDefaultConfiguration: true

dataOverlayDirectory: file:///rosette/server/launcher/config/custom-profiles/my-ner
Copy the Model File
cp model.6124a1d399ff8ef3173bfb38-20210826_10_08_01-LE.bin $INSTALL/config/custom-profiles/my-ner/statistical/eng
Once complete, your directory structure should look like this:
$INSTALL/config/custom-profiles/my-ner
├── config
│   └── rosapi
│       └── rex-factory-config.yaml
└── statistical
    └── eng
        └── model.6124a1d399ff8ef3173bfb38-20210826_10_08_01-LE.bin
Restart Analytics Server
Analytics Server will scan the custom profiles directory periodically for changes and reload a profile if a change is detected. The most assured way to know the profile was loaded is to restart Analytics Server.
cd $INSTALL/rs-docker
docker-compose stop
docker-compose up -d
Check the Custom Profile
When Analytics Server is available, execute the following:
# Listing custom profiles
HOST={RS HOST}
curl http://${HOST}:8181/rest/v1/custom-profiles

# Response is similar:
["ad-suggestions","ad-base-linguistics","my-ner"]
Troubleshooting
If
my-neris not listed, check the Analytics Server logs for issues:cd $INSTALL/rs-docker docker-compose logs -f
Possible problems:
Permissions error reading from the
my-nerdirectory:cd $INSTALL/config/custom-profiles chmod -R 777 ./my-ner/* # Restart Rosette Server
Typo in a configuration file.
Try Out the Model
Using an entity type that the model has been trained on, send an entities request:
curl -H 'Content-Type: application/json' http://${HOST}:8181/rest/v1/entities -d '{"content":"There is a F-16 in the air field.", "language":"eng", "profileId":"my-ner"}'

# Response similar to:
{
  "entities": [
    ...
    {
      "type": "JET",
      "mention": "F-16",
      "normalized": "F-16",
      "count": 1,
      "mentionOffsets": [
        {
          "startOffset": 11,
          "endOffset": 15
        }
      ],
      "entityId": "T1"
    },
    ...
  ]
}
Adding a gazetteer with a custom profile
This section walks you through creating a custom profile that contains an accept gazetteer.
In this tutorial, we will create a custom profile named my-profile and add a set of gazetteers representing movies to it. When the gazetteer matches a movie title we defined, the entity type will be returned as 'MOVIES'.
Show Existing Custom Profiles
With Analytics Server running, execute the following:
Replace HOST with the hostname where RS is installed
HOST=Rosette Server HOST
curl http://${HOST}:8181/rest/v1/custom-profiles

# Response is similar:
["ad-suggestions","ad-base-linguistics"]
Create the Custom Profile Directory
INSTALL=the directory where RS was installed, e.g. /basis/rs
cd $INSTALL/config/custom-profiles
mkdir my-profile
cd my-profile
mkdir -p config/rosapi
mkdir -p gazetteer/eng/accept
The directory structure under $INSTALL/config/custom-profiles/my-regex follows the same structure as the Entity Extractor root data directory, with the addition of Analytic Server's config/rosapi subdirectory.
Create the
rex-factory-config.yamlFileUsing your editor of choice, create the file at:
$INSTALL/config/custom-profiles/my-profile/config/rosapi/rex-factory-config.yaml
Contents of the file:
# rootDirectory is the location of the rex root
rootDirectory: ${rex-root}
# startingWithDefaultConfigurations sets whether to fill in the defaults with createDefaultExtractor
startingWithDefaultConfiguration: true

dataOverlayDirectory: file:///rosette/server/launcher/config/custom-profiles/my-profile

acceptGazetteers:
  eng: ["/rosette/server/launcher/config/custom-profiles/my-profile/gazetteer/eng/accept/movies.txt"]
Create the Gazetteer File
Using your editor of choice, create the
movies.txtfile at:$INSTALL/config/custom-profiles/my-profile/gazetteer/eng/accept/movies.txt
Contents of the file:
MOVIES
Inception
The Godfather
Batman
Superman
Pulp Fiction
The Matrix
Top Gun
Fight Club
Once complete, your directory structure should look like this:
$INSTALL/config/custom-profiles/my-profile
├── config
│   └── rosapi
│       └── rex-factory-config.yaml
└── gazetteer
    └── eng
        └── accept
            └── movies.txt
Restart Analytics Server
Analytics Server will scan the custom profiles directory periodically for changes and reload a profile if a change is detected. The most assured way to know the profile was loaded is to restart Analytics Server.
cd $INSTALL/rs-docker
docker-compose stop
docker-compose up -d
Check the Custom Profile
When Analytics Server is available, execute the following:
# Listing custom profiles
HOST={RS HOST}
curl http://${HOST}:8181/rest/v1/custom-profiles

# Response is similar:
["ad-suggestions","ad-base-linguistics","my-profile"]
Troubleshooting
If
my-profileis not listed, check the Analytics Server logs for issues:cd $INSTALL/rs-docker docker-compose logs -f
Possible problems:
Permissions error reading from the
my-profiledirectory:cd $INSTALL/config/custom-profiles chmod -R 777 ./my-profile/* # Restart Rosette Server
Typo in a configuration file.
Try Out the Gazetteer
curl -H 'Content-Type: application/json' http://${HOST}:8181/rest/v1/entities -d '{"content":"This movie is Fight Club", "language":"eng", "profileId":"my-profile"}'

# Response similar to:
{
  "entities": [
    {
      "type": "MOVIES",
      "mention": "Fight Club",
      "normalized": "Fight Club",
      "count": 1,
      "mentionOffsets": [
        {
          "startOffset": 14,
          "endOffset": 24
        }
      ],
      "entityId": "T0"
    }
  ]
}
Troubleshooting
If the response from Analytics Server lists the movie as
PRODUCT, then the custom gazetteer is not being used. To verify that this is the case, add?output=rosetteto the request.curl -H 'Content-Type: application/json' http://${HOST}:8181/rest/v1/entities?output=rosette -d '{"content":"This movie is Fight Club", "language":"eng", "profileId":"my-profile"}' # Using the output=rosette will return tokens, sentences, entities, script, and language identification of the document. # It will also list what model matched each of the entities. # If the custom profile is being used, you should see something like: { "startOffset": 14, "endOffset": 24, "source": "gazetteer", "subsource": "/rosette/server/launcher/config/custom-profiles/my-profile/gazetteer/eng/accept/movies.txt", "normalized": "Fight Club" } ], "headMentionIndex": 0, "type": "MOVIES", "entityId": "T0" # This indicates that the custom-profile my-profile detected 'Fight Club' using a gazetteer.
Reject Gazetteers A reject gazetteer can be used to reject certain phrases from entity extraction. To create a reject gazetteer, a file named
my-reject.txtwould be defined in the way as the accept gazetteers just using different configuration keys. For example the$INSTALL/config/custom-profiles/my-profile/config/rosapi/rex-factory-config.yamlfile would also contain:
# Note the spaces before 'eng' are significant
rejectGazetteers:
  eng: ["/rosette/server/launcher/config/custom-profiles/my-profile/gazetteer/eng/reject/movies-reject.txt"]
If adding a reject gazetteer in English the directory structure would look like:
$INSTALL/config/custom-profiles/my-profile
  ├── config
  │   └── rosapi
  │       └── rex-factory-config.yaml
  └── gazetteer
      └── eng
          └── accept
          │   └── movies.txt
          └── reject
              └── my-reject.txt
Adding regexes with a custom profile
This section walks you through creating a custom Entity Extractor profile containing regular expressions (regex) for an Analytics Server.
Note
Regexes can be very difficult to get correct.
In this tutorial, we will create a custom profile named my-regex and add a regex representing an IMEI (International Mobile Equipment Identity). An IMEI uniquely identifies a mobile device. When the regex matches an IMEI as defined, the entity type will be returned as IDENTIFIER:IMEI.
Show Existing Custom Profiles
With Analytics Server running, execute the following:
# Replace HOST with the hostname where RS is installed
HOST=Rosette Server HOST
curl http://${HOST}:8181/rest/v1/custom-profiles

# Response is similar:
["ad-suggestions","ad-base-linguistics"]
Create the Custom Profile Directory
INSTALL=the directory where RS was installed, e.g., /basis/rs
cd $INSTALL/config/custom-profiles
mkdir my-regex
cd my-regex
mkdir -p config/rosapi
mkdir -p regex/eng/accept/supplemental
The directory structure under
$INSTALL/config/custom-profiles/my-regexfollows the same structure as theREXroot data directory, with the addition of Analytic Server'sconfig/rosapisubdirectory.Create the
rex-factory-config.yamlfileUsing your editor of choice, create the file at:
$INSTALL/config/custom-profiles/my-regex/config/rosapi/rex-factory-config.yaml
Contents of the file:
# rootDirectory is the location of the rex root
rootDirectory: ${rex-root}
# startingWithDefaultConfigurations sets whether to fill in the defaults with createDefaultExtractor
startingWithDefaultConfiguration: true

dataOverlayDirectory: file:///rosette/server/launcher/config/custom-profiles/my-regex

acceptRegularExpressionSets:
- "/rosette/server/launcher/config/custom-profiles/my-regex/regex/eng/accept/supplemental/imei-regexes.xml"
Create the Regex File
An
IMEIis generally a 15-digit sequence of numbers, e.g.,IMEI 356303484465073.Using your editor of choice, create the
imei-regexes.xmlfile at:$INSTALL/config/custom-profiles/my-regex/regex/eng/accept/supplemental/imei-regexes.xml
Contents of the file:
<?xml version="1.0" encoding="utf-8" standalone="yes"?>
<!DOCTYPE regexps PUBLIC "-//basistech.com//DTD RLP Regular Expression Config 7.1//EN"
        "urn:basistech.com:7.1:rlpregexp.dtd">

<regexps>
    <!-- IMEI Number -->
    <regexp lang="eng" type="IDENTIFIER:IMEI">([0-9]){15}</regexp>
</regexps>
Once complete, your directory structure should look like this:
$INSTALL/config/custom-profiles/my-regex
├── config
│   └── rosapi
│       └── rex-factory-config.yaml
└── regex
    └── eng
        └── accept
            └── supplemental
                └── imei-regexes.xml
Notes:
Regexes are specific to a language.
To define a regex applicable to all languages, place it in the
/regex/xxx/accept/supplementaldirectory, wherexxxis processed for all languages.There are both
acceptandrejectregexes. Accept regexes are positive matches, whereas reject regexes will reject text from being processed further. For instance, if Fight Club were in a reject regex, it would never be returned when using the custom profile, even though Analytics Server has other entries for Fight Club.
Reject Regexes:
A reject regex in a file named
imei-regexes-reject.xmlwould be defined similarly to the accept regex but deployed in a different location and use different configuration keys. This could be used, for example, to reject certain IMEI from being detected. The$INSTALL/config/custom-profiles/my-regex/config/rosapi/rex-factory-config.yamlfile would also contain:>rejectRegularExpressionSets: - "/rosette/server/launcher/config/custom-profiles/my-regex/regex/eng/reject/supplemental/imei-regexes-reject.xml"
Directory structure for reject gazetteer in English:
$INSTALL/config/custom-profiles/my-regex
├── config
│   └── rosapi
│       └── rex-factory-config.yaml
└── regex
    └── eng
        └── accept
        │   └── supplemental
        │       └── imei-regexes.xml
        └── reject
            └── supplemental
                └── imei-regexes-reject.xml
Restart Analytics Server
Analytics Server will periodically scan the custom profiles directory for changes and reload a profile if a change is detected. To ensure the profile is loaded, restart Analytics Server:
cd $INSTALL/rs-docker
docker-compose stop
docker-compose up -d
Check the Custom Profile
When Analytics Server is available, execute the following:
# Listing custom profiles
HOST={RS HOST}
curl http://${HOST}:8181/rest/v1/custom-profiles

# Response is similar:
["ad-suggestions","ad-base-linguistics","my-regex"]
Troubleshooting:
If
my-regexis not listed, check the Analytics Server logs for issues:cd $INSTALL/rs-docker docker-compose logs -f
Possible problems:
Permissions error reading from the
my-regexdirectory:cd $INSTALL/config/custom-profiles chmod -R 777 ./my-regex/* # Restart Rosette Server
Typo in a configuration file.
Try Out the Regex
curl -H 'Content-Type: application/json' http://${HOST}:8181/rest/v1/entities -d '{"content":"This phone has IMEI 012345678912345", "language":"eng", "profileId":"my-regex"}'

# Response similar to:
{
  "entities": [
    {
      "type": "IDENTIFIER:IMEI",
      "mention": "012345678912345",
      "normalized": "012345678912345",
      "count": 1,
      "mentionOffsets": [
        {
          "startOffset": 18,
          "endOffset": 33
        }
      ],
      "entityId": "T0"
    }
  ]
}
Troubleshooting:
To verify that the regex is being used, add
?output=rosetteto the request:curl -H 'Content-Type: application/json' http://${HOST}:8181/rest/v1/entities?output=rosette -d '{"content":"This phone has IMEI 012345678912345", "language":"eng", "profileId":"my-regex"}' # The output=rosette option will return tokens, sentences, entities, script, and language identification of the document. It will also list what model matched each entity. # For example, if the custom profile is being used, you should see something like: { "startOffset": 18, "endOffset": 33, "source": "regex", "subsource": "/rosette/server/launcher/config/custom-profiles/my-regex/regex/eng/accept/supplemental/imei-regexes.xml", "normalized": "012345678912345" }The
sourcestatement inidicates that the object was extracted using a regex, and thesubsourceindicates the specific regex that extracted it.
Notes regarding the MTS Analytics Server
Analytics Server is pre-configured to store custom profiles in the
${INSTALL}/config/custom-profilesdirectory.Any path inside the configuration files, such as
dataOverlayDirectory: file:///rosette/server/launcher/config/custom-profiles/my-config, is defined in terms of the Analytics Server container's filesystem, not the host's filesystem. Use/rosette/server/launcher/config/custom-profilesin the configuration files instead of${INSTALL}/config/custom-profiles.The configuration setting
startingWithDefaultConfiguration: truecontrols if the server-wide configuration is used in addition to the custom profile. IfstartingWithDefaultConfiguration:is set tofalse, the custom profile must include all NER models, gazetteers, regexes, and other data files from the REX root.