Babel Street Analytics Server User Guide
Overview
Analytics Server is a Java-based service that offers a locally-deployable package, providing access to Babel Street Analytics functions as RESTful web service endpoints.
Analytics Server can be installed on Windows, Linux, or macOS or it can be run as a Docker application. A Helm chart for Kubernetes deployments of Analytics Server is available here.
Note
Analytics Server was previously named Rosette Server.
Minimum system requirements
Important
Many installations will require more than 32 GB of disk space. A complete installation may require up to 90GB to install Analytics Server. The exact amount needed will depend on the endpoints and the languages installed.
Any installation including the /entities, /sentiment, /topics, or /relationships endpoints will require additional space.
x86_64 CPU with 4 or more physical cores
Basic Memory Requirements:
Minimum 16GB RAM
50GB of disk space (more may be needed for growing logs)
64-bit macOS, Linux, or Windows
64-bit JDK 17 or 21 installed (tested with OpenJDK)
The following commands must be installed on Linux
curlnetstatorsspsgettextbash
Native OS Libraries, needed for some endpoints
Linux:
glibc-2.17
glibc++-3.4.19
libgcc_s-3..0
Windows:
Notice
Endpoints requiring native OS libraries.
/name-similarity,/name-translation, andname-deduplicationwhen the language is Chinese, Japanese, Korean, Russian, or Arabic./sentimentwhen the option for using DNN model is specified("options": {"modelType": "dnn"})/morphology/*,/sentences,/tokens, when the endpoint is using a neural model. This includes:When the language of the data is Hebrew and the option for using the DNN models is specified
"options": {"disambiguatorType": "dnn"}.When the language of the data is Korean and the option for using the DNN models is specified
"options": {"modelType": "dnn"}.
/morphologywhen the language of the data is Indonesian, Standard Malay, or Tagalog and themorphoFeatureiscompleteorparts-of-speech./entitieswhen the language of the data is English, Arabic, or Korean and the option for using DNN model is specified("options": {"modelType": "dnn"})./relationships.
Optimal memory settings
Analytics Server's memory consumption includes the JVM heap and memory mapping of on-disk files. The size of these vary depending on the endpoint(s) enabled in the instance.
Memory mapped files
Analytics Server’s data files are loaded into virtual memory. Some endpoints, such as /entities, involve a large amount of data. In order for Analytics to operate at its peak performance, we recommend that you reserve enough free memory to allow memory mapping of all our data files so that page misses are minimized at runtime.
To estimate the size for memory mapping, you can sum up the files in the unpacked roots folder in your installation.
Many of Server's endpoints organize their data by language. So you can further refine your estimates if you know exactly which languages your input documents are in. Just look for the sub-folders and files under roots/<component-name>-<version> that carry a 3-character ISO 693 code and exclude those not applicable to you.
Disk requirements
You should have sufficient amount of free space to unpack the application and data from your shipment. This could range from 1GB to 90GB. The package size will grow as product updates are released. The amount required is the unpacked directories and files from all *.tar.gz in the shipment package.
Analytics Server also requires space to hold logs and other temporary files. Logs can grow depending on the log level and the number of calls. If you have a log rotation mechanism in place, a couple of GBs should be sufficient. Otherwise, experiment with your call patterns and plan for growth accordingly.
Shipment
You will receive an email containing all the files needed to install Analytics Server, for multiple operating systems and also for using Docker. The files you download depends on your operating system and type of install.
License key file
The Analytics license key file, rosette-license.xml, may be sent in the same email or a separate email.
File Name | Function |
|---|---|
| Analytics Server license key file |
Tip
Each endpoint has a supported-languages method which returns the languages supported by the endpoint in addition to your license status for the language. The method returns a boolean for the field licensed where true indicates that you are licensed for the particular language.
Documentation
The release notes (analytics-server-release-notes-<version>.pdf) and this user guide (analytics-server-user-guide-<version>.pdf) are included with every shipment. Before downloading any other files, you can review the new features and bug fixes included in the release.
File Name | Function |
|---|---|
| Cumulative release notes for Analytics Server |
| This file |
| Entity Extractor Application Developer's Guide |
Docker installation
If installing using a Docker container, download only the Docker compose file (docker_compose.yml) and the license file (rosette-license.xml). Docker will download the remaining files. For offline installation, you will need to download all the files while connected. Those files will be in the last section of the shipment email.
You must run the installer while connected to the internet to download the files and create the volumes. Once the files are downloaded, you can run docker-compose up without be connected to the internet.
File Name | Function |
|---|---|
| Docker compose file |
Docker - offline installation
If you are only connected to the internet for the file download, and will be performing the remaining install while not connected to the internet, you will download the Docker yaml file and the all Docker images.
Download all the component tar files and import_docker_images.sh to create the docker volumes locally.
File Name | |
|---|---|
| A helper script to download the components used for the offline Docker installation. |
| Docker compose file |
| Script to create Docker volumes locally |
| Root file for <component>. Your shipment will contain one or more root files. |
| Docker image for Analytics Server |
macOS/Linux
When installing on macOS or Linux, only download the installer (install_rosette.sh) and the license file (rosette-license.xml). The installer will download the remaining files.
Note
You must run the installer while connected to the internet to download the files. Once the files are downloaded, re-run the installer locally, without a connection, to resume the install.
File Name | Function |
|---|---|
| Install script for macOS and Linux |
Windows
The Windows install requires manually downloading install files, product files, as well as the component (root) files.
File Name | Function |
|---|---|
| List of the roots for each endpoint |
| Root file for <component>. Your shipment will contain one or more root files. |
| Analytics RESTful server |
| Windows script to unpack and arrange component (root) files |
Custom Endpoint Installation
All shipments contain a file for implementing custom endpoints. It contains an installation script and the files for the reverse proxy and application server. The installation script is currently for Linux and macOS only.
File Name | Function |
|---|---|
rosette-custom-endpoint-installer-<version>.tar.gz | Custom endpoint installer and archives. |
Root components
The component files (roots) contain the endpoint specific models and data. Each shipment contains one or more root files, based on your license. You may receive roots that you did not order because of Root dependencies.
File Name | Endpoints | ||||||||||||||||||||||||||||||||||||||||||||||||
|---|---|---|---|---|---|---|---|---|---|---|---|---|---|---|---|---|---|---|---|---|---|---|---|---|---|---|---|---|---|---|---|---|---|---|---|---|---|---|---|---|---|---|---|---|---|---|---|---|---|
| Sentiment Analysis | ||||||||||||||||||||||||||||||||||||||||||||||||
| Relationship Extraction and Syntactical Dependencies | ||||||||||||||||||||||||||||||||||||||||||||||||
| Morphological Analysis, Tokenization, and Sentence Tagging | ||||||||||||||||||||||||||||||||||||||||||||||||
| Transliteration[a] | ||||||||||||||||||||||||||||||||||||||||||||||||
| Relationship Extraction and Syntactical Dependencies | ||||||||||||||||||||||||||||||||||||||||||||||||
| Entity Extraction | ||||||||||||||||||||||||||||||||||||||||||||||||
| Language Identification | ||||||||||||||||||||||||||||||||||||||||||||||||
| Name Similarity, Translation, and Deduplication | ||||||||||||||||||||||||||||||||||||||||||||||||
| Categorization | ||||||||||||||||||||||||||||||||||||||||||||||||
| Topics | ||||||||||||||||||||||||||||||||||||||||||||||||
| Semantic Vectors and Similar Terms | ||||||||||||||||||||||||||||||||||||||||||||||||
[a] Analytics can transliterate Arabizi or Romanized Arabic chat alphabet to native Arabic script and vice versa. | |||||||||||||||||||||||||||||||||||||||||||||||||
Language-specific files
To minimize the size of your Server installation, the entity extraction (rex-root) and semantic similarity (tvec-root) components are shipped by language. The name of the language specific files contain the three letter ISO-639 language code, indicating which language is supported by the file.
Entity extraction is shipped with one base file and one or more language-specific files. Example:
rex-root-<version>.tar.gzrex-root-<version>-eng.tar.gzfor English language filesrex-root-<version>-deu.tar.gzfor German language files
Semantic Similarity is shipped with one file per language. Example:
tvec-root-<version>-eng.tar.gzfor English language filestvec-root-<version>-deu.tar.gzfor German language files
Root dependencies
If you receive any roots that are not part of your licensed endpoints, it's most likely because that root is a dependency for one of your licensed endpoints. For example, if you license entity extraction, you will also have the root for morphological analysis. The language identification root (rli-root) is shipped with many endpoints to determine the language of the request.
Endpoint | Package |
|---|---|
categories |
|
entities |
|
language |
|
morphology |
|
name-deduplication |
|
name-similarity |
|
name-translation |
|
relationships |
|
sentences |
|
sentiment |
|
syntax/dependencies |
|
semantics |
|
tokens |
|
topics |
|
transliteration |
|
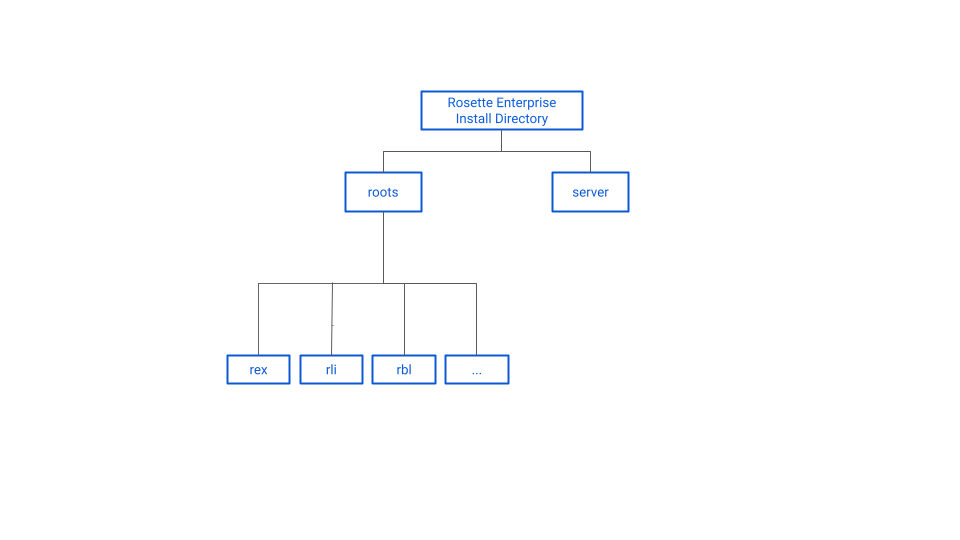
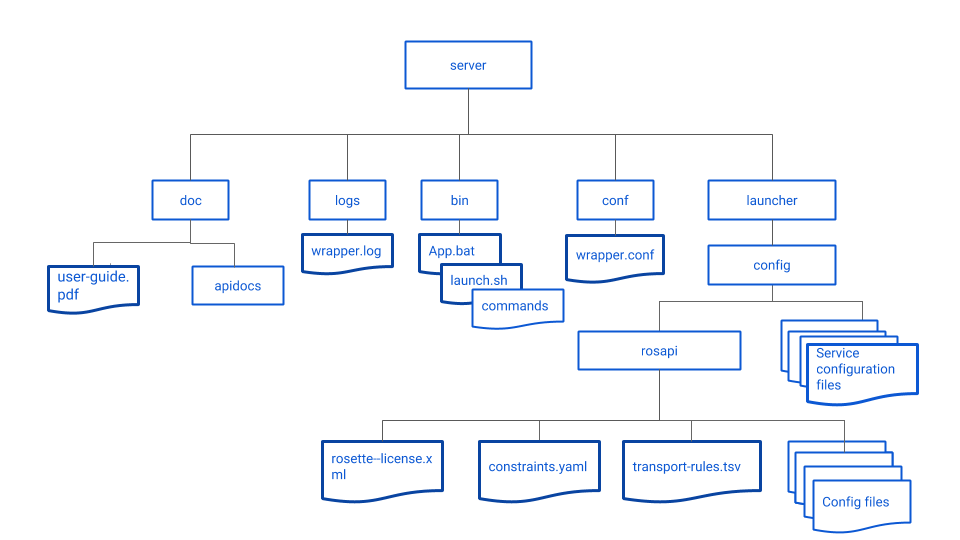
Server file structure
The diagrams below shows the file structure of Analytics Server.
Installing with Docker
Tip
Analytics can be configured and run with the roots hosted on an NFS server. An example Helm deployment can be found at https://github.com/rosette-api/helm.
Docker requirements
You must have a recent version of Docker Engine installed
Docker disk image size must be increased to 120GB (from the default of 60GB) to install the full Server package.
If installing on Windows, Docker for Windows must be installed (not Docker Toolbox or Docker Machine) with Hyper-V enabled.
Memory requirements
The Docker memory must be set to at least 16 GB if all endpoints are licensed and activated, and may require more depending on your application.
At a minimum, the Docker maximum memory should be the same or more than the Server JVM heap size. Otherwise, when running in a Docker container Analytics Server may get SIGKILL when the JVM asks for more memory the Docker allocates.
Installing offline
Once the files are downloaded and installed, Docker can be run without being connected to the internet. To install offline:
Download the component file tarballs, along with the Docker files and license, from the email containing the Server files.
Run
import_docker_images.shto create the Docker volumes.Run the Docker container (
docker compose) as described below.
Install and run Docker container
To download the volumes directly, you must have an internet connection.
Tip
In certain circumstances; like an installation involving all endpoints and languages, docker compose may timeout. To avoid repeatedly executing the command until it succeeds, you can increase the default timeout (60 seconds).
In the directory containing the file docker-compose.yml run:
echo "COMPOSE_HTTP_TIMEOUT=300" >> .env
Download the Docker file
docker-compose.ymland license filerosette-license.xml. Note the location of the license file (path-to-license).To run the Docker container (and download the volumes if they haven't already been downloaded):
ROSAPI_LICENSE_PATH=<path-to-license>/rosette-license.xml docker compose upYou can also provide a stack name:
ROSAPI_LICENSE_PATH=<path-to-license>/rosette-license.xml docker compose -p <stack-name> upThe Analytics RESTful server will be accessible on the Docker host on the port defined in the
docker-compose.ymlfile.
Note
If your installation includes the entity extraction component (rex-root), you may see failed to open ... warning messages for data files in languages not installed in your system. These can safely be ignored.
Tip
Now you can Try it out.
Modifying Analytics Server parameters in Docker
Important
To modify Server parameters, edit the docker-compose.yaml file.
The following configuration options can be changed by editing the environment section of the file.
Number of worker threads
Whether Rosette is set to Pre-Warm
Documentation host port (necessary if you change the host port)
Uncomment the line for the variable and change the value.
Note
To run the entity extraction and linking, sentiment analysis, and topic extraction endpoints, the recommended value for ROSETTE_JVM_MAX_HEAP is 16GB. The default value in the file is 4 GB.
environment:
# - ROSETTE_JVM_MAX_HEAP=4  # max Java heap size in GB, default is 4, must be >=4;
                            # to run all endpoints the recommended minimum is 16
# - ROSETTE_WORKER_THREADS=2  # number of worker threads, default is 2, must be >=1
# - ROSETTE_PRE_WARM=false  # pre-warm the server on startup, default is false,
                            # valid values are true|false
# - ROSETTE_DOC_HOST_PORT=localhost:8181  # hostname should be accessible on the network,
                                          # port value should match mapped port above
#      - ROSETTE_APIKEY_SECURITY=true     # Whether to enable API key security for the Rosette Server endpoints. Can be true or false. Default is false.
#      - ROSETTE_APIKEY_SECURITY_AUTHENTICATION_ONLY_MODE=true # Whether API key security is used in authentication only mode.
                                                               # Needs API key security to be enabled. Can be true or false. Default is true.
#      - ROSETTE_APIKEY_SECURITY_UNSECURED_ENDPOINTS=doc/**,v1/info,v1/ping # Comma separated list of endpoints that should not require API keys.
                                                                            # Needs API key security to be enabled. Default is doc/**,v1/info,v1/ping
You can specify your own volume, for example, backed by a different volume driver.
volumes:
# if a local volume is not desirable, change this to suit your needs
rosette-roots-vol:
The default docker configuration uses port 8181 for the Analytics endpoints. To change this, modify the ports section.
ports:
- "8181:8181"
Only the first value in the port statement should be changed. The port statement and the ROSETTE_DOC_HOST_PORT value must match.
ports:
- "4444:8181"

environment:
- ROSETTE_DOC_HOST_PORT=localhost:4444
If you're accessing the documentation from a different machine, change local host to the documentation machine network accessible host name.
Adding and modifying Analytics files in Docker
There are times you may need to modify and/or add files to the Analytics Server installation. For example, to add an English gazetteer to entity extraction, you must add the file to the installDirectory/roots/rex/<version>/data/gazetteer/eng/accept directory.
To access the installation directories within the Docker volumes:
By default, the server volume is mounted as read-only (
ro). Before starting the container, edit thedocker-compose.ymlfile to make the Rosette server volume writable. Remove the:rofrom the end of therosette-roots-vol:statement:As shipped:
volumes:
      - rosette-roots-vol:/rosette/server/roots:ro
      - ${ROSAPI_LICENSE_PATH}:/rosette/server/launcher/config/rosapi/rosette-license.xml:ro
Modified:
volumes:
      - rosette-roots-vol:/rosette/server/roots
      - ${ROSAPI_LICENSE_PATH}:/rosette/server/launcher/config/rosapi/rosette-license.xml:ro
Start the Docker container:
ROSAPI_LICENSE_PATH=<path-to-license>/rosette-license.xml docker-compose up
Determine the name of the Docker container:
docker ps
Execute an interactive shell on the container:
docker exec -it containerID shOnce in the shell, you can add and modify files within the container.
Edit the
docker-compose.ymlfile to set the server volume back to read-only (ro):volumes: - rosette-roots-vol:/rosette/server/roots:roStop and restart the Docker container to include the new and edited files.
Installing via Helm chart
A Helm chart for the Kubernetes deployments of Analytics Server is available. This chart bootstraps an Analytics Server deployment, and also populates a persistent volume with the Rosette roots required for the Server's successful operation.
Use this link to download the chart and its templates
Prerequisites
An Analytics License secret available in the namespace where the installation will happen and
licenseSecretNameset invalues.yamlor provided during installation with--set licenseSecretName=<license secret name>.If you don't have a license already available in the namespace, you can create one:
kubectl create secret generic rosette-license-file --from-file=<license-file>
A static persistent volume or a storage class capable of dynamically provisioning persistent volumes for the Analytics roots and the corresponding key set in
values.yamlor provided during installation with--set storageClassName=<storage class>or--set rootsVolumeName=<volume>.The persistent volume should have ownership of 2001:0 and a permission mode of 775 or 770. This can be done for you with an Init Container. See Persistent Volume Permissions Parameters for more information.
For more instructions on how to dynamically setup the roots storage, see examples.
Installing in-document coreference
The in-document coreference (indoc coref) server provides additional functionality to the /entities endpoint. The server returns all mentions to an entity. In addition to the named entity, pronominal references, titles, and other mentions are linked and returned.
For shipments that include the /entities endpoint, an additional docker compose file will be bundled in with the shipment. The Docker image will be available on Docker Hub. A saved image will also be included that can be loaded into a local Docker cache.
The install_rosette.sh script will automatically prompt you to install the indoc coref if the image is included in the shipment. Docker is required to install the indoc coref server. When running the installation script, the following steps are performed:
Check that Docker is installed.
Verify the Docker privileges.
Check that there is enough disk space to install the image.
Import the image
Update the
rex-factory-config.yamlfile for indoc coref setting two parameters:It will add the url to the
indocCorefServerUrlparameter.It will set
useIndocServer. You will be prompted for the correct value. When set totrue, the indoc coref server is enabled for all calls. When set tofalse, you must add"options":{"useIndocServer":"true"}to your /entities request body. The default isfalse.
You can also install the indoc coref server using Docker:
docker compose --file docker-compose.coref.yaml up
If you are using a Docker installation, and you want to install both servers on the same machine, you can launch Analytics Server and the coref server together:
ROSAPI_LICENSE_PATH=<PATH TO>/rosette-license.xml docker compose \
--file docker-compose.coref.yaml \
--file docker-compose.yaml \
up
To modify the url, uncomment and edit the ROSETTE_COREF_URL variable in the compose file:
- ROSETTE_COREF_URL=http://172.17.0.1:5000
Installing on a GPU
The response time is much slower when indoc coref is enabled. For production work, we strongly recommended that the indoc coref server is installed on a system with a GPU.
Requirements:
The GPU must be an NVIDIA GPU.
The GPU has to be exposed to Docker.
GPU access has to be turned on for docker compose. The compose file shipped with the product has an initial docker compose template. Use that file as a starting point for your own system.
To install on the GPU machine:
Docker must be installed
Copy tarball onto the GPU machine into the Docker cache or use Docker Hub.
Run docker compose:
docker compose --file docker-compose.coref.yaml up
Installing event extraction
If you are licensed for event extraction, the Events Training Server (ETS) must be installed with Analytics Server. This is the same file that is used for training, but with some different installation parameters.
You must have Docker, dockercompose, and unzip installed.
The product can be installed interactively or with a headless installer.
To install interactively:
Unzip the file
ets-installation-<version>.zip.Start the installation:
./install-ets.sh
To run the headless install, use the
--headlessflag. The.propertiesfile is in the same directories as the installation script.Use the
--dry-runflag to validate the properties file, print the settings, and exit without changing anything.
The Event Training Server installer will prompt you for the following information:
Prompt | Purpose | Options | Notes |
|---|---|---|---|
ETS mode | Determine if installation is for training or extraction (production) mode | 1) Training 2) Extraction 3) Exit Installer | Sets the mode. |
Installation directory | Installation directory for Event Training Server files | Default: If the directory does not exist, you'll be prompted to create it. If the directory exists, you'll be prompted whether it can be overwritten. | This is now the |
Port Event Training Server should listen on | Default: 9999 You will then have to confirm to use that port. | This port and hostname will be required when installing the other servers. | |
Directory for ETS workspaces | This directory will be mounted as a volume. | Default: If the directory does not exist, you'll be prompted to create it. If the directory exists, you'll be prompted whether it can be overwritten. | This directory holds the events models. |
Full qualified name where ActiveMQ is installed | Active_MQ_Host | ||
Active MQ port | Default: 61616 |
Required endpoints
The following endpoints must be installed and licensed in Analytics Server to support event extraction.
Endpoint | Event Extraction |
|---|---|
/entities | ✓ |
/events | ✓ |
/language | ✓ |
/morphology | ✓ |
/semantics | ✓ |
/sentences | ✓ |
/tokens | ✓ |
/info | ✓ |
/ping | ✓ |
Configure Analytics Server for event extraction
Important
The Analytics Server configuration must be updated to support events. The rex-factory-config.yaml installed by the install scripts contains the correct values. You only need to run this update script if you are using a different copy of the yaml file.
Copy the file
./scripts/update-rs-configuration.shfrom the Event Training Server directory to the Analytics Server machine or directory.Run the script from the Analytics Server directory.
./update-rs-configuration.sh
The script will prompt you for the following information:
Prompt | Purpose | Options | Notes |
|---|---|---|---|
Should Analytics Server be updated to communicate with Events Training Server? | Analytics Server only communicates with Event Training Server in production. | Y for the production server N for the training server | |
Fully qualified host name where Events Training Server is installed | The suggested value will be the host name of your current machine | Cannot be empty, | |
Port Events Training Server is listening on | Default: 9999 | ||
Enter Location of Analytics Server configuration | This directory will be mounted as a volume. | Default:
| The configuration file to customize Analytics Server. |
Location of Analytics Server roots | This directory will be mounted as a volume. | Default:
|
Event extraction requires specific Entity Extractor configuration parameters. The install scripts install a version of the rex-factory-config.yaml file containing the correct values for the parameters. The parameters added or modified by the install scripts are in the table below.
Parameter | Value for Events | Default Value | Notes |
|---|---|---|---|
|
|
| Entire document processed as unstructured text. |
|
|
| Entity confidence values are returned. |
|
|
| Entity Extractor will resolve pronounces to person entities. |
|
|
| Entities are disambiguated to a known knowledge base, Wikidata. |
|
|
| Entity Extractor determines case sensitivity. |
|
| ||
| "${rex-root}/data/regex/<lang>/accept/supplemental/date-regexes.xml" "${rex-root}/data/regex/<lang>/accept/supplemental/time-regexes.xml" ${rex-root}/data/regex/<lang>/accept/supplemental/geo-regexes.xml" "${rex-root}/data/regex/<lang>/accept/supplemental/distance-regexes.xml" | Activate the supplemental regexes for date, time, geo, and distance. These are shipped with Entity Extractor but need to be activated for each installed language, along with unspecified (xxx) language. |
Testing the Install
To test out the install, you will need a way to make an HTTP request. Common methods are:
From the command line using curl
From Windows Powershell using
Invoke-WebRequestFrom a browser using the interactive documentation
Ping
Ping the server to test that Server is running and you can connect to it.
bash:
curl http://localhost:8181/rest/v1/ping
Windows Powershell:
Invoke-WebRequest -Uri http://localhost:8181/rest/v1/ping
Windows Command Prompt:
start "" http://localhost:8181/rest/v1/ping
This should return:
{"message":"Rosette at your service","time":1467912784915}
Query the version
bash:
curl http://localhost:8181/rest/v1/info
Windows Powershell:
Invoke-WebRequest -Uri http://localhost:8181/rest/v1/info
This should return:
{
  "name": "Rosette",
  "version": "1.28.0",
  "buildNumber": "a8ea5010",
  "buildTime": "20231218215507",
  "licenseExpiration": "Perpetual"
}
Test an endpoint
Test an endpoint that you have a license for. For example, the following code tests the entities endpoint.
bash:
curl --request POST \
--url http://localhost:8181/rest/v1/entities \
--header 'accept: application/json' \
--header 'content-type: application/json' \
--data '{"content": "Bill Murray will appear in new Ghostbusters film: Dr. Venkman was spotted filming in Boston."}'
Windows Powershell:
Invoke-WebRequest -Uri http://localhost:8181/rest/v1/entities
-Method POST
-Headers @{"accept"="application/json"}
-ContentType "application/json"
-Body '{"content":"Bill Murray will appear in new Ghostbusters film: Dr.  Venkman was spotted filming in Boston."}'
This will return a list of extracted entities in JSON format.
Note
Calling an endpoint that you are not licensed for will result in an error.
Upgrading to a New Release
Each release of Analytics Server is a complete release and should be installed in a new directory. You cannot run multiple versions of Analytics Server on the same machine at the same time.
Warning
macOS and Linux Users
If you have $ROSAPI_ROOTS set from a previous release, you will need to remove it before starting the install script.
Download and install the new release into an empty directory, following the instructions for your operating system.
On Windows:
Update the $ROSAPI_ROOTS and $ROSAPI environment variables to the new locations.
Copy in the new license file.
Ensure that you have stopped the server from the previous release.
Start the new server.
Once you have installed the new release, you can delete the previous version. You may choose to keep the old version in case you encounter issues with the new installation.
Accessing the deployed documentation
Once the Analytics Server is running, you can access the documentation.
Important
The recommended browser for viewing the documentation is Chrome. Edge and IE may not properly display the pages.
Features and Functions
Provides an overview of each endpoint with actual code and response examples.
http://localhost:8181/rest/doc/
Interactive Documentation
Allows you to make calls to Rosette from within the browser.
http://localhost:8181/rest/doc/swagger
Note
If you try to view the documentation from a browser that's not on the server where Server is installed, you will need to replace localhost:8181 with the appropriate hostname and ensure that the port is accessible. See Update documentation hostname on how to update the documentation hostname.
Configuration files
There are two groupings of configuration files.
The system configuration files are found in
config. These are the files for overall service configuration. These are files whose names end in.cfg. These files are in Java property file syntax, and define name-value pairs.The more complex Endpoint and transport rules configuration files are found in
launcher/config/rosapi. These are the files you need to edit to change the input parameters, transport rules, and configuration requirements of the individual endpoints.
System configuration files
These are the configuration files for overall service operation. The perceptive reader may notice that there are endpoint specific configuration files here as well, e.g. dedupe, rni, rnt.
Location: server/launcher/config
Configuration File | Purpose |
|---|---|
| Defines the pathnames for the download extractor config file and the constraints file. |
| Configuration for RLI specifically the short string threshold. |
| Configuration for name deduplication. |
| Configuration for the documentation settings. |
| Configuration for frontend health check. |
| Configuration for the front end RESTful services parameters. |
| Configuration file for usage tracking. |
| Configuration for metrics endpoint. |
| Configuration for name indexing. |
| Configuration for name translation. |
| This configures the workers' web server's asynchronous request processing, its queuing, and failure retry. |
| Configuration for the location of each endpoint root as well as the native code root. It also contains configuration settings for worker threads and CloudWatch metrics. |
| Configuration for CXF. Defines urlBase. Works in conjunction with org.apache.cxf.http.jetty-main.cfg. |
The following files are deprecated as of Release 1.28.0 (December 2023):
Configuration File | Purpose |
|---|---|
| Configuration for worker service startup. |
| Configuration for CXF HTTP Jetty. CXF is Rosette's webservice framework and Jetty is its embedded webserver. Works in conjunction with com.basistech.ws.cxf.cfg. |
| Configuration for Apache CXF. |
Endpoint and transport rules configuration files
The following files contain configuration parameters for Analytics Server, individual endpoints, and transport rules.
Location: /server/launcher/config/rosapi
Configuration File | Purpose |
|---|---|
| Defines input constraints for Analytics Server: maximums for document and text input sizes as well as names deduplication list size. It is referenced by |
| Provides the detailed configuration of the download/text-extractor (DTE) component. It is referenced by |
| Configures the pipelines. The entries contained in this file are highly dependent on the backend code. It may be useful for identifying language support for the various endpoints as well as the associated endpoint configuration file, but should be left in its shipped state unless otherwise instructed. |
| Lists the individual factory configurations, as called for by |
The following file is deprecated as of Release 1.28.0 (December 2023):
Configuration File | Purpose |
|---|---|
| Provides a mapping to the worker REST URL. |
Factory configuration files
The worker-config.yaml file details component factories and the pipelines for each endpoint. A single endpoint may use multiple factories. Use this file to determine which factories you may have to modify to set the configuration values for a task. Some factories, such as rbl-factory-config.yaml are used by multiple endpoints.
File Name | Primary Endpoint | ||||||||||||||||||||||||||||||||||||||||||||||||
|---|---|---|---|---|---|---|---|---|---|---|---|---|---|---|---|---|---|---|---|---|---|---|---|---|---|---|---|---|---|---|---|---|---|---|---|---|---|---|---|---|---|---|---|---|---|---|---|---|---|
| topics | ||||||||||||||||||||||||||||||||||||||||||||||||
| categories | ||||||||||||||||||||||||||||||||||||||||||||||||
| syntax/dependencies | ||||||||||||||||||||||||||||||||||||||||||||||||
| events | ||||||||||||||||||||||||||||||||||||||||||||||||
| morphology sentences | ||||||||||||||||||||||||||||||||||||||||||||||||
| transliteration | ||||||||||||||||||||||||||||||||||||||||||||||||
| relationships | ||||||||||||||||||||||||||||||||||||||||||||||||
| entities | ||||||||||||||||||||||||||||||||||||||||||||||||
| topics entities | ||||||||||||||||||||||||||||||||||||||||||||||||
| language | ||||||||||||||||||||||||||||||||||||||||||||||||
| name-deduplication | ||||||||||||||||||||||||||||||||||||||||||||||||
| name-similarity | ||||||||||||||||||||||||||||||||||||||||||||||||
| name-translation | ||||||||||||||||||||||||||||||||||||||||||||||||
| semantics/vector | ||||||||||||||||||||||||||||||||||||||||||||||||
| sentiment | ||||||||||||||||||||||||||||||||||||||||||||||||
| semantics/similar | ||||||||||||||||||||||||||||||||||||||||||||||||
| tokens | ||||||||||||||||||||||||||||||||||||||||||||||||
| topics | ||||||||||||||||||||||||||||||||||||||||||||||||
[a] To modify the parameters of the name-similarity endpoint, see Name similarity configuration files | |||||||||||||||||||||||||||||||||||||||||||||||||
Disabling licensed endpoints
Typically, all endpoints which you have active licenses for will load and run when called. Use these instructions to disable specific endpoints.
Warning
We recommend that you do not disable the /language endpoint as it is used by many endpoints to identify the language of the request.
In the
server/launcher/configdirectory, create a file namedoverride-endpoints.yamllisting only the endpoints that you want enabled.endpoints: - /language - /entities - /categories - /semantics/vector - /morphology - /sentences - /tokensIn the
server/launcher/configdirectory, edit the filecom.basistech.ws.worker.configand specify theoverrideEndpointsPathnameparameter. This will be the full path name of the file you created in the previous step. For example, if you installed Analytics in the directory/Users/user/rosette-1.20.3, the parameter would be:overrideEndpointsPathname=/Users/user/rosette-1.20.3/server/launcher/config/override-endpoints.yaml
Restart Analytics Server for the changes to take effect.
If you call a disabled endpoint, you will receive an "unknownError". For example, if you are licensed for the /topics endpoint, but disable it, a call to the endpoint will return the following JSON:
{
  "code": "unknownError",
  "message": "Worker unsupported target Endpoint{path=/topics}/eng",
  "stack": null
}
The /ping and /info endpoints are always enabled. They do not have to be listed in the override-endpoints.yaml file.
Name similarity configuration files
There are two .yaml files located in the installDirectory/roots/rni-rnt/<version>/rlpnc/data/etc directory to guide you in configuring the name-similarity endpoint, parameter_defs.yaml and parameter_profiles.yaml. The parameter_defs.yaml file lists the default value for all parameters, along with a short description. This file should not be modified.
To configure the name-similarity results, change the values of the parameters in the parameter_profiles.yaml file. Parameter values can be for all language pairs, or for a specific language pair. If the change is for all languages, use the any: profile. If a parameter change is for a specific language pair, use the appropriate language code pair. The two language codes are always written in alphabetical order, except for eng, which always comes last.
Edit the
installDirectory/roots/rni-rnt/<version>/rlpnc/data/etc/parameter_profiles.yamlfile.Search for
any:Add parameterName: parameter value
Save
Edit the
installDirectory/roots/rni-rnt/<version>/rlpnc/data/etc/parameter_profiles.yamlfile.Search for the language combination
spa_eng:Add parameterName: parameter value
Save
Health check endpoints
Analytics Server contains a configurable health check endpoint to report the health information of servers connected to Analytics. These servers include:
events-training-server (ETS): server for training event models,
indoc-coref-server (indoc coref): server providing indocument coreference,
rex-training-server (RTS): server for training entity models.
The health status supports the following states for each service:
UP if the service is up and available.
DOWN if the service is not available temporarily.
UNAVAILABLE to indicate the service is not configured.
The configuration is in the file config/com.basistech.ws.fe.health.cfg. It is disabled by default.
# Should the health/services endpoint list external services' health
# Default is false
#showExternalServicesHealth=true
Timeout for the health requests towards the external services can be set with the asyncResponseTimeoutMs field in the config/com.basistech.ws.fe.health.cfg file.
ETS and RTS are up and reporting as healthy. Indoc is configured but is self-reporting as down or is unreachable/not started. Analytics Server is installed at localhost:31818.
$ curl -s http://localhost:31818/rest/v1/health/services | jq '.'
{
  "events-training-server": "UP",
  "indoc-coref-server": "DOWN",
  "rex-training-server": "UP"
}
Logging
Log files
Analytics uses Log4j to configure and control logging. The file /conf/log4j2.xml configures logging of the Analytics Server instance. This file can be customized to provide the level of logging preferred by your organization.
By default, Analytics generates the following log files in the /logs/ directory:
500-exception.logrosapi.logwrapper.log
Expanded diagnostic logging
The current default logging is deliberately quiet on successful calls and client-side (4xx) errors. It includes some startup and configuration messaging, along with errors from server-side (5xx) problems. You may require additional logging for diagnostics, monitoring, and analysis.
Analytics Server includes the ability to turn on CXF logging to provide additional message visibility for debugging. By default, this feature is disabled. To enable CXF logging, modify the following files.
Edit the file
conf/log4j2.xmland uncomment theorg.apache.cxf.serviceslogger:Logger name="org.apache.cxf.services" level="info"> <AppenderRef ref="CXF-Request-Appender"/> <AppenderRef ref="Console-Appender"/> </Logger>
Edit the file
conf/wrapper.confand uncomment the following 2 lines:#wrapper.java.classpath.3=./cxf-rt-features-logging*.jar #wrapper.java.additional.654=-Dorg.apache.cxf.logging.enabled=pretty
Overview of Log4j
At a very high level Log4J has the concept of a Logger which references one or more Appenders. Appenders are the objects that write to logs. Types of Appenders include:
RollingFile: Appenders which write to files and perform log file rotations.Console: Appenders which write to output such asSTDOUTandSTDERR.
Each Appender is configured slightly differently either programmatically or using an XML configuration file. An Appender will include a Layout which indicates what is written to the log. Here you can find the specification for the plain text Pattern, known as PatternLayout.
Another important concept in logging is the log level, which is an indication of the severity of the message being logged. Severity ranges from low priority INFO to WARN to ERROR. When a logger has its log level set to WARN then only log messages of severity WARN or ERROR are logged when using that logger. When set to INFO then messages of INFO or higher are logged. Loggers can be enabled for all messages in the system. These loggers are known as Root loggers. They can also be associated with specific classes by using the class's name. For example, a Logger named com.basistech.ws.logrequesttracker would only be used when a class with a name starting with com.basistech.ws.logrequesttracker outputs a log message.
There are many types of Appenders. You need to identify the Appender defined for you need. For example, HTTP Appenders send logs of HTTP, Syslog Appenders write to the system log, etc. A list of built-in Appenders can be found here.
Loggers can also have different types of layouts in addition to text. Common layouts include CSV, JSON, and XML. The list of built-in Layouts can be found here.
Using Log4j in Analytics Server
Logging in Analytics Server is configured through an XML configuration file named log4j2.xml, found in the server/conf directory. The configuration file defines four loggers, one of which, com.basistech.ws.logrequesttracker, is commented out (disabled) by default.
Defined Loggers in Log4j
The loggers are specified at the bottom of the XML file in the Loggers element. The structure of the Logger is to usually set the log level of the logger and then reference the definition of the Appender that the logger should by using the AppenderRef element.
The configuration file defines the following loggers:
There are two Root Loggers in the Analytics Server configuration; one writes to a log file and one writes to STDOUT. The default root log level is
ERROR, so only errors are sent.File-Appender: a ROOT logger which writes to a log file.Console-Appender: a ROOT logger which writes to STDOUT.
org.eclipse.jetty.server.handler: this logger is used to log errors from the Jetty server. This logger does not contain anAppenderRef; it inherits the Appender from the ROOT logger.com.basistech.ws: a logger with a log level of INFO. This is used to log messages from the com.basistech.ws classes. Log messages from these classes indicate NLP processing errors.com.basistech.ws.logrequesttracker:this logger is disabled by default.
The Loggers element:
  <Loggers>
       <Root level="warn">
           <AppenderRef ref="File-Appender" level="warn"/>
           <AppenderRef ref="Console-Appender" level="warn"/>
       </Root>
       <Logger name="org.eclipse.jetty.server.handler" level="error"/>
<!--
       <Logger name="com.basistech.ws.logrequesttracker" level="info" additivity="false">
           <AppenderRef ref="Request-Appender"/>
       </Logger>
-->
       <Logger name="WEBSITE.WS - Your Internet Address For Life™ " level="info">
           <AppenderRef ref="500-Exception-Appender" level="info"/>
       </Logger>
   </Loggers>
Defined Appenders in Log4J2.xml
The log4j2.xml file contains 4 Appender definitions:
Request-Appender: is referenced by thecom.basistech.ws.logrequesttracker, which is disabled.Console-Appender: logs all messages to SYSTEM_OUT. This is referenced by the ROOT logger.File-Appender: logs all messages to the file /rosapi.log. This is also referenced by the ROOT logger.500-Exception-Appender: Another file appender, which writes all messages to the500-exception-logfile.
The appenders used the following output format by default. Note that whitespace is significant.
[%-5level] %d{yyyy-MM-dd HH:mm:ss.SSS} [%t] %c - %msg%nThis results in messages such as:
[INFO ] 2024-05-30 18:56:07.729 [rosapi-worker-0]
com.basistech.rosette.tvec.EmbeddingMetadata - Vector metadata:
The following table describes the format specifiers and their meanings.
Format | Meaning | Example |
|---|---|---|
[ | the [ character | |
%-5level | a 5 character field with the log level |
|
] | the ] character | |
%d{yyyy-MM-dd HH:mm:ss.SSS} | a date in the given format | 2024-05-30 18:56:07.729 |
[%t] |
| [rosapi-worker-0] |
%c | the class name logging the message | com.basistech.rosette.tvec.EmbeddingMetadata |
- | the - character | |
%msg%n | the log message followed by a new line | Vector metadata: |
Appender definition
<Appenders>
       <Console name="Console-Appender" target="SYSTEM_OUT">
           <PatternLayout>
               <pattern>
                   [%-5level] %d{yyyy-MM-dd HH:mm:ss.SSS} [%t] %c - %msg%n
               </pattern>>
           </PatternLayout>
       </Console>
       <RollingFile name="File-Appender"
                    fileName="${log-path}/rosapi.log"
                    filePattern="${archive}/rosapi.log.%d{yyyy-MM-dd-hh-mm}.gz">
           <PatternLayout pattern="[%-5level] %d{yyyy-MM-dd HH:mm:ss.SSS} [%t] %c - %msg%n"/>
           <Policies>
               <SizeBasedTriggeringPolicy size="30 MB"/>
           </Policies>
           <DefaultRolloverStrategy max="30"/>
       </RollingFile>
<!--
       <RollingFile name="Request-Appender"
                    fileName="${log-path}/request-tracker.log"
                    filePattern="${archive}/request-tracker.log.%d{yyyy-MM-dd-hh-mm}.gz">
           <PatternLayout pattern="[%-5level] %d{yyyy-MM-dd HH:mm:ss.SSS} [%t] %c - %msg%n"/>
           <Policies>
               <SizeBasedTriggeringPolicy size="30 MB"/>
           </Policies>
           <DefaultRolloverStrategy max="30"/>
       </RollingFile>
-->
       <RollingFile name="500-Exception-Appender"
                    fileName="${log-path}/500-exception.log"
                    filePattern="${archive}/500-exception.log.%d{yyyy-MM-dd-hh-mm}.gz">
           <PatternLayout pattern="[%-5level] %d{yyyy-MM-dd HH:mm:ss.SSS} [%t] %c - %msg%n"/>
           <RegexFilter regex=".*Exception processing ticket.*" onMatch="ACCEPT" onMismatch="DENY"/>
           <Policies>
               <SizeBasedTriggeringPolicy size="30 MB"/>
           </Policies>
           <DefaultRolloverStrategy max="30"/>
       </RollingFile>
   </Appenders>
Disabling Writing to Files
To disable writing to files and to instead log all messages to STDOUT or STDERRR:
Edit the
log4j2.xmlfileThe ROOT logger should only reference the
Console-AppenderChange the
com.basistech.wsLoogger to reference theConsole-Appender.Note the change to the level. If more logging is desired, then the ROOT logger can be set to INFO by changing
level="warn"tolevel="info"on the ROOT logger and the Console-Appender reference.If the log messages should be sent to STDERR rather than STDOUT then change the Console-Appender to use SYSTEM_ERR rather than SYSTEM_OUT.
For example, to only write to STDOUT:
  <Loggers>
       <Root level="warn">
<!--
           <AppenderRef ref="File-Appender" level="warn"/>
-->
           <AppenderRef ref="Console-Appender" level="warn"/>
       </Root>
       <Logger name="org.eclipse.jetty.server.handler" level="error"/>
<!--
      <Logger name="com.basistech.ws.logrequesttracker" level="info" additivity="false">
           <AppenderRef ref="Request-Appender"/>
       </Logger>
-->
       <Logger name="WEBSITE.WS - Your Internet Address For Life™ " level="info">
<!--            <AppenderRef ref="500-Exception-Appender" level="info"/> -->
           <AppenderRef ref="Console-Appender" level="info"/>
       </Logger>
   </Loggers>
Configuring server performance
Configuring the JVM heap size
There is not a single one size fits all number here. The best value for max heap size depends on a number of factors:
activated endpoints and features
usage pattern
data characteristics such as size (both character and token lengths), language, and genre
java garbage collector and its settings
Our recommendation is to follow directions from well-known sources, such as this to experiment with heap settings by testing your usage of Analytics Server in order to identify the ideal settings that suits you the best.
Please note that it’s not recommended setting the max heap to the amount of physical RAM in the system. More heap doesn’t always translate to better performance, especially depending on your garbage collection settings. Also, we do require sufficient amount of free memory for memory mapped files.
Use this table to estimate the minimum heap required based on your selection of endpoints. Note that endpoints may have implicit code dependencies on other endpoints, so the dependencies' heap needs to be added if they have not been accounted for.
Tip
We recommend setting the initial and max heap to the same value.
Endpoint | Min Heap | Note |
|---|---|---|
language | 0.25GB | |
morphology | 1.5GB | |
transliteration | 0.5GB | |
entities | 1GB | add 1.5GB if morphology is not already enabled |
sentiment | 1GB | add 1.5GB if morphology is not already enabled; add 1GB if entities is not already enabled |
categories | 1GB | add 1.5GB if morphology is not already enabled |
topics | 1.5GB | add 1.5GB if morphology is not already enabled; add 1GB if entities is not already enabled |
text-embeddings | 1GB | add 1.5GB if morphology is not already enabled |
relationships | 3GB | add 1.5GB if morphology is not already enabled; add 1GB if entities is not already enabled |
dependencies | 0.4GB | |
name-similarity | 2GB | combined with name-translation |
name-translation | 2GB | combined with name-similarity |
name-deduplication | 2GB | add 2GB if neither name-similarity or name-translation is on |
On macOS/Linux or Windows:
Edit the file
server/conf/wrapper.confModify the value of
wrapper.java.maxmemory
With Docker:
Edit the file
docker-compose.ymlModify the value of
ROSETTE_JVM_MAX_HEAP
Configuring worker threads for HTTP transport
Multiple worker threads allow you to implement parallel request processing. Generally, we recommend that the number of threads should be less than the number of physical cores or less than the total number of hyperthreads, if enabled.
You can experiment with 2-4 worker threads per core. More worker threads may improve throughput a bit, but typically won't improve latency. The default value of worker threads is 2.
If the URL for all licensed endpoints are set to local: (not distributed):
Edit the file
/launcher/config/com.basistech.ws.worker.cfg.Modify the value of
workerThreadCount
If using transport rules in a distributed deployment on macOS/Linux or Windows:
Edit the file
/launcher/config/com.basistech.ws.worker.cfg.Modify the value of
workerThreadCount.
If using Docker, only the docker-compose.yml file must be modified:
Edit the file
docker-compose.ymlModify the value of
ROSETTE_WORKER_THREADS
Setting Analytics Server to pre-warm
To speed up first call response time, Analytics Server can be pre-warmed by loading data files at startup at the cost of a larger memory footprint.
Most components load their data lazily, meaning that the data required for processing will only be loaded into memory when an actual call hits. This is particularly true for language-specific data. The consequence is that when the very first call with text in a given language arrives at a worker, the worker can take a quite a bit of time loading data before it can process the request.
Pre-warming is Analytics Server's attempt to address the 1st-call penalty by hitting the worker with text in every licensed language it supports at boot time. Then, when an actual customer request comes in, all data will have already been memory mapped and you won't experience a first call delay as the data is loaded. Only languages licensed for your installation will be pre-warmed.
The default is set to false, pre-warm is not enabled.
To set Analytics Server to warm up the worker upon activation
On macOS/Linux or Windows:
Edit the file
/com.basistech.ws.worker.cfgset
warmUpWorker=true
Tip
When installing on macOS or Linux, Analytics can be set to pre-warm in the installation. Select Y when asked Pre-warm Rosette at startup? You can always change the option by editing the com.basistech.ws.worker.cfg file.
With Docker:
Edit the file
docker-compose.ymlSet
ROSETTE_PRE_WARM=true
Setting the language parameter
If the language of the input text is known, you can add the language parameter to bypass the language identification step in the processing pipeline, speeding up the processing time and increasing throughput.
Each document endpoint accepts an optional language parameter:
{"content": "your_text_here", "language":"eng"}Optimizing the /entities endpoint
If the data consists of many relatively small individual files, concatenating them will improve the throughput. But you must be aware that this can impact the accuracy of the model. The statistical model includes a consistency feature which reflects a tendency of the model to label recurring tokens with the same type. This may cause entities to be labelled incorrectly when concatenating text samples that don't share the same context.
Regular Expressions
Regular expressions (regexes) are used for finding entities which follow a strict pattern with a rigid form and infinite combinations, such as URLs and credit card numbers. In the default Entity Extractor installation the regex files are:
language specific:
data/regex/<lang>/accept/regexes.xmlwhere <lang> is the ISO 693-3 language codecross-language:
data/regex/xxx/accept/regexes.xmlsupplemental:
data/regex/<lang>/accept/supplemental
Regular expressions can decrease throughput performance. The /entities endpoint is pre-configured with a set of regular expressions. You can improve performance by removing unused expressions by:
moving the files with the unused expressions out of the directory, or
commenting out specific expressions within the file.
The supplemental regular expressions are configured in the rex-factory-config.yaml file. Remove or comment out values from the supplementalRegularExpressionPaths parameter to remove unused supplemental regex files.
Disable Entity linking. By default, entity linking is disabled, but enabling it can slow down the response time of Analytics Server.
Disable Pronominal resolution By default, pronominal resolution is disabled, but enabling it can slow down the response time of Analytics Server.
Disable In-document Coreference Documents often contain multiple references to a single entity. In-document coreference (indoc coref) chains together all mentions to the same entity. By default, indoc coref is disabled (NULL).
Advanced configuration options
The following sections describe custom installation configurations and will not apply to all installs.
Modify the input constraints
The limits for the input parameters are in the file /rosapi/constraints.yaml. Modify the values in this file to increase the limits on the maximum input character count and maximum input payload per call. You can also increase the number of names per list for each call to the name deduplication endpoint.
The default values were determined as optimal during early rounds of performance tests targeting < 2 second response times. Larger values may cause degradation of system performance.
Parameter | Minimum | Maximum | Default Value | Description |
|---|---|---|---|---|
maxInputRawByteSize | 1 | 10,000,000 | 614400 | The maximum number of input bytes per raw doc |
maxInputRawTextSize | 1 | 1,000,000 | 50000 | The maximum number of input characters per submission |
maxNameDedupeListSize | 1 | 100,000 | 1000 | The maximum number of names to be deduplicated. |
To modify the input constraints:
Edit the file
/rosapi/constraints.yamlModify the value for one or more parameters
Enable passing files to endpoints
Most endpoints can take either a text block, a file, or a link to a webpage as the input text. The webpage link is in the form of a URI. To enable passing a URI to an endpoint, the enableDTE flag must be set in the file com.basistech.ws.worker.cfg.
By default, the flag is set to True; URI passing is enabled.
#download and text
extractorenableDte=true
Change Analytics RESTful server port
Note
Use this is to change the default port on Windows installations or to change the server port after installation on Linux and macOS. The Linux and macOS install script install_rosette.sh appends this line to conf/wrapper.conf during install if you override the default.
The default installation uses port 8181 for the Analytics endpoints. To change the default port, edit the file conf/wrapper.conf; uncomment and modify the port value.
wrapper.java.additional.301=-Drosapi.port=8181
For example, change 8181 to 9191.
When changing the port, update the documentation hostname as well:
cd doc/swaggerEdit the file
swagger.yamlIn the
serverssection, replacelocalhost:8181with the correct port.servers: - url: 'http://localhost:8181/rest/v1/'
Update documentation hostname
Note
Use this is to change the default port on Windows installations or to change the server port after installation on Linux and macOS. The Linux and macOS install script install_rosette.sh appends this line to conf/wrapper.conf during install if you override the default.
If you want to change the default port to execute the interactive documentation:
cd doc/swaggerEdit the file
swagger.yamlIn the
serverssection, replacelocalhost:8181with the correct port.servers: - url: 'http://localhost:8181/rest/v1/'
Understanding the transport rules
The transport rules provide a means of mapping an endpoint along with some defined options (language, linked-entities, length) to a processing URL. Transport rules allow you to define a distributed deployment routing a subset of calls to different machines, balancing the load by routing high demand calls to separate machines.
Location: <version>/server/launcher/config/rosapi/transport-rules.tsv
The basic format of an entry is:
endpoint [tab] options [tab] URL
where:
endpointis any valid endpoint and may have one or more entries. Multiple rules for the same endpoint are processed in the order listed; if there is a conflict between rules, the first one processed prevails. The most specific rules should be listed first. The last rule should be general enough to match any remaining conditions. Conditions left without a valid routing will fail.optionszero or more of:lang=a|b|cprovides a list of languages for this particular rule. Zero or more entries are permitted.the wildcard
*may be used to specify any languageslength > nandlength < nwhere length is the number of UTF-16 characters in the input string. To define a range, you need to create 2 rules, a<rule and a>rule.
URLvalid URL for transport. There is a special URL,local:. This is used to route/languagerequests to be processed inside the front end, not sent over the network at all. The recommendation is to uselocal:if the worker resides on the same machine and same JVM with the frontend.
An example of multiple endpoint entries:
/entities lang=eng|spa, http://localhost:${rosapi.port}/rest/worker/process
/entities linkEntities=false  http://localhost:${rosapi.port}/rest/worker/process
/entities lang=ara|eng|jpn|spa|zho  http://localhost:${rosapi.port}/rest/worker/process
/entities * http://localhost:${rosapi.port}/rest/worker/process
/language       *       local:
Install TensorFlow GPU support
Note
TensorFlow GPU is currently only available on the Linux and Windows operating systems.
To improve performance, especially when invoking deep neural network based models, you may choose to run on a GPU.
Download TensorFlow
To make use of GPUs on your Linux system, you should download libtensorflow_jni_gpu-1.14.0.jar Platform-dependent native code with GPU (CUDA) support for the TensorFlow Java library from http://repo1.maven.org/maven2/org/tensorflow/libtensorflow_jni_gpu/1.14.0/libtensorflow_jni_gpu-1.14.0.jar.
You can also compile your own version of libtensorflow_jni, which may provide better performance than the pre-compiled version.
cd $ROSAPI
mkdir tf_jni_gpu
jar xf libtensorflow_jni_gpu-1.14.0.jar -C tf_jni_gpu
Edit conf/wrapper.conf to modify java.library.path to the following:
wrapper.java.library.path.1=../tf_jni_gpu/org/tensorflow/native/linux-x86_64
wrapper.java.library.path.2=../lib
Verify TensorFlow GPU Support
To verify TensorFlow GPU support, run Analytics Server
cd $ROSAPI/bin
./launch.sh console
And in an entity request with DNN modelType options:
curl --request POST \
--url http://localhost:8181/rest/v1/entities \
--header 'accept: application/json' \
--header 'content-type: application/json' \
--data '{"content": "Barack Obama was born in Hawaii", \
  "options": { "modelType": "DNN" }}'
Verify that you see Tensorflow found and create a GPU in your console output
jvm 1    | 2018-04-18 18:38:15.346273: I tensorflow/core/common_runtime/gpu/gpu_device.cc:1344] Found device 0 with properties:
jvm 1    | name: Tesla K80 major: 3 minor: 7 memoryClockRate(GHz): 0.8235
jvm 1    | pciBusID: 0000:00:1e.0
jvm 1    | totalMemory: 11.17GiB freeMemory: 11.10GiB
jvm 1    | 2018-04-18 18:38:15.346291: I tensorflow/core/common_runtime/gpu/gpu_device.cc:1423] Adding visible gpu devices: 0
jvm 1    | 2018-04-18 18:38:15.617319: I tensorflow/core/common_runtime/gpu/gpu_device.cc:911] Device interconnect StreamExecutor with strength\
 1 edge matrix:
jvm 1    | 2018-04-18 18:38:15.617346: I tensorflow/core/common_runtime/gpu/gpu_device.cc:917]      0
jvm 1    | 2018-04-18 18:38:15.617351: I tensorflow/core/common_runtime/gpu/gpu_device.cc:930] 0:   N
jvm 1    | 2018-04-18 18:38:15.617609: I tensorflow/core/common_runtime/gpu/gpu_device.cc:1041] Created TensorFlow device (/job:localhost/repli\
ca:0/task:0/device:GPU:0 with 10764 MB memory) -> physical GPU (device: 0, name: Tesla K80, pci bus id: 0000:00:1e.0, compute capability: 3.7)
jvm 1    | 2018-04-18 18:38:15.941174: I tensorflow/cc/saved_model/loader.cc:161] Restoring SavedModel bundle.
jvm 1    | 2018-04-18 18:38:16.094135: I tensorflow/cc/saved_model/loader.cc:196] Running LegacyInitOp on SavedModel bundle.
jvm 1    | 2018-04-18 18:38:16.131329: I tensorflow/cc/saved_model/loader.cc:291] SavedModel load for tags { serve }; Status: success. Took 986\
397 microseconds.
Known Limitations
Tensorflow does not provide GPU support for Java macOS as of Tensorflow 1.14
Authentication and authorization
By default, no authorization is required when making calls to an on-premise installation of Analytics Server. If required, you can add additional checks on API calls. There are three supported modes of authorization and authentication in Analytics Server.
No authorization. All licensed endpoints are available to all users. No API keys are needed. This is the default.
Authentication only. If a valid API key is provided in your call, the user is authorized to use any endpoint supported in the installation.
Authentication and authorization. The key must be valid and the key must be authorized to access the endpoint being called.
When authentication or authorization is required, a key must be passed in each API call. The key is passed using the header, X-BabelStreetAPI-Key. This header is pre-defined in our programming language bindings, as it is the same header used for accessing Babel Street Hosted Services.
To support authentication and authorization, a database is created to store users and keys. The database is managed through the key management console.
Enabling
Enable the feature
Edit the file
conf/wrapper.confand uncomment the following line:#wrapper.java.additional.402=-Drosapi.feature.ENABLE_API_KEYS=true
The number may be different than
402.Restart the application.
Select the authentication and authorization setting
Edit the file launcher/config/com.basistech.ws.apikeys.cfg. By default, only authentication is enabled. To enable both authentication and authorization, uncomment the following line and set the value to false.
#authenticationOnly=true
If installing using Docker, there are 3 additional environment variables:
# Whether to enable API key security for the Rosette Server endpoints.
# Can be true or false. Default is false.
#     - ROSETTE_APIKEY_SECURITY=true

# Whether API key security is used in authentication only mode.
# Needs API key security to be enabled. Can be true or false. Default is true.
#     - ROSETTE_APIKEY_SECURITY_AUTHENTICATION_ONLY_MODE=true

# Comma separated list of endpoints that should not require API keys.
#Needs API key security to be enabled. Default is doc/**,v1/info,v1/ping
#     - ROSETTE_APIKEY_SECURITY_UNSECURED_ENDPOINTS=doc/**,v1/info,v1/ping
The rosette-server and rosette-apikeys services should have the same volume mounted to
/rosette/server/db. This is done by default.If you need to change the database connection parameters,
com.basistech.ws.apikeys.cfgneeds to be mounted to/rosette/server/launcher/config/com.basistech.ws.apikeys.cfgfor both services.Multiple docker installations on the host can use the same database. All rosette-server and rosette-apikeys services that share the database must be on the same docker network
Using the key
The key is passed using the header, X-BabelStreetAPI-Key. This header is pre-defined in our programming language bindings, as it is the same header used for accessing Babel Street Hosted Services.
Error response codes
401: the key is expired, it has been disabled, it doesn't exist in the database, or, no key was included in the request.
403: the key is valid (enabled, unexpired, exists) but does not have authorization for the endpoint being called.
Advanced database configuration
Other configuration parameters are set in the file. These options are exposed to allow you to customize the configuration for your implementation. To change any of the parameters, uncomment the parameter and change the value. You must then restart the server.
launcher/config/com.basistech.ws.apikeys.cfg
Database connection mode
A database is required to store the authentication and authorization users, keys, and other data. The database can be on your local file system or a separate H2 database server.
Parameter | Description | Default |
|---|---|---|
dbConnectionMode | The type of database. There are two options: | file |
dbName | Name of the database | apikeys |
dbURI | In file mode, the path to the directory where the database is stored. Relative paths are based from the bin directory. In server model, this must be provided and should be | ../db |
dbSSLMode | When in server mode, use SSL to connect to the database. The database server must be running with SSL enabled | false |
dbUser | Username for the database. For a new database, this will be used to create the database | rosette-server |
dbPassword | Password for the database. For a new database this will be used to create the database. | "" |
authenticationOnly | When set to true, every valid API key can access all endpoints. | true |
Unsecured endpoints
This is a list of endpoints that are accessible to unauthenticated users. The default list includes the browsable documentation as well as /info and /ping.
Key expiration
On creation, keys will never expire unless an expiration is explicitly defined.
You can explicitly define the number of days a key should be valid from it's creation, by providing a positive integer to the --expiryDays parameter of the create key command.
Providing 0 will make the command use the default value set in the file. If no default value is defined in the file, then it will be set to 90 days.
Updates to this default are only registered during the console startup. If you change the value make sure to restart the API Key Management Console.
Key management console
rosette-apikeys is a shell tool to manage the keys. To launch the tool:
Linux/macOS
./bin/rosette-apikeys
Windows
.\bin\rosette-apikeys.bat
Once in the shell, use help to see the available commands:
help
To see the usage for a command:
help <command>
or
<command> --help
To run commands in non-interactive mode, add them after the script. Example:
./bin/rosette-apikeys list keys
SSL/TLS
The key management console can communicate with an SSL secured database server. It uses the same launcher/config/com.basistech.ws.apikeys.cfg file as Server to connect to the database server. A custom truststore can be provided for the key management console by setting the RS_TRUSTSTORE and RS_TRUSTSTORE_PASSWORD environment variables.
For example, if you have your truststore located in launcher/config, set your environment variables:
export RS_TRUSTSTORE=/rosette/server/launcher/config/my_custom_truststore.jks
export RS_TRUSTSTORE_PASSWORD=mycustomtruststorepassword
Calling Analytics Server
The API keys are sent in headers and are vulnerable in transfer if unencrypted. To secure them, enable SSL/TLS for Analytics Server.
If the database is in server mode:
Enable SSL on the database
Update
dbSSLModein thelauncher/config/com.basistech.ws.apikeys.cfgfileConfirm that the Analytics Server truststore trusts the key of the database keystore
Examples
A user named Alice needs access to /language and /tokens. The key should not expire.
Create the key.
create key --name alice --authorities LANGUAGE TOKENS --orFiltersAuthority
returns the key value
bsrs_fe48f4f2_2e2a_4f0c_bdb6_fd2904f1561f
To list the key.
list keys
Bob and Carlos are on the same team, TeamOne, and need access to /entities, /morphology and /sentiment. The team will always need access to the same collection of endpoints. They also have a policy that keys should be rotated every two weeks. To enforce the policy, the keys are created with a two-week expiration.
Create the group.
create group --name TeamOne --authorities ENTITIES
Add /morphology.
add auth toGroup --groupNames TeamOne --authNames MORPHOLOGY
Add /sentiment.
add auth toGroup --groupNames TeamOne --authNames SENTIMENT
Find the group.
find group --names TeamOne
returns
┏━━━━━━━━┯━━━━━━━━━━━━━━━━━━━━━━━━━━━━━━━┓
┃Name    │Authorities                    ┃
┣━━━━━━━━┿━━━━━━━━━━━━━━━━━━━━━━━━━━━━━━━┫
┃TeamOne │ENTITIES, MORPHOLOGY, SENTIMENT┃
┗━━━━━━━━┷━━━━━━━━━━━━━━━━━━━━━━━━━━━━━━━┛
Create the key with an expiration of 14 days.
create key --name bob --groups TeamOne --expiryDays 14
create key --name carlos --groups TeamOne --expiryDays 14
Let's see all the keys now in the system.
list keys
returns the keys for alice, bob, and carlos
Alice is going on a medical leave, let's disable her key.
Disable Alice's key.
disable key --filters name=alice
Answer
y. when prompted to disable the key.Disabled 1 API key(s)
Once Alice returns, re-enable her key.
Enable Alice's key.
enable key --filters name=alice
Answer
ywhen prompted to enable the key.Enabled 1 API key(s)
When the keys of Bob and Carlos expire, their keys can be refreshed.
Refresh the keys for the group
TeamOne.refresh key --filters hasGroup=TeamOne
Answer
ywhen prompted to refresh the keys.Refreshed 2 API key(s)
New API keys are generated.
Set the new expiration date.
set expiration --filters hasGroup=TeamOne --expiryDays 14
Authority Mappings
The following table shows the endpoint(s) that correspond to each assigned authority. When you add the authority, you may get access to multiple endpoints.
Authority | Endpoint(s) |
|---|---|
ADDRESS_SIMILARITY | [v1/address-similarity/**] |
CATEGORIES | [v1/categories/**] |
CUSTOM_PROFILES | [v1/custom-profiles] |
DOCUMENTATION | [doc/**] |
ENTITIES | [v1/entities, v1/entities/info, v1/entities/indoc-coref-server/supported-languages, v1/entities/supported-languages] |
ENTITIES_CONFIGURATION | [v1/entities/configuration/**] |
EVENTS | [v1/events/**] |
EXTERNAL_HEALTH | [v1/health/services] |
INFO | [v1/info] |
LANGUAGE | [v1/language/**] |
METRICS | [metrics/**] |
MORPHOLOGY | [v1/morphology/**] |
NAME_DEDUPLICATION | [v1/name-deduplication/**] |
NAME_SIMILARITY | [v1/name-similarity/**] |
NAME_TRANSLATION | [v1/name-translation/**] |
PING | [v1/ping] |
RECORD_SIMILARITY | [v1/record-similarity/**] |
RELATIONSHIPS | [v1/relationships/**] |
SEMANTICS_SIMILAR | [v1/semantics/similar/**] |
SEMANTICS_VECTOR | [v1/semantics/vector/**] |
SENTENCES | [v1/sentences/**] |
SENTIMENT | [v1/sentiment/**] |
SYNTAX_DEPENDENCIES | [v1/syntax/dependencies/**] |
TEXT_EMBEDDINGS | [v1/text-embedding/**] |
TOKENS | [v1/tokens/**] |
TOPICS | [v1/topics/**] |
TRANSLITERATION | [v1/transliteration/**] |
USAGE | [usage/**] |
Enabling SSL/TLS in Analytics Server
Secure Socket Layer (SSL) is a standard security technology for establishing an encrypted link between a web server and a web browser. The protocol allows for the authentication, encryption, and decryption of data sent over the Internet.
HTTPS requires an SSL certificate. SSL certificates have a key pair, made up of a public and a private key. These keys work together to establish an encrypted connection. You can use a self-signed (private) certificate or use a trusted certificate authority to sign a certificate for you. The certificate must be imported into the Java Keystore file serviceKeystore.jks. The keystore is used for secure storage of and access to keys and certificates.
Note
The Root Certificate Authority can also be added to the truststore used system-wide by Java. If this option is used, then the trust store does not need to be explicitly set in the steps below. Typically, the global certificate authority certificate truststore is in <JAVA_INSTALL>/lib/security/cacerts with the default password of changeit.
SSL over inbound Analytics Server connections
Edit the keystore and truststore file properties and passwords in launcher/config/jetty-ssl-config.xml.
<beans xmlns="http://www.springframework.org/schema/beans"
       xmlns:xsi="http://www.w3.org/2001/XMLSchema-instance"
       xmlns:http="http://cxf.apache.org/transports/http/configuration"
       xmlns:httpj="http://cxf.apache.org/transports/http-jetty/configuration"
       xmlns:sec="http://cxf.apache.org/configuration/security"
       xsi:schemaLocation="
        http://www.springframework.org/schema/beans                 http://www.springframework.org/schema/beans/spring-beans.xsd
        http://cxf.apache.org/transports/http/configuration         http://cxf.apache.org/schemas/configuration/http-conf.xsd
        http://cxf.apache.org/transports/http-jetty/configuration   http://cxf.apache.org/schemas/configuration/http-jetty.xsd
        http://cxf.apache.org/configuration/security                http://cxf.apache.org/schemas/configuration/security.xsd">


    <httpj:engine-factory id="rosette-server-engine-config">
        <httpj:engine port="#{ systemProperties['rosapi.port'] }">
            <httpj:tlsServerParameters>
                <sec:clientAuthentication required="false" />
                <sec:keyManagers keyPassword="[key-pass]">
                    <sec:keyStore type="JKS" password="[keystore-pass]"
                                  file="path/to/keystore.jks"/>
                </sec:keyManagers>
                <sec:trustManagers>
                    <sec:keyStore type="JKS" password="[truststore-pass]"
                                  file="path/to/truststore.jks"/>
                </sec:trustManagers>
            </httpj:tlsServerParameters>
        </httpj:engine>
    </httpj:engine-factory>

</beans>
Change http to https in /launcher/config/com.basistech.ws.cxf.cfg.
urlBase=https://0.0.0.0:${rosapi.port}/restSSL over outbound Analytics Server connections
Create a file named
ssl-conf.conf. Edit the file, adding the following contents:#encoding=UTF-8 #Uncomment the line below to enable SSL debugging #-Djavax.net.debug=ssl -Djavax.net.ssl.keyStore=<full path to the Java keystore file (jks|pkcs12)> -Djavax.net.ssl.keyStorePassword=<KEY_STORE_PASSWORD> -Djavax.net.ssl.trustStore=<full path to the Java truststore file (jks|pkcs12)> -Djavax.net.ssl.trustStorePassword=<TRUST_STORE_PASSWORD>
Edit
<ROSETTE_SERVER_INSTALL>/server/conf/wrapper.conf. Add the following to the end of the file:wrapper.java.additional_file=<path to the ssl-conf.conf file>
for example:
wrapper.java.additional_file=/rosette/server/launcher/config/ssl-conf.conf
Example
Note
These instructions assume all workers are on a single machine. If Analytics Server is installed in an environment with distributed workers, contact Support.
Note
keyPassword and keyStore.password must have the same value.
Example:
{noformat}lsServerParameters.keyManagers.keyPassword=sspass
tlsServerParameters.keyManagers.keyStore.password=sspass{noformat}
Generate an RSA key pair for the server.
This example is for evaluation purposes only. The generated key is good for seven days. Please work with your appropriate internal group to acquire your keys for production usage.
$JAVA_HOME/bin/keytool -genkeypair \
        -validity 7 \
        -alias myservicekey \
        -keystore serviceKeystore.jks \
        -dname "cn=exampleName, ou=exampleGroup, o=exampleCompany, c=us" \
        -keypass skpass \
        -storepass sspass \
        -keyalg RSA \
        -sigalg SHA256withRSA
Set the permissions for the keystore file to read only
chmod 400 serviceKeystore.jks
Rename the file
launcher/config/rosapi/transport-rules.tsv. Removing this file forces local transports for all endpoints. We recommend renaming the file, to have the original file as a backup.mv launcher/config/rosapi/transport-rules.tsv launcher/config/rosapi/transport-rules.tsv.original
Change
httptohttpsinlauncher/config/com.basistech.ws.cxf.cfg.urlBase=https://0.0.0.0:${rosapi.port}/restEdit the file
launcher/config/jetty-ssl-config.xmland add the following lines to use the generated keystore:<beans xmlns="http://www.springframework.org/schema/beans" xmlns:xsi="http://www.w3.org/2001/XMLSchema-instance" xmlns:http="http://cxf.apache.org/transports/http/configuration" xmlns:httpj="http://cxf.apache.org/transports/http-jetty/configuration" xmlns:sec="http://cxf.apache.org/configuration/security" xsi:schemaLocation=" http://www.springframework.org/schema/beans http://www.springframework.org/schema/beans/spring-beans.xsd http://cxf.apache.org/transports/http/configuration http://cxf.apache.org/schemas/configuration/http-conf.xsd http://cxf.apache.org/transports/http-jetty/configuration http://cxf.apache.org/schemas/configuration/http-jetty.xsd http://cxf.apache.org/configuration/security http://cxf.apache.org/schemas/configuration/security.xsd"> <httpj:engine-factory id="rosette-server-engine-config"> <httpj:engine port="#{ systemProperties['rosapi.port'] }"> <httpj:tlsServerParameters> <sec:clientAuthentication required="false" /> <sec:keyManagers keyPassword="[key-pass]"> <sec:keyStore type="JKS" password="[keystore-pass]" file="path/to/keystore.jks"/> </sec:keyManagers> <sec:trustManagers> <sec:keyStore type="JKS" password="[truststore-pass]" file="path/to/truststore.jks"/> </sec:trustManagers> </httpj:tlsServerParameters> </httpj:engine> </httpj:engine-factory> </beans>
Optional: SSL with remote workers
To use remote workers, the certificate needs to be trusted.
For testing, import the certificate to the truststore file, cacerts.jks, as trusted.
This example is for evaluation purposes only, continuing using the previously generated key. Please work with your appropriate internal group to acquire your keys for production usage. If your key is acquired from a trusted certificate authority, no further configuration may be required. As this example uses self-signed certificates, the following steps are necessary.
Export the certificate from the Java KeyStore.
keytool -exportcert \
        -alias myservicekey \
        -keystore serviceKeystore.jks \
        -file server.cer \
        -storepass sspass
Import the certificate into a trust store.
keytool -import \
        -v \
        -trustcacerts \
        -alias localhost \
        -file server.cer \
        -keystore cacerts.jks \
        -storepass capass
Instruct the JRE to trust the self-signed certificate by updating
conf/wrapper.conf.wrapper.java.additional.201=-Djavax.net.ssl.trustStore=/path-to-cacerts/cacerts.jks wrapper.java.additional.202=-Djavax.net.ssl.trustStorePassword=capass
Custom profiles
Custom profiles allow Analytics Server to be customized without altering the server-wide (global) settings. A custom profile can consist of any combination of regexes, gazetteers, configuration settings, or models. Analytics Server can support multiple profiles, each with different data domains (such as user dictionaries, regular expressions files, and custom models) as well as different parameter and configuration settings. Each profile is defined by its own root directory. Any data or configuration files that live in the root directory of an endpoint can be part of a custom profile.
Using custom profiles, a single endpoint can simultaneously support users with different processing requirements within a single instance of Analytics Server. For example, one user may work with product reviews and have a custom sentiment analysis model they want to use, while another user works with news articles and wants to use the default sentiment analysis model.
You can also create a custom profile for testing purposes. Once the test team is satisfied with the results of the component under test, the profile can be deployed to the global configuration so that everyone can use them by default.
Only the settings specified in the custom profile overide the server-wide configuration. If a profile does not override a setting then the server-wide setting is used.
Each unique profile in Analytics Server is identified by a string, profileId. The profile is specified when calling the API, by adding the profileId parameter, indicating the set of configuration and data files to be used for that call.
Custom profiles and their associated data are contained in a <profile-data-root> directory. This directory can be anywhere in your environment; it does not have to be in the Analytics Server install directory.
Endpoint | Applicable data files for custom profile |
|---|---|
/categories | Custom models |
/entities | Gazetteers, regular expression files, custom models, linking knowledge base |
/morphology | User dictionaries |
/sentiment | Custom models |
/tokens | Custom tokenization dictionaries |
Note
Custom profiles are not currently supported for the address-similarity, name-deduplication, name-similarity, record-similarity, and name-translation endpoints.
Setting up custom profiles
Create a directory to contain the configuration and data files for the custom profile.
The directory name must be 1 or more characters consisting of
0-9,A-Z,a-z, underscore or hyphen and no more than 80 characters long. It cannot contain spaces. It can be anywhere on your server; it does not have to be in the Analytics Server directory structure. This is theprofile-data-root.Create a subdirectory for each profile, identified by a profileId.
For each profile, create a subdirectory named profileID in the profile-data-root. The profile-path for a project is
profile-data-root/profileId.For example, let's assume our
profile-data-rootis rosette-users, and we have two profiles: group1 and group2. We would have the followingprofile-paths:rosette-users/group1 rosette-users/group2
Edit the Analytics Server configuration files to look for the profile directories.
The configuration files are in the
launcher/config/directory. Set theprofile-data-rootvalue in this file:com.basistech.ws.worker.cfg
# profile data root folder that may contain profile-id/{rex,tcat} etc
profile-data-root=file:///Users/rosette-users
Add the customization files for each profile. They may be configuration and/or data files.
When you call the API, add "profileId" = "myProfileId" to the body of the call.
{"content": "The black bear fought the white tiger at London Zoo.",
 "profileId": "group1"
}
custom-profiles endpoint
https://localhost:8181/rest/v1/custom-profiles
The /custom-profiles endpoint returns a list of all custom profiles on the server.
curl -s http://localhost:8181/rest/v1/custom-profiles
If the call includes an app-id in the request header, the custom-profiles endpoint returns all profiles under the specified app-id.
curl -s http://localhost:8181/rest/v1/custom-profiles -H "X-RosetteAPI-App-Id: app-id"
Updating custom profiles
New profiles are automatically loaded in Analytics Server. You do not have to bring down or restart the instance to add new models or data to Analytics Server.
When editing an existing profile, you may need to restart Analytics Server. If the profile has been called since Analytics Server was started, the Server must be restarted for the changes to take effect. If the profile has not been called since Analytics Server was started, there is no need to restart.
To add or update models or data, assuming the custom profile root rosette-users and profiles group1 and group2.
Add a new profile with the new models or new data, for example
group3.Delete the profile and re-add it. Delete
group1and then recreate thegroup1directory with the new models and/or data.
Custom configuration
The configurations for each endpoint are contained in the factory configuration files. The worker-config.yaml file describes which factory configuration files are used by each endpoint as well as the pipelines for each endpoint. To modify parameter values or any other configuration values, copy the factory configuration file into the profile path and modify the values.
Let's go back to our example with profile-ids of group1 and group2. Group1 wants to modify the default entities parameters, setting entity linking to true and case sensitivity to false. These parameters are set in the rex-factory-config.yaml file.
Copy the file
/launcher/config/rosapi/rex-factory-config.yamltorosette-users/group1/config/rosapi/rex-factory-config.yaml.Edit the new
rex-factory-config.yamlfile as needed. This is an excerpt from a sample file.# rootDirectory is the location of the rex root rootDirectory: ${rex-root} # startingWithDefaultConfigurations sets whether to fill in the defaults with CreateDefaultExtrator startingWithDefaultConfiguration: true # calculateConfidence turns on confidence calculation # values: true | false calculateConfidence: true # resolvePronouns turns on pronoun resolution # values: true | false resolvePronouns: true # rblRootDirectory is the location of the rbl root rblRootDirectory: ${rex-root}/rbl-je # case sensitivity model defaults to auto caseSensitivity: false # linkEntities is default true for the Cloud linkEntities: true
Custom data sets
Each profile can include custom data sets. For example, the entities endpoint includes multiple types of data files, including regex and gazetteers. These files can be put into their own directory for entities, known as an overlay directory. This is an additional data directory which takes priority over the default entities data directory.
Note
If the data overlay directory is named rex, the contents of the overlay directory will completely replace all supplied data files, including models, regex, and gazetteer files.
If your custom data sets are intended to supplement the shipped files, the directory name must not be
rex.If your custom data sets are intended to completely replace the shipped files, use the directory name
rex.
We will create a custom gazetteer file called custom_gaz.txt specifying "John Doe" as an ENGINEER entity type. Full details on how to create custom gazetteer files are in the section Gazetteers in the Adaptation Studio User Guide. You can also use Adaptation Studio to compile a gazetteer for improved performance.
Create the custom gazetteer file in
/Users/rosette-users/group1/custom-rex/data/gazetteer/eng/accept/custom_gaz.txt.It should consist of just two lines:ENGINEER John Doe
Copy the file
/launcher/config/rosapi/rex-factory-config.yamlto/Users/rosette-users/group1/config/rosapi/rex-factory-config.yaml.Edit the new
rex-factory-config.yamlfile, setting thedataOverlayDirectory.# rootDirectory is the location of the rex root rootDirectory: ${rex-root} dataOverlayDirectory: "/Users/rosette-users/group1/custom-rex/data"Call the entities endpoint with the
profileIdset togroup1:curl -s -X POST \ -H "Content-Type: application/json" \ -H "Accept: application/json" \ -H "Cache-Control: no-cache" \ -d '{"content": "John Doe is employed by Basis Technology", "profileId": "group1"}' \ "http://localhost:8181/rest/v1/entities"
You will see "John Doe" extracted as type ENGINEER from the custom gazetteer.
Custom models
You can train and deploy a custom model to the entities endpoint for entity extraction. You can either:
Copy the model file to the default data directory in the Entity Extractor root folder.
<RosetteServerInstallDir>/roots/rex/<version>/data/statistical/<lang>/<modelfile>where <lang> is the 3 letter language code for the model.Copy the model to the data directory of a custom profile.
<profile-data-root>/<profileId>/data/statistical/<lang>/<modelfile>where <lang> is the 3 letter language code for the model.The custom profile must be set up as described in Setting up custom profiles
Tip
Model naming convention
The prefix must be model. and the suffix must be -LE.bin. Any alphanumeric ASCII characters are allowed in between.
Example valid model names:
model.fruit-LE.bin
model.customer4-LE.bin
Example
In this example, we're going to add the entity types COLORS and ANIMALS to the entities endpoint, using a regex file.
Create a
profile-data-root, called rosette-users in theUsersdirectory.Create a user with the
profileIdof group1. The newprofile-pathis:/Users/rosette-users/group1
Edit the Analytics Server configuration files:
/launcher/config/com.basistech.ws.worker.cfg/launcher/config/com.basistech.ws.frontend.cfg
adding the profile-data-root.
# profile data root folder that may contain app-id/profile-id/{rex,tcat} etc
profile-data-root=file:///Users/rosette-users
Copy the
rex-factory-config.yamlfile from/launcher/config/rosapiinto the new directory:/Users/rosette-users/group1/config/rosapi/rex-factory-config.yaml
Edit the copied file, setting the
dataOverlayDirectoryparameter and adding the path for the new regex file. The overlay directory is a directory shaped like thedatadirectory. The entities endpoint will look for files in both locations, preferring the version in the overlap directory.dataOverlayDirectory: "/Users/rosette-users/group1/custom-rex/data" supplementalRegularExpressionPaths: - "/Users/rosette-users/group1/custom-rex/data/regex/eng/accept/supplemental/custom-regexes.xml"
Create the file
custom-regexes.xmlin the/Users/rosette-users/group1/custom-rex/data/regex/eng/accept/supplementaldirectory.<regexps> <regexp type="COLOR">(?i)red|white|blue|black</regexp> <regexp type="ANIMAL">(?i)bear|tiger|whale</regexp> </regexps>
Call the entities endpoint without using the custom profile:
 curl -s -X POST \
    -H "Content-Type: application/json" \
    -H "Accept: application/json" \
    -H "Cache-Control: no-cache" \
    -d '{"content": "The black bear fought the white tiger at London Zoo." }' \
    "http://localhost:8181/rest/v1/entities"
The only entity returned is London Zoo:
{
  "entities": [
    {
      "type": "LOCATION",
      "mention": "London Zoo",
      "normalized": "London Zoo",
      "count": 1,
      "mentionOffsets": [
        {
          "startOffset": 41,
          "endOffset": 51
        }
      ],
      "entityId": "T0"
    }
  ]
}
Call the entities endpoint, adding the profileId to the call:
curl -s -X POST \ -H "Content-Type: application/json" \
-H "Accept: application/json" \
-H "Cache-Control: no-cache" \
-d '{"content": "The black bear fought the white tiger at London Zoo.",
     "profileId": "group1"}' \
"http://localhost:8181/rest/v1/entities"
The new colors and animals are also returned:
    "entities": [
        {
            "type": "COLOR",
            "mention": "black",
            "normalized": "black",
            "count": 1,
            "mentionOffsets": [
                {
                    "startOffset": 4,
                    "endOffset": 9
                }
            ],
            "entityId": "T0"
        },
        {
            "type": "ANIMAL",
            "mention": "bear",
            "normalized": "bear",
            "count": 1,
            "mentionOffsets": [
                {
                    "startOffset": 10,
                    "endOffset": 14
                }
            ],
            "entityId": "T1"
        },
        {
            "type": "COLOR",
            "mention": "white",
            "normalized": "white",
            "count": 1,
            "mentionOffsets": [
                {
                    "startOffset": 26,
                    "endOffset": 31
                }
            ],
            "entityId": "T2"
        },
        {
            "type": "ANIMAL",
            "mention": "tiger",
            "normalized": "tiger",
            "count": 1,
            "mentionOffsets": [
                {
                    "startOffset": 32,
                    "endOffset": 37
                }
            ],
            "entityId": "T3"
        },
        {
            "type": "LOCATION",
            "mention": "London Zoo",
            "normalized": "London Zoo",
            "count": 1,
            "mentionOffsets": [
                {
                    "startOffset": 41,
                    "endOffset": 51
                }
            ],
            "entityId": "T4"
        }
Usage tracking
Usage tracking provides metrics on all Rosette server calls. Call counts are provided by app-id, profileId, endpoint, and language.
Application ids (
app-id) are an optional way to identify the application or group making the call. Theapp-idis the value ofX-RosetteAPI-App-IDin the call header. If no application id is provided in the call header, the calls are allocated to theno-app-idgroup.Profile ids (
profileId) are an optional way of identifying a custom profile. Each profile can have its own data domain, parameter, and configuration settings. If no profile id is provided in the call, the calls are allocated to theno-profile-idgroup.Language is identified by the 3-letter ISO 639-3 language code.
xxxindicates the language was unknown.Calls made to the endpoints
/rest/v1/info,/rest/v1/ping, and/rest/v1/customare not included in the statistics.
Call statistics are kept in the file launcher/config/rosette-usage.yaml. The statistics are cumulative from the file creation date. The file is created when the server is started. If the file already exists when the server is started, new statistics are added to the existing file. The file is not deleted when the server is stopped.
Usage
To access the statistics, call the usage endpoint:
curl http://localhost:8181/rest/usage
where localhost:8181 is the location of the Analytics installation.
Sample Response
{"no-app-id": {
   "no-profile-id": {
      "/rest/v1/tokens": {
        "eng": {
            "calls": 1
        },
        "zho": {
            "calls": 1
        }
      },
      "/rest/v1/categories": {
        "eng": {
            "calls": 1
        }
      },
      "/rest/v1/language": {
        "xxx": {
            "calls": 1
        }
      }
    }
  }
}
You can also aggregate usage data by having Prometheus pull metrics from multiple instances using the /metrics endpoint. A single call returns all endpoints.
curl http://localhost:8181/rest/metrics
where localhost:8181 is the location of the Analytics installation.
Sample Response
# HELP rosette_http_requests_total Total number of Rosette Enterprise requests processed.
# TYPE rosette_http_requests_total counter
rosette_http_requests_total{app_id="no-app-id",profile_id="no-profile-id",
    endpoint="/rest/v1/tokens",lang="zho",} 1.0
rosette_http_requests_total{app_id="no-app-id",profile_id="no-profile-id",
    endpoint="/rest/v1/semantics/vector",lang="eng",} 1.0
rosette_http_requests_total{app_id="no-app-id",profile_id="no-profile-id",
    endpoint="/rest/v1/morphology/compound-components",lang="deu",} 1.0
rosette_http_requests_total{app_id="no-app-id",profile_id="no-profile-id",
    endpoint="/rest/v1/syntax/dependencies",lang="eng",} 1.0
rosette_http_requests_total{app_id="no-app-id",profile_id="no-profile-id",
    endpoint="/rest/v1/morphology/lemmas",lang="eng",} 1.0
rosette_http_requests_total{app_id="no-app-id",profile_id="no-profile-id",
    endpoint="/rest/v1/topics",lang="eng",} 1.0
rosette_http_requests_total{app_id="no-app-id",profile_id="no-profile-id",
    endpoint="/rest/v1/transliteration",lang="eng",} 1.0
rosette_http_requests_total{app_id="no-app-id",profile_id="no-profile-id",
    endpoint="/rest/v1/sentences",lang="eng",} 1.0
rosette_http_requests_total{app_id="no-app-id",profile_id="no-profile-id",
    endpoint="/rest/v1/address-similarity",lang="xxx",} 1.0
rosette_http_requests_total{app_id="no-app-id",profile_id="no-profile-id",
    endpoint="/rest/v1/name-deduplication",lang="xxx",} 1.0
rosette_http_requests_total{app_id="no-app-id",profile_id="no-profile-id",
    endpoint="/rest/v1/morphology/complete",lang="eng",} 1.0
rosette_http_requests_total{app_id="no-app-id",profile_id="no-profile-id",
    endpoint="/rest/v1/entities",lang="eng",} 1.0
rosette_http_requests_total{app_id="no-app-id",profile_id="no-profile-id",
    endpoint="/rest/v1/name-translation",lang="xxx",} 1.0
rosette_http_requests_total{app_id="no-app-id",profile_id="no-profile-id",
    endpoint="/rest/v1/morphology/parts-of-speech",lang="eng",} 1.0
rosette_http_requests_total{app_id="no-app-id",profile_id="no-profile-id",
    endpoint="/rest/v1/semantics/similar",lang="eng",} 1.0
rosette_http_requests_total{app_id="no-app-id",profile_id="no-profile-id",
    endpoint="/rest/v1/language",lang="xxx",} 1.0
rosette_http_requests_total{app_id="no-app-id",profile_id="no-profile-id",
    endpoint="/rest/v1/sentiment",lang="eng",} 1.0
rosette_http_requests_total{app_id="no-app-id",profile_id="no-profile-id",
    endpoint="/rest/v1/categories",lang="eng",} 1.0
rosette_http_requests_total{app_id="no-app-id",profile_id="no-profile-id",
    endpoint="/rest/v1/name-similarity",lang="xxx",} 1.0
rosette_http_requests_total{app_id="no-app-id",profile_id="no-profile-id",
    endpoint="/rest/v1/morphology/han-readings",lang="zho",} 1.0
rosette_http_requests_total{app_id="no-app-id",profile_id="no-profile-id",
    endpoint="/rest/v1/relationships",lang="eng",} 1.0
Configuration parameters
The configuration parameters for usage tracking is in the file launcher/config/com.basistech.ws.local.usage.tracker.cfg.
Disable Tracking By default, usage tracking is turned on. To disable tracking, uncomment the
enabledparameter and change the value to false:enabled: false
Report interval To set the reporting interval in minutes, change the
reportIntervalparameter. The default is 1 minute.reportInterval: 2
File Location To set the location for the
rosette-usage.yamlfile set theusage-tracker-rootparameter. The default location is<rosette>/server/launch/config. Uncomment the line and change it to your preferred location. This example changes it to the/var/logdirectory:usage-tracker-root: /var/log
Resetting the counter
To reset the counter:
Stop the server
Remove the following files:
launcher/config/rosette-usage.yamllauncher/config/rosette-usage.yaml.backup
Restart the server
Identifying an application
No authorization is required when using an on-premises installation of Analytics. You may, however, want to track Analytics calls by groups within your organization. To do this, include an application id (app-id) in the request header of all calls. This allows Analytics to track usage by app-id.
An application id is:
A user-defined string.
It is defined in the call.
There is no validation or authorization on the value.
Used for usage tracking only.
If no
app-idis included in the header, calls are allocated to theno-app-idgroup.
Example:
curl -s -X POST \
    -H "X-RosetteAPI-App-Id: usergroup1" \
    -H "Content-Type: application/json" \
    -H "Accept: application/json" \
    -H "Cache-Control: no-cache" \
    -d '{"content": "Por favor Señorita, says the man." }' \
    "https://localhost:8181/rest/v1/language"
Associating custom profiles with application ids
Note
As of the 1.20.0 release of Server, custom profiles are no longer associated with application ids. All custom profiles are now available to all application ids without requiring file duplication.
To require custom profiles to be installed under the application group, add the following line to the wrapper.conf file:
wrapper.java.additional.250=-Drosapi.feature.CUSTOM_PROFILE_UNDER_APP_ID
When tracking usage in installations which utilize custom profiles, you can require that the custom profiles must be installed in subdirectories under each application group.
Example:
The app-id identifies the group making the call. The app-id is the value of X-RosetteAPI-App-ID in the call header. If no application id is provided in the call header, the calls are allocated to the no-app-id group.
The ProfileId identifies the customized components
<app-id>/<ProfileID>/config
<app-id>/<ProfileID>/config/rosapi
<app-id>/<ProfileID>/custom-rex
If you have multiple groups (app-id) using the same set of configuration and customizations, you can create symbolic links (ln -s <source> <link> to save disk space. Otherwise, you will have to install the customizations under each app-id.
 |
Custom endpoints
A custom endpoint combines business logic and calls to Rosette endpoints into a new endpoint that is fully integrated in Analytics Server. With a single call, you can make calls to multiple Analytics endpoints, follow specific workflows, and execute custom logic.
Architecture
The custom endpoint architecture includes two platform-independent components:
A reverse proxy that is placed in front of the normal entry point. The shipment includes a Spring Boot application that utilizes Spring Cloud Gateway, an open source routing framework, in order to provide a reverse proxy capability.
The custom endpoint is a Spring Boot application and can either be deployed as a web archive (WAR) using Tomcat or as a stand-alone Spring Boot application.
Note
Spring Cloud Gateway and Tomcat are provided as an example of one way to implement a custom endpoint. You can substitute your preferred reverse proxy or application server to achieve the same results.
The reverse proxy's configuration file routes all incoming requests:
Calls to standard Analytics endpoints are routed to the Analytics Server as usual.
Calls to custom endpoints are routed to the application server, which makes calls to standard Analytics endpoints and applies custom logic.
Installing
All shipments contain the file rosent-custom-endpoint-installer-<version>.tar.gz containing an installation script and the files for the reverse proxy and application server. The installation script is currently for Linux and macOS only.
You can install the custom endpoints while Analytics Server is running, or start it after you complete the custom endpoints installation.
Install Analytics Server as usual. Ensure
JAVA_HOMEis set.Download and extract
rosent-custom-endpoint-installer-<version>.tar.gzfrom your shipment email. The files will be extracted into a directory namedrosent-custom-endpoint-installer-<version>.Run
rosent-custom-endpoint-installer.sh../rosent-custom-endpoint-installer.sh
The installer will guide you through the installation and customization process.
You will have the option of installing tomcat to host the custom endpoints.
You will have the option to install the stand-alone sample and source code.
The sample can be deployed as a standalone Spring Boot application or as a ware deployed in tomcat.
Configuring and running the services
Start the application server:
tomcat/apache-tomcat-<version>/bin/rosent-tomcat.sh startTo start the service:
tomcat/apache-tomcat-<version>/bin/rosent-tomcat.sh start
The following messages are displayed when the application server starts up:
Starting RosetteEnterprise Tomcat...
Waiting for RosetteEnterprise Tomcat......
running: PID:76987
To stop the service:
tomcat/apache-tomcat-<version>/bin/rosent-tomcat.sh stop
To get the status of the service:
tomcat/apache-tomcat-<version>/bin/rosent-tomcat.sh status
To view the console logs:
tomcat/apache-tomcat-<version>/bin/rosent-tomcat.sh console
Start the proxy server:
proxy/bin/rosent-proxy.sh startTo start the service:
proxy/bin/rosent-proxy.sh startThe following messages are displayed when the proxy server starts up:
Starting RosetteEnterprise Proxy...
Waiting for RosetteEnterprise Proxy......
running: PID:77560
To stop the service:
proxy/bin/rosent-proxy.sh stop
To get the status of the service:
proxy/bin/rosent-proxy.sh status
To view the console logs:
proxy/bin/rosent-proxy.sh console
Configuring a custom endpoint
The application.yml file configures most aspects of the proxy including ports, certificates, routing, and timeouts. If you move the application.yml file, the ./conf/proxy-wrapper.conf must be updated with the new location.
wrapper.app.parameter.2=--spring.config.location=<new file location>
The proxy can be configured using the values in the application.yml file directly or by setting the environment variables in ./conf/proxy-wrapper.conf.
To set the port the proxy will use:
set.PROXY_PORT=8182
To set the location logs are written to:
set.PROXY_LOG_DIR=./logs
To set the location of the custom application:
SAMPLE_ENDPOINT_APP_HOST=http:/localhost:8183
The location of Analytics Server:
set.ROSETTE_SERVER_HOST=http://localhost:8181
If your custom code is in Java, put your WAR file into the webapps directory of the Tomcat installation directory. To use other languages, see Adding non-Java custom code.
Your Java web application should define a URI to access the code. Create a rule in the proxy definition to adjust the final path to access the custom code.
Resiliency
Each component, including Analytics Server, has its own, independent, Tanuki Java Wrapper application. Tanuki monitors the health of the application and relaunches if the Java application crashes or gets into a bad state.
In addition, the proxy application exposes two endpoints that can be used to access the proxy health:
/info: Returns a version of the running proxy and a short description. Example:curl http://localhost:8182/info
Returns:
{ "app": { "name": "rosent-proxy", "description": "Rosette Custom Endpoint Proxy", "version": "0.3.0", } }/health: Indicates if the proxy is UP or Down. Example:curl http://localhost:8182/health
Returns:
{
"status": "UP"
}
Note
Access to these endpoints can be restricted to network interface if required. Details on restricting access can be obtained from Babel Street support or Spring Boot Actuator documentation, by setting the management server address and port.
Example
Note
The source code for the example application is located in the directory /rosette/custom-endpoint. You do not need to extract the file to run the example application, as there is a compiled and packaged version of the code deployed with the Tomcat application server. You only need to access the source code if you want to use it as a template for your own endpoint.
The custom endpoint application includes an example application, matchSentences , which calculates the relevance of documents and sentences against a list of keywords. It combines calls to the /sentences and /semantics/vector endpoints with custom code. The custom code uses the cosine similarity function to calculate similarity scores between the sentences and the keywords, as well as comparing the scores to the input threshold value.
The input is a list of keywords, a document or the URL to a document, and a threshold.
The response is the cosine similarity scores and a true/false value indicating if the score is above the threshold for each sentence, and for the entire document.
Call the endpoint
Example payload
File: matchSentences.json
{
    "keywords": [
       "USA",
       "Iran",
       "attack",
       "protest"
    ],
    "document": "Iran was planning attacks on    four US embassies
     when its top general was killed, President Donald Trump says.
     When asked what threat led to last Friday's US drone strike,
     he told Fox News: \"I can reveal that I believe it probably
     would've been four embassies.\" \"The killing of Gen Qasem Soleimani,
     a national hero, came after days of protests at the US embassy in Baghdad.",
   "threshold": 0.25
}
Call /matchSentences
curl -s http://localhost:8182/rest/v1/match-sentences -XPOST \
-H 'Content-Type: application/json; charset=utf-8' -d \
@matchSentences.json
Example configuration
Spring Cloud Gateway is used for proxy routing. There are 2 routes defined by /rest/v1/match-sentences and /rest/v1/**. All traffic sent to /rest/v1/match-sentences will be sent to the custom application.
The custom application will change depending on how the application is being run.
When run as a Spring Boot application the path is
/rest/v1/match-sentences -> /service/matchSentencesWhen deployed as a war the path is
/rest/v1/match-sentences -> /custom-endpoint/matchSentences.The paths to
/infoendpoints is either/service/infoor/custom-endpoint/info.
spring:
  cloud:
    gateway:
      routes:
        # Route to the custom endpoint
        - id: sample_app_route
          uri: ${SAMPLE_ENDPOINT_APP_HOST:http://localhost:8183}
          predicates:
            - Path=/rest/v1/match-sentences/**,matchTrailingSlash=false
          filters:
# When running the custom endpoint as a stand-alone spring boot application
#           - RewritePath=/rest/v1/match-sentences/info(?<segment>.*), /service/info$\{segment}
#           - RewritePath=/rest/v1/match-sentences/health(?<segment>.*), /service/health$\{segment}
#           - RewritePath=/rest/v1/match-sentences/prometheus(?<segment>.*), /service/prometheus$\{segment}
#           - RewritePath=/rest/v1/match-sentences/env(?<segment>.*), /service/env$\{segment}
#           - RewritePath=/rest/v1/match-sentences(?<segment>.*), /service/matchSentences/$\{segment}
# When running the custom endpoint as a war file in tomcat
#           - RewritePath=/rest/v1/match-sentences/info(?<segment>.*), /custom-endpoint/info$\{segment}
#           - RewritePath=/rest/v1/match-sentences/health(?<segment>.*), /custom-endpoint/health$\{segment}
#           - RewritePath=/rest/v1/match-sentences/prometheus(?<segment>.*), /custom-endpoint/prometheus$\{segment}
#           - RewritePath=/rest/v1/match-sentences/env(?<segment>.*), /custom-endpoint/env$\{segment}
#           - RewritePath=/rest/v1/match-sentences(?<segment>.*), /custom-endpoint/matchSentences/$\{segment}
     # Calls to Analytics Server Endpoints
     - id: rosette_pass_thru
       uri: ${ROSETTE_SERVER_HOST:http://localhost:8181}
       predicates:
         - Path=/rest/v1/**,matchTrailingSlash=false
         - Path=/rest/**,matchTrailingSlash=false
Adding non-Java custom code
The examples and instructions here assume you are writing your custom code in Java. If you are using a different language, you will need to set up your own application server that is specific for that language. Then you add your own routing rules to the proxy so that the traffic is directed to the correct place.
Let's assume you'd like to add a python file named python_example.py,and you want to execute it from the url http://localhost:8182/rest/v1/python_example.
Stand up a python application server.
Configure the application server to work with the
python_example.pyfile.Create a rule in the proxy's
application.ymlfile that routes requests torest/v1/python_exampleto the python application server such that it calls thepython_example.pyfile.
Customizing name and record matching
This section provides an overview of how name matching works and how to tune it. For a more complete explanation of the many parameters and files that can be modified to tune name, address, and record matching, refer to the Babel Street Match User Guide.
Match
Babel Street Match uses machine learning and cutting-edge NLP techniques to perform name matches, address matches, record matches, and name deduplication across a large set of languages and writing scripts. Match functionality is provided through four endpoints:
Names are complex to match because of the large number of variations that occur within a language and across languages. Match breaks a name into tokens and compares the matching tokens. Match can identify variations between matching tokens including, but not limited to, typographical errors, phonetic spelling variations, transliteration differences, initials, and nicknames.
Variation | Example(s) |
|---|---|
Phonetic and/or spelling differences | Nayif Hawatmeh and Nayif Hawatma |
Missing name components | Mohammad Salah and Mohammad Abd El-Hamid Salah |
Rarity of a shared name component | Two English names that contain Ditters are more likely to match than two names that contain Smith |
Initials | John F. Kennedy and John Fitzgerald Kennedy |
Nicknames | Bobby Holguin and Robert Holguin |
"Cousin" or cognate names | Pedro Calzon and Peter Calzon |
Uppercase/Lowercase | Rosa Elena PACHECO and Rosa Elena Pacheco |
Reordered name components | Zedong Mao and Mao Zedong |
Variable Segmentation | Henry Van Dick and Henri VanDick, Robert Smith and Robert JohnSmyth |
Corresponding name fields | For [Katherine][Anne][Cox], the similarity with [Katherine][Ann][Cox] is higher than the similarity with [Katherine Ann][Cox] |
Truncation of name elements | For Sawyer, the similarity with Sawy is higher than the similarity with Sawi. |
Configuring name matching
There are many ways to configure Match to better fit your use case and data. The two primary mechanisms are by modifying match parameters and editing overrides. You can also train a custom language model.
Parameter configuration files
Individual name tokens are scored by a number of algorithms or rules. These algorithms can be optimized by modifying configuration parameters, thus changing the final similarity score.
The parameter files are contained in two .yaml files located in /rlpnc/data/etc. The parameters are defined in parameter_defs.yaml and modified in parameter_profiles.yaml.
parameter_defs.yamllists each match parameter along with the default value and a description. Each parameter may also have a minimum and maximum value, which is the system limit and could cause an error if exceeded. A parameter may also have a recommended minimum (sane_minimum) and recommended maximum (sane_maximum) value, which we advise you do not exceed.parameter_profiles.yamlis where you change parameter values based on the language pairs in the match.
Important
Do not modify the parameter_defs.yaml file. All changes should be made in the parameter_profiles.yaml file.
Do refer to the parameter_defs.yaml file for definitions and usage of all available parameters.
Parameter profiles
The parameters in the parameter_profiles.yaml file are organized by parameter profiles. Each profile contains parameter values for a specific language pair. For example, matching "Susie Johnson" and "Susanne Johnson" will use the eng_eng profile. There is also an any profile which applies to all language pairs.
Parameter profiles have the following characteristics:
Parameter profile names are formed from the language pairs they apply to. The 3 letter language codes are always written in alphabetical order, except for English (
eng), which always comes last. The two languages can be the same. Examples:spa_engara_jpneng_eng
They can include the entity type being matched, such as
eng_eng_PERSON. The parameter values in this profile will only be used when matching English names with English names, where the entity type is specified as PERSON. Any entity type listed in the table can be used.Parameter profiles can inherit mappings from other parameter profiles. The global
anyprofile applies to all languages; all profiles inherit its values.The
anyprofile can include an entity type;any_PERSONapplies to all PERSON matches regardless of language.Specific language profiles inherit values from global profiles. The profile matching person names is named
any_PERSON. The profile for matching Spanish person against English person names is namedspa_eng_PERSON. It inherits parameter values from thespa_engprofile and theany_PERSONprofile. Theany_PERSONprofile will not override parameter values from more specific profiles, such as thespa_engprofile.
Important
Global changes are made with the any profile.
Any changes to address parameters should go under the any profile, and will affect all fields for all addresses.
Any changes to date parameters must go under the any profile.
Selected name parameters
Given the large number of configurable name match parameters in Match, you should start by looking at the impact of modifying a few parameters. The complete definition of all available parameters is found in the parameter_defs.yaml file.
The following examples describe the impact of parameter changes in more detail.
conflictScore)Let’s look at the two names: ‘John Mike Smith’ and ‘John Joe Smith’. ‘John’ from the first and second name will be matched as well the token ‘Smith’ from each name. This leaves unmatched tokens ‘Mike’ and ‘Joe’. These two tokens are in direct conflict with each other and users can determine how it is scored. A value closer to 1.0 will treat ‘Mike’ and ‘Joe’ as equal. A value closer to 0.0 will have the opposite effect. This parameter is important when you decide names that have tokens that are dissimilar should have lower final scores. Or you may decide that if two of the tokens are the same, the third token (middle name?) is not as important.
initialsScore)Consider the following two names: 'John Mike Smith' and 'John M Smith'. 'Mike' and 'M' trigger an initial match. You can control how this gets scored. A value closer to 1.0 will treat ‘Mike’ and ‘M’ as equal and increase the overall match score. A value closer to 0.0 will have the opposite effect. This parameter is important when you know there is a lot of initialism in your data sets.
deletionScore)Consider the following two names: ‘John Mike Smith’ and ‘John Smith’. The name token ‘Mike’ is left unpaired with a token from the second name. In this example a value closer to 1.0 will not penalize the missing token. A value closer to 0.0 will have the opposite effect. This parameter is important when you have a lot of variation of token length in your name set.
reorderPenalty)This parameter is applied when tokens match but are in different positions in the two names. Consider the following two names: ‘John Mike Smith’, and ‘John Smith Mike’. This parameter will control the extent to which the token ordering ( ‘Mike Smith’ vs. ‘Smith Mike’) decreases the final match score. A value closer to 1.0 will penalize the final score, driving it lower. A value closer to 0.0 will not penalize the order. This parameter is important when the order of tokens in the name is known. If you know that all your name data stores last name in the last token position, you may want to penalize token reordering more by increasing the penalty. If your data is not well-structured, with some last names first but not all, you may want to lower the penalty.
boostWeightAtRightEnd, boostWeightAtLeftEnd, boostWeightAtBothEndsboost)These parameters boost the weights of tokens in the first and/or last position of a name. These parameters are useful when dealing with English names, and you are confident of the placement of the surname. Consider the following two names: “John Mike Smith’ and ‘John Jay M Smith’. By boosting both ends you effectively give more weight to the ‘John’ and ‘Smith’ tokens. This parameter is important when you have several tokens in a name and are confident that the first and last token are the more important tokens.
The parameters boostWeightAtRightEnd and boostWeightAtLeftEnd should not be used together.
Configuring name overrides
Match includes override files (UTF-8 encoded) to improve name matching. There are different types of override files:
Stop patterns and stop word prefixes designate name elements to strip during indexing and queries, and before running any matching algorithms.
Name pair matches specify scores to be assigned for specified full-name pairs.
Token pair overrides specify name token pairs that match along with a match score.
Token normalization files specify the normalized form for tokens and variants to normalize to that form.
Low weight tokens specify parts of names (such as suffixes) that don't contribute much to name matching accuracy.
The name matching override files are in the /rlpnc/data/rnm/ref/override directory.
You can modify these files and add additional files in the same subdirectory to extend coverage to additional supported languages. You can also create files that only apply to a specified entity type, such as PERSON.
Customizing entity extraction
The Analytics Server endpoints are configured by the files found in the /launcher/config/rosapi directory. Be careful when editing any of these files as the endpoints will not work if not configured properly.
The entity extraction and linking parameters are in the file rex-factory-config.yaml.
For details on how Rosette entity extraction works and how to customize it, refer to the Entity Extractor Application Developers Guide included in the Analytics Server package.
Entity extraction parameters
To modify the default configuration of the /entities endpoint, edit the file /launcher/config/rosapi/rex-factory-config.yaml. The file contains the following parameters. To change the value of a parameter, uncomment the parameter and set the new value.
Parameter | Description | Default |
|---|---|---|
| A Entity Extractor root directory contains language models and necessary configuration files. |
|
| The directory containing the RBL root for Entity Extractor to use. |
|
| Additional gazetter files used to reject entities for the given language. |
|
| Regular expressions and gazetteers may be configured to match tokens partially independent from token boundaries. If true, reported offsets correspond to token boundaries. |
|
| Additional regex files used to reject entities. |
|
| The option to allow partial gazetteer matches. For the purposes of this setting, a partial match is one that does not line up with token boundaries as determined by the internal tokenizer. This only applies to accept gazetteers. |
|
| Custom list of Knowledge Bases for the linker, in order of priority |
|
| The maximum number of tokens allowed in an entity returned by Statistical Entity Extractor. Entity Redactor discards entities from Statistical Entity Extractor with more than this number of tokens. |
|
| Custom processors to add to annotators. |
|
| Additional files used to produce regex entities. |
|
| If true, entity confidence values are calculated. Can be overridden by specifying |
|
| File containing additional joiner rules. |
|
| Entity types to be excluded from extraction. |
|
| An overlay directory is a directory shaped like the |
|
| The confidence value threshold below which entities extracted by the statistical processor are ignored. |
|
| When true, resolve pronouns to person entities. |
|
| Additional files used to produce statistical entities for the given language. You may pass multiple statistical models. The parameter should be formatted in trios of values specfying language, case-sensitivity and the model file, separated by commas. Case-sensitivity can be |
|
| Additional gazetteer files used to produce entities for the given language. |
|
| The option to link mentions to knowledge base entities with disambiguation model. Enabling this option also enables |
|
| The capitalization (aka 'case') used in the input texts. Processing standard documents requires caseSensitive, which is the default. Documents with all-caps, no-caps or headline capitalization may yield higher accuracy if processed with the caseInsensitive value. Can be |
|
| The maximum number of entities for in-document coreference resolution (a.k.a. chaining). |
|
| If true, entity chain salience values are calculated. Can be overridden by specifying |
|
| The option to retain social media symbols ('@' and '#') in normalized output |
|
| An option to calculate entity-chain salience with statistical-based calculation (returns 0 or 1) or simple calculation (returns score between 0 and 1) |
|
| Register a custom processor class. |
|
| The option to keep existing annotated text entities. |
|
| The option to prefer length over weights during redaction. If true, the redactor will always choose a longer entity over a shorter one if the two overlap, regardless of their user-defined weights. In this case, if the lengths are the same, then weight is used to disambiguate the entities. If false, the redactor will choose the higher weighted entity when two overlap, regardless of the length of the entity string. In this case, if the weights are the same, then the redactor will choose the longer of the two entities. |
|
| The option to assign default confidence value 1.0 to non-statistical entities instead of null. |
|
| The confidence value threshold below which linking results by the kbLinker processor are ignored. |
|
| An option for document entity resolution (also known as entity chaining). Valid values are: |
|
Default processors: | List the set of active processors for an entity extraction run. All processors are active by default. This method provides a way to turn off selected processors. The order of the processors cannot be changed. Note that turning off redactor can cause overlapping and unsorted entities to be returned. |
|
| The option to add supplemental regex files, usually for entity types that are excluded by #default. The supplemental regex files are located at |
|
| Configures how structured regions will be processed. It has three values: |
|
| Determines if money values should be extracted as |
|
| Url for the indocument coreference server. Only available when the indoc coref server is installed. | |
| When set to Only available when the indoc coref server is installed. |
|
In-document coreference
Within a document, there may be multiple references to a single entity. In-document coreference (indoc coref) chains together all mentions to an entity.
The indoc coref server is an additional server which must be installed on your system for Server.
By default, indoc coref is disabled.
To enable indoc coref for a call, set the option
useIndocServertotrue.The response time will be slower when indoc coref is enabled. We recommend using a GPU with indoc coref enabled.
To see which languages support indoc coref, use the
/entities/indoc-coref-server/supported-languagesendpoint.
Adding dynamic gazetteers
You can use the API to dynamically add gazetteer entries to the /entities endpoint. The REST endpoint is:
https://localhost:8181/rest/v1/entities/configuration/gazetteer/add
Parameters:
language: The 3 letter language code of the new values. For example, to add an English value, the language would be
eng. To add the value to all languages, the language code isxxx. The language must be supported by the /entities endpoint.entity type: The type of the entity. For example, PERSON, LOCATION, ORGANIZATION, or TITLE. The entity type must already exist in the system.
values: One or more values to be added to the gazetteer.
profileId (Optional): Custom profile id
In this example, we're adding the companies New Corp and Best Business, to the entities gazetteer for all languages (xxx).
curl --request POST \
--url http://localhost:8181/rest/v1/entities/configuration/gazetteer/add \
--header 'accept: application/json' \
--header 'content-type: application/json' \
--data '{"language": "xxx", "configuration":{"entities":{ "COMPANY": ["New Corp", "Best Business"]}}}'In this example, we're adding the same data as above, to the profile named group1.
curl --request POST \
--url http://localhost:8181/rest/v1/entities/configuration/gazetteer/add \
--header 'accept: application/json' \
--header 'content-type: application/json' \
--data '{"language": "xxx", \
"configuration":{"entities":{ "COMPANY": ["New Corp", "Best Business"]}}, "profileId": "group1"}'In this example, the new values are in a file called new_companies.json:
{"language": "xxx", "configuration": {"entities":{ "COMPANY": ["New Corp", "Best Business"] } } } The cURL command to add the file values:
curl --request POST \
--url http://localhost:8181/rest/v1/entities/configuration/gazetteer/add \
--header 'accept: application/json' \
--header 'content-type: application/json' \
--data '@new_companies.json'
Caution
Dynamic gazetteer entries are held completely in memory and state is not saved on disk. When Analytics Server is brought down, the contents are lost. To save the new entries, add the new values to the related gazetteer file before restarting Analytics Server.
Overlay data directory
If your project has a set of unique data files that you would like to keep separate from other data files, you can put them in their own directory, also known as an overlay directory. This is an additional data directory, which takes priority over the default Entity Extractor data directory.
The overlay directory must have the same directory tree as the provided data directory. If an overlay directory is set, Entity Extractor searches both it and the default data directory.
If a file exists in both places, the version in the overlay directory is used.
If there is an empty file in the overlay directory, Entity Extractor will ignore the corresponding file in the default
datadirectory.If there is no file in the overlay directory, Entity Extractor will use the file in the default directory.
To specify the overlay directory use:
Create an overlay directory:
<install-directory>/my-dataAdd the overlay directory to the
rex-factory-config.yamlfile:dataOverlayDirectory: <install-directory>/my-data
Create an overlay directory:
Add an empty file (
gaz-LE.bin) to the overlay directory:my-data/gazetteer/eng/accept/gaz-LE.bin
Add the overlay directory to the
rex-factory-config.yamlfile:dataOverlayDirectory: <install-directory>/my-data
The default English gazetteer will not be used in calls.
In the above example, add a reject gazetteer file:
my-data/gazetter/deu/reject/reject-names.txtDefault configuration
The default configuration of the /entities endpoint uses the same default values as the Entity Extractor Java SDK. It is optimized to be more performance-oriented, with fewer options enabled, than the configuration of Babel Street Hosted Services, which is configured to provide a fully-functional demonstration environment. [1]
Feature | Analytics Server | Parameter Setting in Analytics Server | Rosette Cloud |
|---|---|---|---|
Entity Linking | false (disabled) |
| true (enabled) |
Regular Expression Files | no files are loaded |
| all files are loaded |
Pronominal Resolution | false (disabled) |
| true (enabled) |
Case Sensitivity | case-sensitive |
| automatic |
Structured Regions | none |
|
|
Entity linking
Text that refers to an entity is called an entity mention, such as “Bill Clinton” and “William Jefferson Clinton”. Analytics connects these two entity mentions with entity linking, since they refer to the same real-world PERSON entity. Linking helps establish the identity of the entity by disambiguating common names and matching a variety of names, such as nicknames and formal titles, with an entity ID.
Analytics uses the Wikidata knowledge base as a base to link Person, Location, and Organization entities. If the entity exists in Wikidata, then Analytics returns the Wikidata QID, such as Q1 for the Universe. If Analytics cannot link the entity, then it creates a placeholder temporary (“T”) entity ID to link mentions of the same entity in the document. However, the TID may be different across documents for the same entity.
Analytics supports linking to other knowledge bases, specifically the DBpedia ontology and the Thomson Reuters PermID. You can also link to one or more custom knowledge bases. You can use Model Training Suite to train your own custom knowledge bases which are then uploaded to Analytics Server.
Entity linking in Analytics Server is off by default, to improve call speed. When entity linking is turned off, Analytics returns the entities with a TID.
You can enable entity linking in Analytics Server for a single call or as a system default in your environment.
Per-call: add
{"options": {"linkEntities": true}}to your call.Default: edit the
/launcher/config/rosapi/rex-factory-config.yamlfile as shown below:#The option to link mentions to knowledge base entities with #disambiguation model. #Enabling this option also enables calculateConfidence. linkEntities: true
By default, linking to DBpedia is turned off. To turn it on:
Enable entity linking
Add
{"options": {"includeDBpediaTypes": true}}to the call
The list of knowledge bases can be customized in the rex-factory-config.yaml file with the kbs parameter, which takes a List of Paths to knowledge bases.
kbs:
    - /customKBs/kb1
    - /customKBs/kb2
    - /rosette/server/roots/rex/7.44.1.c62.2/data/flinx/data/kb/basis
Note
Setting the list of knowledge bases completely overwrites the list of knowledge bases the linker uses. If you want the default Wikidata knowledge base to be included, it must be on the list of knowledge bases.
Loading regex files
By default, the supplemental regex files are not loaded when the entity extraction endpoint is loaded. To load either the provided supplemental files or new files, edit the /launcher/config/rosapi/rex-factory-config.yaml file adding the supplementalRegularExpressionPaths statements to the file, as show below.
Tip
The files are named following the pattern: data/regex/<lang>/accept/regexes.xml, where <lang> is either the ISO 639-3 language code for the supported language, or xxx for all or any languages.
#The option to add supplemental regex files, usually for entity types that are excluded by
#default. The supplemental regex files are located at data/regex/<lang>/accept/supplemental and
#are not used unless specified.
supplementalRegularExpressionPaths:
- "${rex-root}/data/regex/eng/accept/supplemental/date-regexes.xml"
- "${rex-root}/data/regex/eng/accept/supplemental/geo-regexes.xml"
Pronominal resolution
Entity extraction can try to resolve pronouns with their antecedent entities. For example, in the sentences:
John Smith lives in Boston. He is originally from New York
pronominal resolution would resolve he with John Smith. By default, pronominal resolution is disabled.
To enable it, edit the /launcher/config/rosapi/rex-factory-config.yaml file as shown below:
#The option to resolve pronouns to person entities.
resolvePronouns: true
Case sensitivity
Case sensitivity refers to the capitalization (aka 'case') used in the input texts. Entity extraction can use case to help identify named entities (such as proper nouns) in documents.
Valid values for caseSensitivity
caseSensitive:(default) Case found in standard documents, those in which case follows grammar for the most part.caseInsensitive:Used for documents with all-caps, no-caps, or headline capitalization. These are documents in which capitalization is not a good indicator for named entities.automatic:Analytics detects the case from the input model and chooses an appropriate model to use.
To change the default case sensitivity, edit the /launcher/config/rosapi/rex-factory-config.yaml file as shown below:
#The capitalization (aka 'case') used in the input texts. Processing standard documents
#requires caseSensitive, which is the default. Documents with all-caps, no-caps or headline
#capitalization may yield higher accuracy if processed with the caseInsensitive value.
caseSensitivity: automatic
Customizing the morphology and sentences endpoints
The Analytics Server endpoints are configured by the files found in the /launcher/config/rosapi directory. Be careful when editing any of these files as the endpoints will not work if not configured properly.
The morphology-specific parameters and settings are in the file: rbl-factory-config.yaml. The sentences endpoint uses the same configuration file.
Fragment boundary detection
In cases where a document or part of a document contains tables and lists, instead of sentences, the /sentences endpoint can detect fragment boundaries as sentence boundaries. One way fragment boundaries are identified is by encountering fragment delimiters. A delimiter is restricted to one character and the default delimiters are U+0009 (tab), U+000B (vertical tab), and U+000C (form feed).
You can modify the set of recognized delimiters:
Edit the file
/launcher/config/rosapi/rbl-factor-config.yamlRemove the comment from the
fragmentBoundaryDelimitersparameterEdit the parameter values string to contain all values to be recognized as fragment boundaries, including any of the default values you want to keep
In addition to the fragment delimiters, the fragment boundary detector automatically inserts a break:
After 3+ consecutive spaces
After 2 new lines
At the end of the line, when the line has less than 7 tokens
At the end of the line which contains a previous fragment boundary
After every newline in a list. A list is defined as 3 or more lines containing the same punctuation mark within the first 5 characters of the line.
By default, fragment boundary detection is turned on. To turn off fragment boundary detection:
Edit the file
/launcher/config/rosapi/rbl-factor-config.yamlRemove the comment from the
fragmentBoundaryDetectionparameterSet
fragmentBoundaryDetection: false
Customizing the language identification endpoint
The /language endpoint provides an additional, rule- and model-based algorithm that is more accurate than the regular algorithm for short inputs. By default, the short-string threshold is 0 and short-string language detection is inactive. To turn it on, set the threshold to a non-negative integer, such as 20. If the string contains fewer characters than this threshold, the /language endpoint will perform short-string language detection.
To enable the short-string algorithm, edit the rli-factory-config.yaml file and set shortStringThreshold to your preferred value.
shortStringThreshold: 20
Customizing categorization and sentiment endpoints
The Analytics Server endpoints are configured by the files found in the /launcher/config/rosapi directory. Be careful when editing any of these files as the endpoints will not work if not configured properly.
The endpoint-specific parameters and settings are in the files of the format: cat-factory-config.yaml and sent-factory-config.yaml.
The worker-config.yaml file configures the pipeline for each endpoint. The entries in this file are highly dependent on the backend code.
Adding new models for categorization and sentiment
The Analytics Classification Field Training Kit allows users to train their own classification models for the /categories and /sentiment endpoints. Reasons for training a new model include:
Supporting a language that Analytics does not currently support
Increasing accuracy on your particular input data
Supporting a specific categorization taxonomy for your data or task.
See the Training Classification Models with Rosette publication for more information.
Integrating Your Custom Model with Analytics Server
To deploy your custom-trained model, integrate it into Analytics Server as follows:
Ensure that, for the language your are targeting, the following directory exists:
${tcat-root}/models/<lang>/combined-iab-qagMove any existing model files in the target directory to an
unuseddirectory, e.g.
 > mkdir ${tcat-root}/models/<lang>/unused
 > mv ${tcat-root}/models/<lang>/combined-iab-qag/* ${tcat-root}/models/<lang>/unused
Copy all the model files from your newly trained model into your target directory,
${tcat-root}/models/<lang>/combined-iab-qagRelaunch Analytics Server
After relaunching Analytics Server, the categorization endpoint will use the models in the combined-iab-qag directory, therefore using your new model for the language of the newmodel.
For sentiment model integration, place your model files into ${sentiment-root}/data/svm/<lang>/ and use the sentiment endpoint. Similarly, move all existing files for that model to a backup directory before copying over the new files.
Note
Note that depending on your specific FTK version, your newly created model may have a lexicon_filtered file while the existing model has lexicon.filtered instead. Analytics supports both naming schemes for backwards compatibility. Regardless of which naming scheme you see, you should remove the existing filtered lexicon file before adding the one from your new model. If both lexicon.filtered and lexicon_filtered files are in the same model directory, lexicon.filtered will take precedence.
Adding new language models
Out of the box, the /sentiment and /categories endpoints only support the languages of the models that ship with the distribution. Once you have trained a model in a new language, you must add the new languages to the transport-rules.tsv and worker-config.yaml files in Analytics Server.
For both endpoints, edit the
transport-rules.tsvfile. Each endpoint is listed, with alang=statement listing the supported languages for the endpoint. Add the three letter ISO 693-3 language code for the new model languages./categories lang=eng /sentiment lang=ara|eng|fas|fra|jpn|spa
For the
/sentimentendpoint only, edit theworker-config.yamlfile. Go to the section labeledtextPipelines. Each endpoint is listed with alanguages:statement listing the supported languages for the endpoint. Add the three letter ISO 693-3 language code for the new model languages.# sentiment - endpoint: /sentiment languages: [ 'ara', 'eng', 'fas', 'fra', 'jpn', 'spa' ] steps: - componentName: entity-extraction - componentName: sentiment
Configuring the sentiment endpoint for document-level analysis
The sentiment analysis endpoint can be configured to return document-level sentiment analysis only, by turning off entity-level sentiment analysis. This requires modifying the worker-config.yaml file to remove the entity extraction step from the process. This will speed up document-level sentiment analysis.
The following edits are made to the worker-config.yaml file. The shipped version of the file is:
# sentiment
- endpoint: /sentiment
  languages: [ 'ara', 'eng', 'fas', 'fra', 'jpn', 'spa' ]
  steps:
  - componentName: entity-extraction
  - componentName: sentiment
Change the above block to:
# sentiment
- endpoint: /sentiment
  languages: [ 'ara', 'eng', 'fas', 'fra', 'jpn', 'spa' ]
  steps:
  - componentName: base-linguistics
    factoryName: tokenize
  - componentName: sentiment
The entity extraction endpoint must be replaced by the tokenization endpoint in the pipeline.
Customizing the language identification endpoint
The /language endpoint provides an additional, rule- and model-based algorithm that is more accurate than the regular algorithm for short inputs. By default, the short-string threshold is 0 and short-string language detection is inactive. To turn it on, set the threshold to a non-negative integer, such as 20. If the string contains fewer characters than this threshold, the /language endpoint will perform short-string language detection.
To enable the short-string algorithm, edit the rli-factory-config.yaml file and set shortStringThreshold to your preferred value.
shortStringThreshold: 20